先发英文原版,然后和网友们一起翻译。
Building an intelligent agent
There are many ways to impart intelligence to an agent. The most commonly used techniques include machine learning, stored knowledge, rules, and so on. In this section, we will focus on machine learning. In this method, the way we impart intelligence to an agent is through data and training.
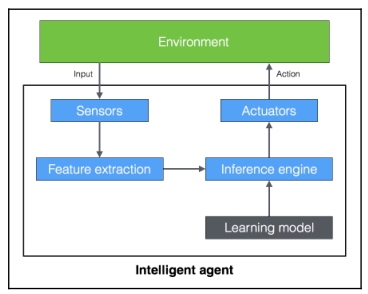
Let’s see how an intelligent agent interacts with the environment:
With machine learning, we want to program our machines to use labeled data to solve a given problem. By going through the data and the associated labels, the machine learns how to extract patterns and relationships.
In the preceding example, the intelligent agent depends on the learning model to run the inference engine. Once the sensor perceives the input, it sends it to the feature extraction block. Once the relevant features are extracted, the trained inference engine performs a prediction based on the learning model. This learning model is built using machine learning. The inference engine then takes a decision and sends it to the actuator, which then takes the required action in the real world.
There are many applications of machine learning that exist today. It is used in image recognition, robotics, speech recognition, predicting stock market behavior, and so on. In order to understand machine learning and build a complete solution, you will have to be familiar with many techniques from different fields such as pattern recognition, artificial neural networks, data mining, statistics, and so on.
Types of models
There are two types of models in the AI world: Analytical models and Learned models. Before we had machines that could compute, people used to rely on analytical models. These models were derived using a mathematical formulation, which is basically a sequence of steps followed to arrive at a final equation. The problem with this approach is that it was based on human judgment. Hence these models were simplistic and inaccurate with just a few parameters.
We then entered the world of computers. These computers were good at analyzing data. So, people increasingly started using learned models. These models are obtained through the process of training. During training, the machines look at many examples of inputs and outputs to arrive at the equation. These learned models are usually complex and accurate, with thousands of parameters. This gives rise to a very complex mathematical equation that governs the data.
Machine Learning allows us to obtain these learned models that can be used in an inference engine. One of the best things about this is the fact that we don’t need to derive the underlying mathematical formula. You don’t need to know complex mathematics, because the machine derives the formula based on data. All we need to do is create the list of inputs and the corresponding outputs. The learned model that we get is just the relationship between labeled inputs and the desired outputs.
Installing Python 3
We will be using Python 3 throughout this book. Make sure you have installed the latest version of Python 3 on your machine. Type the following command on your Terminal to check:
$ python3 --version
If you see something like Python 3.x.x (where x.x are version numbers) printed on your terminal, you are good to go. If not, installing it is pretty straightforward.
Installing on Ubuntu
Python 3 is already installed by default on Ubuntu 14.xx and above. If not, you can install it using the following command:
$ sudo apt-get install python3
Run the check command like we did earlier:
$ python3 --version
You should see the version number printed on your Terminal.
Installing on Mac OS X
If you are on Mac OS X, it is recommended that you use Homebrew to install Python 3. It is a great package installer for Mac OS X and it is really easy to use. If you don’t have Homebrew, you can install it using the following command:
$ ruby -e “$(curl -fsSL https://raw.githubusercontent.com/Homebrew/install/master/install)”
Let’s update the package manager:
$ brew update
Let’s install Python 3:
$ brew install python3
Run the check command like we did earlier:
$ python3 –version
You should see the version number printed on your Terminal.
Installing on Windows
If you use Windows, it is recommended that you use a SciPy-stack compatible distribution of Python 3. Anaconda is pretty popular and easy to use. You can find the installation instructions at: https://www.continuum.io/downloads.
If you want to check out other SciPy-stack compatible distributions of Python 3, you can find them at http://www.scipy.org/install.html. The good part about these distributions is that they come with all the necessary packages preinstalled. If you use one of these versions, you don’t need to install the packages separately.
Once you install it, run the check command like we did earlier:
$ python3 –version
You should see the version number printed on your Terminal.
Installing packages
During the course of this book, we will use various packages such as NumPy, SciPy, scikit- learn, and matplotlib. Make sure you install these packages before you proceed.
If you use Ubuntu or Mac OS X, installing these packages is pretty straightforward. All these packages can be installed using a one-line command on the terminal. Here are the relevant links for installation:
NumPy: http://docs.scipy.org/doc/numpy-1.10.1/user/install.html
SciPy: http://www.scipy.org/install.html
scikit-learn: http://scikit-learn.org/stable/install.html
matplotlib: http://matplotlib.org/1.4.2/users/installing.html
If you are on Windows, you should have installed a SciPy-stack compatible version of Python 3.
Loading data
In order to build a learning model, we need data that’s representative of the world. Now that we have installed the necessary Python packages, let’s see how to use the packages to interact with data. Go into the Python terminal by typing the following command:
$ python3
Let’s import the package containing all the datasets:
>>> from sklearn import datasets
Let’s load the house prices dataset:
>>> house_prices = datasets.load_boston()
Print the data:
>>> print(house_prices.data)
You will see an output like this printed on your Terminal:

Let’s check out the labels:
You will see the following printed on your Terminal:
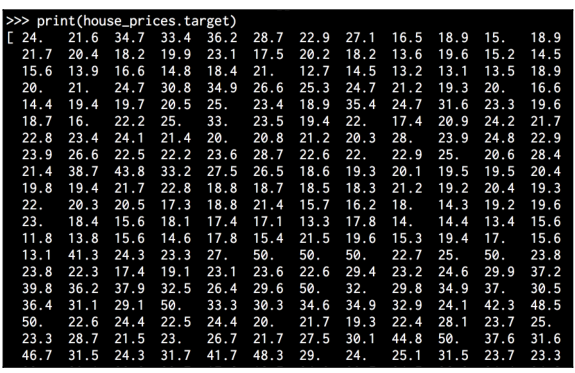
The actual array is larger, so the image represents the first few values in that array.
There are also image datasets available in the scikit-learn package. Each image is of shape 8×8. Let’s load it:
>>> digits = datasets.load_digits()
Print the fifth image:
>>> print(digits.images[4])
You will see the following on your Terminal:
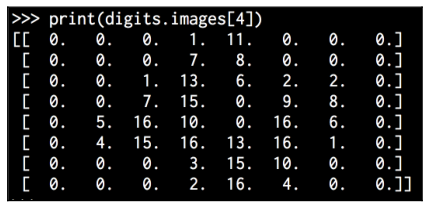
As you can see, it has eight rows and eight columns.
Summary
In this chapter, we learned what AI is all about and why we need to study it. We discussed various applications and branches of AI. We understood what the Turing test is and how it’s conducted. We learned how to make machines think like humans. We discussed the concept of rational agents and how they should be designed. We learned about General Problem Solver (GPS) and how to solve a problem using GPS. We discussed how to develop an intelligent agent using machine learning. We covered different types of models as well.
We discussed how to install Python 3 on various operating systems. We learned how to install the necessary packages required to build AI applications. We discussed how to use the packages to load data that’s available in scikit-learn. In the next chapter, we will learn about supervised learning and how to build models for classification and regression.