Classification and Regression Using Supervised Learning
In this chapter, we are going to learn about classification and regression of data using supervised learning techniques. By the end of this chapter, you will know about these topics:
- What is the difference between supervised and unsupervised learning?
- What is classification?
- How to preprocess data using various methods
- What is label encoding?
- How to build a logistic regression classifier
- What is Naïve Bayes classifier?
- What is a confusion matrix?
- What are Support Vector Machines and how to build a classifier based on that?
- What is linear and polynomial regression?
- How to build a linear regressor for single variable and multivariable data
- How to estimate housing prices using Support Vector Regressor
Supervised versus unsupervised learning
One of the most common ways to impart artificial intelligence into a machine is through machine learning. The world of machine learning is broadly divided into supervised and unsupervised learning. There are other divisions too, but we’ll discuss those later.
Supervised learning refers to the process of building a machine learning model that is based on labeled training data. For example, let’s say that we want to build a system to automatically predict the income of a person, based on various parameters such as age, education, location, and so on. To do this, we need to create a database of people with all the necessary details and label it. By doing this, we are telling our algorithm what parameters correspond to what income. Based on this mapping, the algorithm will learn how to calculate the income of a person using the parameters provided to it.
Unsupervised learning refers to the process of building a machine learning model without relying on labeled training data. In some sense, it is the opposite of what we just discussed in the previous paragraph. Since there are no labels available, you need to extract insights based on just the data given to you. For example, let’s say that we want to build a system where we have to separate a set of data points into multiple groups. The tricky thing here is that we don’t know exactly what the criteria of separation should be. Hence, an unsupervised learning algorithm needs to separate the given dataset into a number of groups in the best way possible.
What is classification?
In this chapter, we will discuss supervised classification techniques. The process of classification is one such technique where we classify data into a given number of classes. During classification, we arrange data into a fixed number of categories so that it can be used most effectively and efficiently.
In machine learning, classification solves the problem of identifying the category to which a new data point belongs. We build the classification model based on the training dataset containing data points and the corresponding labels. For example, let’s say that we want to check whether the given image contains a person’s face or not. We would build a training dataset containing classes corresponding to these two classes: face and no-face. We then train the model based on the training samples we have. This trained model is then used for inference.
A good classification system makes it easy to find and retrieve data. This is used extensively in face recognition, spam identification, recommendation engines, and so on. The algorithms for data classification will come up with the right criteria to separate the given data into the given number of classes.
We need to provide a sufficiently large number of samples so that it can generalize those criteria. If there is an insufficient number of samples, then the algorithm will overfit to the training data. This means that it won’t perform well on unknown data because it fine-tuned the model too much to fit into the patterns observed in training data. This is actually a very common problem that occurs in the world of machine learning. It’s good to consider this factor when you build various machine learning models.
Preprocessing data
We deal with a lot of raw data in the real world. Machine learning algorithms expect data to be formatted in a certain way before they start the training process. In order to prepare the data for ingestion by machine learning algorithms, we have to preprocess it and convert it into the right format. Let’s see how to do it.
Create a new Python file and import the following packages:
import numpy as np
from sklearn import preprocessing
Let’s define some sample data:
input_data = np.array([[5.1, -2.9, 3.3],
                      [-1.2, 7.8, -6.1],
                      [3.9, 0.4, 2.1],
                      [7.3, -9.9, -4.5]])
We will be talking about several different preprocessing techniques. Let’s start with binarization:
- Binarization
- Mean removal
- Scaling
- Normalization
Let’s take a look at each technique, starting with the first.
Binarization
This process is used when we want to convert our numerical values into boolean values. Let’s use an inbuilt method to binarize input data using 2.1 as the threshold value.
Add the following lines to the same Python file:

If you run the code, you will see the following output:
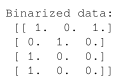
As we can see here, all the values above 2.1 become 1. The remaining values become 0.
Mean removal
Removing the mean is a common preprocessing technique used in machine learning. It’s usually useful to remove the mean from our feature vector, so that each feature is centered on zero. We do this in order to remove bias from the features in our feature vector.
Add the following lines to the same Python file as in the previous section:
# Print mean and standard deviation
print("\nBEFORE:")
print("Mean =", input_data.mean(axis=0))
print("Std deviation =", input_data.std(axis=0))
The preceding line displays the mean and standard deviation of the input data. Let’s remove the mean:
# Remove mean
data_scaled = preprocessing.scale(input_data)
print("\nAFTER:")
print("Mean =", data_scaled.mean(axis=0))
print("Std deviation =", data_scaled.std(axis=0))
If you run the code, you will see the following printed on your Terminal:
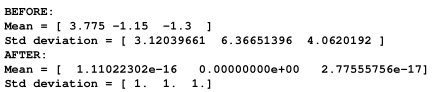
As seen from the values obtained, the mean value is very close to 0 and standard deviation is 1.
Scaling
In our feature vector, the value of each feature can vary between many random values. So it becomes important to scale those features so that it is a level playing field for the machine learning algorithm to train on. We don’t want any feature to be artificially large or small just because of the nature of the measurements.
Add the following line to the same Python file:
# Min max scaling

data_scaler_minmax = preprocessing.MinMaxScaler(feature_range=(0, 1))

data_scaled_minmax = data_scaler_minmax.fit_transform(input_data)

print("\nMin max scaled data:\n", data_scaled_minmax)
If you run the code, you will see the following printed on your Terminal:
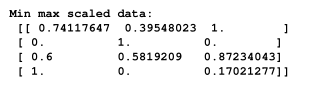
Each row is scaled so that the maximum value is 1 and all the other values are relative to this value.
Normalization
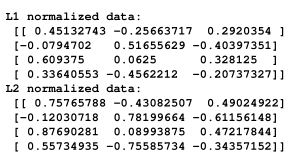
We use the process of normalization to modify the values in the feature vector so that we can measure them on a common scale. In machine learning, we use many different forms of normalization. Some of the most common forms of normalization aim to modify the values so that they sum up to 1. L1 normalization, which refers to Least Absolute Deviations, works by making sure that the sum of absolute values is 1 in each row. L2 normalization, which refers to least squares, works by making sure that the sum of squares is 1.
In general, L1 normalization technique is considered more robust than L2 normalization technique. L1 normalization technique is robust because it is resistant to outliers in the data. A lot of times, data tends to contain outliers and we cannot do anything about it. We want to use techniques that can safely and effectively ignore them during the calculations. If we are solving a problem where outliers are important, then maybe L2 normalization becomes a better choice.
Add the following lines to the same Python file:

If you run the code, you will see the following printed on your Terminal:
The code for this entire section is given in the preprocessing.py file.