目录:
【httpclient基本用法】
【post请求】
【设置超时】
【上传下载文件】
【连接池参数配置及源码解读】
1.httpclient是什么?
http协议可以说是现在Internet上面最重要,使用最多的协议之一了,越来越多的java应用需要使用http协议来访问网络资源,特别是现在rest api的流行,HttpClient 是 Apache Jakarta Common 下的子项目,用来提供高效的、最新的、功能丰富的支持 HTTP 协议的客户端编程工具包,并且它支持 HTTP 协议最新的版本和建议。HttpClient 已经应用在很多的项目中,比如 Apache Jakarta 上很著名的另外两个开源项目 Cactus 和 HTMLUnit 都使用了 HttpClient,很多的java的爬虫也是通过HttpClient实现的,研究HttpClient对我们来说是非常重要的。
使用方法
使用HttpClient发送请求、接收响应很简单,一般需要如下几步即可。
1. 创建HttpClient对象。
2. 创建请求方法的实例,并指定请求URL。如果需要发送GET请求,创建HttpGet对象;如果需要发送POST请求,创建HttpPost对象。
3. 如果需要发送请求参数,可调用HttpGet、HttpPost共同的setParams(HetpParams params)方法来添加请求参数;对于HttpPost对象而言,也可调用setEntity(HttpEntity entity)方法来设置请求参数。
4. 调用HttpClient对象的execute(HttpUriRequest request)发送请求,该方法返回一个HttpResponse。
5. 调用HttpResponse的getAllHeaders()、getHeaders(String name)等方法可获取服务器的响应头;调用HttpResponse的getEntity()方法可获取HttpEntity对象,该对象包装了服务器的响应内容。程序可通过该对象获取服务器的响应内容。
6. 释放连接。无论执行方法是否成功,都必须释放连接
import java.io.IOException;
import java.net.URI;
import java.util.ArrayList;
import java.util.List;
import java.util.Map;

import org.apache.http.NameValuePair;
import org.apache.http.client.entity.UrlEncodedFormEntity;
import org.apache.http.client.methods.CloseableHttpResponse;
import org.apache.http.client.methods.HttpGet;
import org.apache.http.client.methods.HttpPost;
import org.apache.http.client.utils.URIBuilder;
import org.apache.http.entity.ContentType;
import org.apache.http.entity.StringEntity;
import org.apache.http.impl.client.CloseableHttpClient;
import org.apache.http.impl.client.HttpClients;
import org.apache.http.message.BasicNameValuePair;
import org.apache.http.util.EntityUtils;


  public static String doGet(String url, Map<String, String> param) {

        // 创建Httpclient对象
        CloseableHttpClient httpclient = HttpClients.createDefault();

        String resultString = "";
        CloseableHttpResponse response = null;
        try {
            // 创建uri
            URIBuilder builder = new URIBuilder(url);
            if (param != null) {
                for (String key : param.keySet()) {
                    builder.addParameter(key, param.get(key));
                }
            }
            URI uri = builder.build();

            // 创建http GET请求
            HttpGet httpGet = new HttpGet(uri);

            // 执行请求
            response = httpclient.execute(httpGet);
            // 判断返回状态是否为200
            if (response.getStatusLine().getStatusCode() == 200) {
                resultString = EntityUtils.toString(response.getEntity(), "UTF-8");
            }
        } catch (Exception e) {
            e.printStackTrace();
        } finally {
            try {
                if (response != null) {
                    response.close();
                }
                httpclient.close();
            } catch (IOException e) {
                e.printStackTrace();
            }
        }
        return resultString;
    }

    public static String doGet(String url) {
        return doGet(url, null);
    }

    public static String doPost(String url, Map<String, String> param) {
        // 创建Httpclient对象
        CloseableHttpClient httpClient = HttpClients.createDefault();
        CloseableHttpResponse response = null;
        String resultString = "";
        try {
            // 创建Http Post请求
            HttpPost httpPost = new HttpPost(url);
            // 创建参数列表
            if (param != null) {
                List<NameValuePair> paramList = new ArrayList<>();
                for (String key : param.keySet()) {
                    paramList.add(new BasicNameValuePair(key, param.get(key)));
                }
                // 模拟表单
                UrlEncodedFormEntity entity = new UrlEncodedFormEntity(paramList);
                httpPost.setEntity(entity);
            }
            // 执行http请求
            response = httpClient.execute(httpPost);
            resultString = EntityUtils.toString(response.getEntity(), "utf-8");
        } catch (Exception e) {
            e.printStackTrace();
        } finally {
            try {
                response.close();
            } catch (IOException e) {
                // TODO Auto-generated catch block
                e.printStackTrace();
            }
        }

        return resultString;
    }

    public static String doPost(String url) {
        return doPost(url, null);
    }

    public static String doPostJson(String url, String json) {
        // 创建Httpclient对象
        CloseableHttpClient httpClient = HttpClients.createDefault();
        CloseableHttpResponse response = null;
        String resultString = "";
        try {
            // 创建Http Post请求
            HttpPost httpPost = new HttpPost(url);
            // 创建请求内容
            StringEntity entity = new StringEntity(json, ContentType.APPLICATION_JSON);
            httpPost.setEntity(entity);
            // 执行http请求
            response = httpClient.execute(httpPost);
            resultString = EntityUtils.toString(response.getEntity(), "utf-8");
        } catch (Exception e) {
            e.printStackTrace();
        } finally {
            try {
                response.close();
            } catch (IOException e) {
                // TODO Auto-generated catch block
                e.printStackTrace();
            }
        }

        return resultString;
    }
2.HttpClient不是浏览器
很多人觉得既然HttpClient是一个HTTP客户端编程工具,很多人把他当做浏览器来理解,但是其实HttpClient不是浏览器,它是一个HTTP通信库,因此它只提供一个通用浏览器应用程序所期望的功能子集,最根本的区别是HttpClient中没有用户界面,浏览器需要一个渲染引擎来显示页面,并解释用户输入,例如鼠标点击显示页面上的某处,有一个布局引擎,计算如何显示HTML页面,包括级联样式表和图像。javascript解释器运行嵌入HTML页面或从HTML页面引用的javascript代码。来自用户界面的事件被传递到javascript解释器进行处理。除此之外,还有用于插件的接口,可以处理Applet,嵌入式媒体对象(如pdf文件,Quicktime电影和Flash动画)或ActiveX控件(可以执行任何操作)。HttpClient只能以编程的方式通过其API用于传输和接受HTTP消息。HttpClient也是完全内容不可知的。
另一个主要区别是对错误输入或HTTP标准违规的容忍。 需要允许无效的用户输入,以使浏览器用户友好。 还需要对从服务器检索的畸形文档的容忍度,以及在执行协议时服务器行为的缺陷,使尽可能多的用户可访问的网站。 然而,HttpClient努力在默认情况下尽可能接近并遵守HTTP标准规范和相关标准。 它还提供了一些手段来放松规范所施加的一些限制,这些限制允许或要求与不兼容的HTTP源或代理服务器兼容。
3.HttpClient入门使用
注意这个版本主要是基于HttpClient4.5.2版本的来讲解的,也是现在最新的版本,之所以要提供版本说明的是因为HttpClient 3版本和HttpClient 4版本差别还是很多大的,基本HttpClient里面的接口都变了,你把HttpClient 3版本的代码拿到HttpClient 4上面都运行不起来,会报错的。所以这儿一定要注意,好了废话不多说了,开始。
3.1.在pom.xml加入对httpclient的必需的jar包的依赖
   //httpclient的接口基本都在这儿
   <dependency>
      <groupId>org.apache.httpcomponents</groupId>
      <artifactId>httpclient</artifactId>
      <version>4.5.2</version>
    </dependency>
    //httpclient缓存
    <dependency>
      <groupId>org.apache.httpcomponents</groupId>
      <artifactId>httpclient-cache</artifactId>
      <version>4.5</version>
    </dependency>
    //http的mime类型都在这里面
    <dependency>
     <groupId>org.apache.httpcomponents</groupId>
     <artifactId>httpmime</artifactId>
     <version>4.3.2</version>
    </dependency>
注意:常见的MIME类型(通用型):
超文本标记语言文本 .html text/html
xml文档 .xml text/xml
XHTML文档 .xhtml application/xhtml+xml
普通文本 .txt text/plain
RTF文本 .rtf application/rtf
PDF文档 .pdf application/pdf
Microsoft Word文件 .word application/msword
PNG图像 .png image/png
GIF图形 .gif image/gif
JPEG图形 .jpeg,.jpg image/jpeg
au声音文件 .au audio/basic
MIDI音乐文件 mid,.midi audio/midi,audio/x-midi
RealAudio音乐文件 .ra, .ram audio/x-pn-realaudio
MPEG文件 .mpg,.mpeg video/mpeg
AVI文件 .avi video/x-msvideo
GZIP文件 .gz application/x-gzip
TAR文件 .tar application/x-tar
任意的二进制数据 application/octet-stream
3.2.抓取网页的内容并打印到控制台的demo
先直接贴代码:
package fangdd.HttpClientDemo;

import java.io.BufferedReader;
import java.io.IOException;
import java.io.InputStream;
import java.io.InputStreamReader;
import java.util.Locale;

import org.apache.http.HttpEntity;
import org.apache.http.client.HttpClient;
import org.apache.http.client.methods.CloseableHttpResponse;
import org.apache.http.client.methods.HttpGet;
import org.apache.http.impl.client.CloseableHttpClient;
import org.apache.http.impl.client.HttpClients;
import org.apache.http.util.EntityUtils;

public class HttpGetNewSample {

    public static void main(String[] args) {
        // TODO Auto-generated method stub
        String url="http://www.baidu.com";


        //1.使用默认的配置的httpclient
        CloseableHttpClient client = HttpClients.createDefault();
        //2.使用get方法
        HttpGet httpGet = new HttpGet(url);
        InputStream inputStream = null;
        CloseableHttpResponse response = null;

        try {
            //3.执行请求,获取响应
            response = client.execute(httpGet);


            //看请求是否成功,这儿打印的是http状态码
            System.out.println(response.getStatusLine().getStatusCode());
            //4.获取响应的实体内容,就是我们所要抓取得网页内容
            HttpEntity entity = response.getEntity();

            //5.将其打印到控制台上面
            //方法一:使用EntityUtils
            if (entity != null) {
                System.out.println(EntityUtils.toString(entity, "utf-8"));
            }
            EntityUtils.consume(entity);

            //方法二  :使用inputStream
           /* if (entity != null) {
                inputStream = entity.getContent();

                BufferedReader bufferedReader = new BufferedReader(new InputStreamReader(inputStream));
                String line = "";
                while ((line = bufferedReader.readLine()) != null) {
                    System.out.println(line);

                }
            }*/

        } catch (UnsupportedOperationException | IOException e) {
            // TODO Auto-generated catch block
            e.printStackTrace();
        } finally {
            if (inputStream != null) {
                try {
                    inputStream.close();
                } catch (IOException e) {
                    // TODO Auto-generated catch block
                    e.printStackTrace();
                }
            }
            if (response != null) {
                try {
                    response.close();
                } catch (IOException e) {
                    // TODO Auto-generated catch block
                    e.printStackTrace();
                }
            }

        }

    }

}
3.3HttpClient编写程序流程总结
其实从上面我们就可以总结出使用HttpClient其实分为6个步骤
1.创建HttpClient对象
这儿使用的是org.apache.http.impl.client.CloseableHttpClient,他是HttpClient接口的一个实例,创建该对象的最简单方法是CloseableHttpClient client = HttpClients.createDefault();
HttpClients是创建CloseableHttpClient的工厂,采用默认的配置来创建实例,一般情况下我们就用这个默认的实例就足够,后面我们可以去看下怎么定制自己需求配置的来创建HttpClient接口的实例。如果你去看这个函数的源代码,你可以看到org.apache.http.client.CookieStore,org.apache.http.client.config.RequestConfig等等都是采用默认的。后面我们会专门有篇博客探讨怎么根据自己的需求定制httpclient。
2.创建某种请求方法的实例。
创建某种请求的实例,并指定请求的url,如果是get请求,创建对象HttpGet,如果是post 请求,创建对象HttpPost。类型的还有 HttpHead, HttpPost, HttpPut, HttpDelete, HttpTrace, 还有 HttpOptions。分别对应HEAD、POST PUT、DELETE、TRACE、OPTIONS方法,每个方法是做什么的如下表:
| 方法 | 描述 | 是否包含主体 |
| GET | 从服务器获取一份文档 | 否 |
| HEAD | 只从服务器获取文档的首部 | 否 |
| POST | 向服务器发送需要处理的数据 | 是 |
| PUT | 将请求的主体部分存储在服务器上 | 是 |
| TRACE | 对可能经过代理服务器传送到服务器上去的报文进行追踪 | 否 |
| OPTIONS | 决定可以在服务器上执行哪些方法 | 否 |
| DELETE | 从服务器上删除一份文档 | 否 |
可以看得到在Http协议中,只有post方法和put方法的请求里面有实体
3.如果有请求参数的话,Get方法直接写在url后面,例如
HttpGet httpget = new HttpGet(
      “http://www.google.com/search?hl=zh-CN&q=httpclient&btnG=Google+Search&aq=f&oq=”);
或者使用setParameter来设置参数
URI uri = new URIBuilder()
         .setScheme(“http”)
         .setHost(“www.google.com”)
         .setPath(“/ search”)
         .setParameter(“q”,“httpclient”)
         .setParameter(“btnG”,“Google搜索”)
         .setParameter(“aq”,“f”)
         .setParameter(“oq”,“”)
         。建立();
 HttpGet httpget = new HttpGet(uri);
 System.out.println(httpget.getURI());
stdout>
http://www.google.com/search?q=httpclient&btnG=Google+Search&aq=f&oq=
post方法用setEntity(HttpEntity entity)方法来设置请求参数。
后面会详细的探讨Entity这个东西,专门会有一篇博客的,这儿就不在赘叙。
4.发送请求。
调用CloseableHttpClient对象的execute(HttpUriRequest request)发送请求,该方法返回一个CloseableHttpResponse对象。
CloseableHttpResponse response = client.execute(post);,很明显CloseableHttpResponse就是用了处理返回数据的实体,通过它我们可以拿到返回的状态码、首部、实体等等我们需要的东西。
5.获取请求结果。
调用CloseableHttpResponse的getAllHeaders()、getHeaders(String name)等方法可获取服务器的响应头;调用CloseableHttpResponse的getEntity()方法可获取HttpEntity对象,该对象包装了服务器的响应内容。程序可通过该对象获取服务器的响应内容。
 HttpEntity entity = response.getEntity();
            //5.将其打印到显示器上面
             //方法一:使用EntityUtils
              /*
            if(entity!=null)
            {
                System.out.println(EntityUtils.toString(entity,"utf-8"));
            }

            EntityUtils.consume(entity)
            */
            //方法二
            InputStream inputStream = entity.getContent();

            BufferedReader bufferedReader = new BufferedReader(new InputStreamReader(inputStream));
            String line = "";
            while ((line = bufferedReader.readLine()) != null) {
                System.out.println(line);

            }
通过CloseableHttpEntity的getEntity取得实体之后,有两种处理结果的方法,
方法一:使用EntityUtils来处理。
该类是官方提供的一个处理实体的工具类,toSting方法将返回的实体转换为字符串,但是官网不建议使用这个,除非响应实体从一个可信HTTP服务器发起和已知是有限长度的。
方法二:使用InputStream来读取
因为httpEntity.getContent方法返回的就是InputStream类型。这种方法是官网推荐的方式,需要记得的是要自己释放底层资源。
6.关闭连接,释放资源。
如果是使用EntityUtils来处理实体的使用 EntityUtils.consume(entity)来释放资源,可以看得到该函数源码为:
 public static void consume(final HttpEntity entity) throws IOException {
        if (entity == null) {
            return;
        }
        if (entity.isStreaming()) {
            final InputStream instream = entity.getContent();
            if (instream != null) {
                instream.close();
            }
        }
}
其实还是通过关闭inputStream,然后最后我们再关闭CloseableHttpResponse就可以了
如果是使用InputStream来处理实体的,释放代码如下
CloseableHttpClient httpclient = HttpClients.createDefault();
 HttpGet httpget = new HttpGet(“http:// localhost /”);
 CloseableHttpResponse response = httpclient.execute(httpget);
try{
     HttpEntity entity = response.getEntity();
     if(entity!= null){
         InputStream instream = entity.getContent();
        try{
             //做一些有用的事情
         } finally {
             intream.close();
         }}
     }}
 } finally {
     response.close();
 }}
关闭内容流和关闭响应之间的区别是:前者将尝试通过消耗实体内容来保持底层连接活动,而后者立即关闭并丢弃连接
HttpClient实现Post请求
基于项目需求,想要实现Post消息推送,故采用HttpClient组件进行实现,相关代码如下(注:程序采用的httpclient和httpcore依赖包的版本为4.2.5):
import org.apache.http.Header;
import org.apache.http.HttpResponse;
import org.apache.http.HttpStatus;
import org.apache.http.client.HttpClient;
import org.apache.http.client.methods.HttpPost;
import org.apache.http.entity.StringEntity;
import org.apache.http.impl.client.DefaultHttpClient;
import org.apache.http.params.CoreConnectionPNames;
import java.util.UUID;
import net.sf.json.JSONObject;
import java.nio.charset.Charset;

public static boolean httpPostWithJson(JSONObject jsonObj,String url,String appId){
    boolean isSuccess = false;

    HttpPost post = null;
    try {
        HttpClient httpClient = new DefaultHttpClient();

        // 设置超时时间
        httpClient.getParams().setParameter(CoreConnectionPNames.CONNECTION_TIMEOUT, 2000);
        httpClient.getParams().setParameter(CoreConnectionPNames.SO_TIMEOUT, 2000);

        post = new HttpPost(url);
        // 构造消息头
        post.setHeader("Content-type", "application/json; charset=utf-8");
        post.setHeader("Connection", "Close");
        String sessionId = getSessionId();
        post.setHeader("SessionId", sessionId);
        post.setHeader("appid", appid);

        // 构建消息实体
        StringEntity entity = new StringEntity(jsonObj.toString(), Charset.forName("UTF-8"));
        entity.setContentEncoding("UTF-8");
        // 发送Json格式的数据请求
        entity.setContentType("application/json");
        post.setEntity(entity);

        HttpResponse response = httpClient.execute(post);

        // 检验返回码
        int statusCode = response.getStatusLine().getStatusCode();
        if(statusCode != HttpStatus.SC_OK){
            LogUtil.info("请求出错: "+statusCode);
            isSuccess = false;
        }else{
            int retCode = 0;
            String sessendId = "";
            // 返回码中包含retCode及会话Id
            for(Header header : response.getAllHeaders()){
                if(header.getName().equals("retcode")){
                    retCode = Integer.parseInt(header.getValue());
                }
                if(header.getName().equals("SessionId")){
                    sessendId = header.getValue();
                }
            }

            if(ErrorCodeHelper.IAS_SUCCESS != retCode ){
                // 日志打印
                LogUtil.info("error return code,  sessionId: "sessendId"\t"+"retCode: "+retCode);
                isSuccess = false;
            }else{
                isSuccess = true;
            }
        }
    } catch (Exception e) {
        e.printStackTrace();
        isSuccess = false;
    }finally{
        if(post != null){
            try {
                post.releaseConnection();
                Thread.sleep(500);
            } catch (InterruptedException e) {
                e.printStackTrace();
            }
        }
    }
    return isSuccess;
}

// 构建唯一会话Id
public static String getSessionId(){
    UUID uuid = UUID.randomUUID();
    String str = uuid.toString();
    return str.substring(0, 8) + str.substring(9, 13) + str.substring(14, 18) + str.substring(19, 23) + str.substring(24);
}
Ps: 在使用Hadoop集群进行发送POST请求时,遇到”java.lang.NoSuchFieldError: INSTANCE”的问题,此类问题一般是”jar包冲突”的问题所致,但奇怪的是本地的pom.xml设置的依赖包中有该字段,相关的httpclient依赖包如下:
<dependency>
    <groupId>org.apache.httpcomponents</groupId>
    <artifactId>httpclient</artifactId>
    <version>4.4.1</version>
</dependency>
<dependency>
    <groupId>org.apache.httpcomponents</groupId>
    <artifactId>httpcore</artifactId>
    <version>4.4.1</version>
</dependency>
随后在网上查找了一翻,找到问题的缘由,原因在于Hadoop集群运行程序时,首先会加载自己相关目录下的jar包,在自己目录下如果未找到,才会加载程序运行时指定的jar包,随查找了Hadoop集群中相关Jar包路径,发现httpclient的相关依赖包为4.2.5,因此将pom.xml配置文件也更新为该版本,程序则运行通过.
HttpClient中post请求http、https示例
HttpClient 是 Apache Jakarta Common 下的子项目,可以用来提供高效的、最新的、功能丰富的支持 HTTP 协议的客户端编程工具包,并且它支持 HTTP 协议最新的版本和建议。
使用HttpClient发送请求、接收响应很简单,一般需要如下几步即可:
- 创建CloseableHttpClient对象。
- 创建请求方法的实例,并指定请求URL。如果需要发送GET请求,创建HttpGet对象;如果需要发送POST请求,创建HttpPost对象。
- 如果需要发送请求参数,可可调用setEntity(HttpEntity entity)方法来设置请求参数。setParams方法已过时(4.4.1版本)。
- 调用HttpGet、HttpPost对象的setHeader(String name, String value)方法设置header信息,或者调用setHeaders(Header[] headers)设置一组header信息。
- 调用CloseableHttpClient对象的execute(HttpUriRequest request)发送请求,该方法返回一个CloseableHttpResponse。
- 调用HttpResponse的getEntity()方法可获取HttpEntity对象,该对象包装了服务器的响应内容。程序可通过该对象获取服务器的响应内容;调用CloseableHttpResponse的getAllHeaders()、getHeaders(String name)等方法可获取服务器的响应头。
- 释放连接。无论执行方法是否成功,都必须释放连接
具体代码如下(HttpClient-4.4.1):
/**
 * 简单httpclient实例
 *
 * @author arron
 * @date 2015年11月11日 下午6:36:49
 * @version 1.0
 */
public class SimpleHttpClientDemo {

    /**
     * 模拟请求
     *
     * @param url        资源地址
     * @param map    参数列表
     * @param encoding    编码
     * @return
     * @throws ParseException
     * @throws IOException
     */
    public static String send(String url, Map<String,String> map,String encoding) throws ParseException, IOException{
        String body = "";

        //创建httpclient对象
        CloseableHttpClient client = HttpClients.createDefault();
        //创建post方式请求对象
        HttpPost httpPost = new HttpPost(url);

        //装填参数
        List<NameValuePair> nvps = new ArrayList<NameValuePair>();
        if(map!=null){
            for (Entry<String, String> entry : map.entrySet()) {
                nvps.add(new BasicNameValuePair(entry.getKey(), entry.getValue()));
            }
        }
        //设置参数到请求对象中
        httpPost.setEntity(new UrlEncodedFormEntity(nvps, encoding));

        System.out.println("请求地址:"+url);
        System.out.println("请求参数:"+nvps.toString());

        //设置header信息
        //指定报文头【Content-type】、【User-Agent】
        httpPost.setHeader("Content-type", "application/x-www-form-urlencoded");
        httpPost.setHeader("User-Agent", "Mozilla/4.0 (compatible; MSIE 5.0; Windows NT; DigExt)");

        //执行请求操作,并拿到结果(同步阻塞)
        CloseableHttpResponse response = client.execute(httpPost);
        //获取结果实体
        HttpEntity entity = response.getEntity();
        if (entity != null) {
            //按指定编码转换结果实体为String类型
            body = EntityUtils.toString(entity, encoding);
        }
        EntityUtils.consume(entity);
        //释放链接
        response.close();
        return body;
    }
}
对于HTTPS的访问,采取绕过证书的策略:
/**
     * 绕过验证
     *
     * @return
     * @throws NoSuchAlgorithmException
     * @throws KeyManagementException
     */
    public static SSLContext createIgnoreVerifySSL() throws NoSuchAlgorithmException, KeyManagementException {
        SSLContext sc = SSLContext.getInstance("SSLv3");

        // 实现一个X509TrustManager接口,用于绕过验证,不用修改里面的方法
        X509TrustManager trustManager = new X509TrustManager() {
            @Override
            public void checkClientTrusted(
                    java.security.cert.X509Certificate[] paramArrayOfX509Certificate,
                    String paramString) throws CertificateException {
            }

            @Override
            public void checkServerTrusted(
                    java.security.cert.X509Certificate[] paramArrayOfX509Certificate,
                    String paramString) throws CertificateException {
            }

            @Override
            public java.security.cert.X509Certificate[] getAcceptedIssuers() {
                return null;
            }
        };

        sc.init(null, new TrustManager[] { trustManager }, null);
        return sc;
    }
然后修改原来的send方法:
/**
     * 模拟请求
     *
     * @param url        资源地址
     * @param map    参数列表
     * @param encoding    编码
     * @return
     * @throws NoSuchAlgorithmException
     * @throws KeyManagementException
     * @throws IOException
     * @throws ClientProtocolException
     */
    public static String send(String url, Map<String,String> map,String encoding) throws KeyManagementException, NoSuchAlgorithmException, ClientProtocolException, IOException {
        String body = "";
        //采用绕过验证的方式处理https请求
        SSLContext sslcontext = createIgnoreVerifySSL();

        // 设置协议http和https对应的处理socket链接工厂的对象
        Registry<ConnectionSocketFactory> socketFactoryRegistry = RegistryBuilder.<ConnectionSocketFactory>create()
            .register("http", PlainConnectionSocketFactory.INSTANCE)
            .register("https", new SSLConnectionSocketFactory(sslcontext))
            .build();
        PoolingHttpClientConnectionManager connManager = new PoolingHttpClientConnectionManager(socketFactoryRegistry);
        HttpClients.custom().setConnectionManager(connManager);

        //创建自定义的httpclient对象
        CloseableHttpClient client = HttpClients.custom().setConnectionManager(connManager).build();
//        CloseableHttpClient client = HttpClients.createDefault();

        //创建post方式请求对象
        HttpPost httpPost = new HttpPost(url);

        //装填参数
        List<NameValuePair> nvps = new ArrayList<NameValuePair>();
        if(map!=null){
            for (Entry<String, String> entry : map.entrySet()) {
                nvps.add(new BasicNameValuePair(entry.getKey(), entry.getValue()));
            }
        }
        //设置参数到请求对象中
        httpPost.setEntity(new UrlEncodedFormEntity(nvps, encoding));

        System.out.println("请求地址:"+url);
        System.out.println("请求参数:"+nvps.toString());

        //设置header信息
        //指定报文头【Content-type】、【User-Agent】
        httpPost.setHeader("Content-type", "application/x-www-form-urlencoded");
        httpPost.setHeader("User-Agent", "Mozilla/4.0 (compatible; MSIE 5.0; Windows NT; DigExt)");

        //执行请求操作,并拿到结果(同步阻塞)
        CloseableHttpResponse response = client.execute(httpPost);
        //获取结果实体
        HttpEntity entity = response.getEntity();
        if (entity != null) {
            //按指定编码转换结果实体为String类型
            body = EntityUtils.toString(entity, encoding);
        }
        EntityUtils.consume(entity);
        //释放链接
        response.close();
        return body;
    }
但是,如果是自己用jdk或者其他工具生成的证书,还是希望用其他方式认证自签名的证书,这篇文章就来分享一下如何设置信任自签名的证书。当然你也可以参考官网示例中。
要想信任自签名的证书,必须得知道密钥库的路径及密钥库的密码。然后加载到程序来才可以。具体代码如下:
/**
     * 设置信任自签名证书
     *
     * @param keyStorePath        密钥库路径
     * @param keyStorepass        密钥库密码
     * @return
     */
    public static SSLContext custom(String keyStorePath, String keyStorepass){
        SSLContext sc = null;
        FileInputStream instream = null;
        KeyStore trustStore = null;
        try {
            trustStore = KeyStore.getInstance(KeyStore.getDefaultType());
            instream = new FileInputStream(new File(keyStorePath));
            trustStore.load(instream, keyStorepass.toCharArray());
            // 相信自己的CA和所有自签名的证书
            sc = SSLContexts.custom().loadTrustMaterial(trustStore, new TrustSelfSignedStrategy()).build();
        } catch (KeyStoreException | NoSuchAlgorithmException| CertificateException | IOException | KeyManagementException e) {
            e.printStackTrace();
        } finally {
            try {
                instream.close();
            } catch (IOException e) {
            }
        }
        return sc;
    }
然后修改原来的send方法:
/**
     * 模拟请求
     *
     * @param url        资源地址
     * @param map    参数列表
     * @param encoding    编码
     * @return
     * @throws ParseException
     * @throws IOException
     * @throws KeyManagementException
     * @throws NoSuchAlgorithmException
     * @throws ClientProtocolException
     */
    public static String send(String url, Map<String,String> map,String encoding) throws ClientProtocolException, IOException {
        String body = "";

        //tomcat是我自己的密钥库的密码,你可以替换成自己的
        //如果密码为空,则用"nopassword"代替
        SSLContext sslcontext = custom("D:\\keys\\wsriakey", "tomcat");

        // 设置协议http和https对应的处理socket链接工厂的对象
        Registry<ConnectionSocketFactory> socketFactoryRegistry = RegistryBuilder.<ConnectionSocketFactory>create()
            .register("http", PlainConnectionSocketFactory.INSTANCE)
            .register("https", new SSLConnectionSocketFactory(sslcontext))
            .build();
        PoolingHttpClientConnectionManager connManager = new PoolingHttpClientConnectionManager(socketFactoryRegistry);
        HttpClients.custom().setConnectionManager(connManager);

        //创建自定义的httpclient对象
        CloseableHttpClient client = HttpClients.custom().setConnectionManager(connManager).build();
//        CloseableHttpClient client = HttpClients.createDefault();

        //创建post方式请求对象
        HttpPost httpPost = new HttpPost(url);

        //装填参数
        List<NameValuePair> nvps = new ArrayList<NameValuePair>();
        if(map!=null){
            for (Entry<String, String> entry : map.entrySet()) {
                nvps.add(new BasicNameValuePair(entry.getKey(), entry.getValue()));
            }
        }
        //设置参数到请求对象中
        httpPost.setEntity(new UrlEncodedFormEntity(nvps, encoding));

        System.out.println("请求地址:"+url);
        System.out.println("请求参数:"+nvps.toString());

        //设置header信息
        //指定报文头【Content-type】、【User-Agent】
        httpPost.setHeader("Content-type", "application/x-www-form-urlencoded");
        httpPost.setHeader("User-Agent", "Mozilla/4.0 (compatible; MSIE 5.0; Windows NT; DigExt)");

        //执行请求操作,并拿到结果(同步阻塞)
        CloseableHttpResponse response = client.execute(httpPost);
        //获取结果实体
        HttpEntity entity = response.getEntity();
        if (entity != null) {
            //按指定编码转换结果实体为String类型
            body = EntityUtils.toString(entity, encoding);
        }
        EntityUtils.consume(entity);
        //释放链接
        response.close();
        return body;
    }
HttpClient超时设置详解
HttpClient 4.3。HttpClient这货和Lucene一样,每个版本的API都变化很大,这有点让人头疼。就好比创建一个HttpClient对象吧,每一个版本的都不一样,
3.X是这样的
HttpClient httpClient=newDefaultHttpClient();
4.3是这样的
CloseableHttpClient httpClient = HttpClients.createDefault();
当然,上面这些变化只不过是一些小变化,大家看看API大家就都会了。
我要讲的是超时设置,HttpClient有三种超时设置,最近比较忙,没时间具体归纳总结,以后再补上,我这里就讲一些最简单最易用的超时设置方法。
这是个3.X的超时设置方法
HttpClient client = newHttpClient();
client.setConnectionTimeout(30000);
client.setTimeout(30000);

HttpClient httpClient= newHttpClient();
httpClient.getHttpConnectionManager().getParams().setConnectionTimeout(5000);
4.X版本的超时设置(4.3后已过时)
HttpClient httpClient=newDefaultHttpClient();
httpClient.getParams().setParameter(CoreConnectionPNames.CONNECTION_TIMEOUT,2000);//连接时间
httpClient.getParams().setParameter(CoreConnectionPNames.SO_TIMEOUT,2000);//数据传输时间
4.3版本超时设置
CloseableHttpClient httpClient = HttpClients.createDefault();
HttpGet httpGet=newHttpGet("http://www.baidu.com");//HTTP Get请求(POST雷同)
RequestConfig requestConfig = RequestConfig.custom().setSocketTimeout(2000).setConnectTimeout(2000).build();//设置请求和传输超时时间
httpGet.setConfig(requestConfig);
httpClient.execute(httpGet);//执行请求
BTW,4.3版本不设置超时的话,一旦服务器没有响应,等待时间N久(>24小时)。
HttpClient升级到4.5版本后,API有很多变化,HttpClient 4之后,API一直没有太稳定,我感觉4.5版本抽象后,很多API应该快稳定了。
使用HttpClient,一般都需要设置连接超时时间和获取数据超时时间。这两个参数很重要,目的是为了防止访问其他http时,由于超时导致自己的应用受影响。
4.5版本中,这两个参数的设置都抽象到了RequestConfig中,由相应的Builder构建,具体的例子如下:
CloseableHttpClient httpclient = HttpClients.createDefault();
HttpGet httpGet = new HttpGet("http://stackoverflow.com/");
RequestConfig requestConfig = RequestConfig.custom()
        .setConnectTimeout(5000).setConnectionRequestTimeout(1000)
        .setSocketTimeout(5000).build();
httpGet.setConfig(requestConfig);
CloseableHttpResponse response = httpclient.execute(httpGet);
System.out.println("得到的结果:" + response.getStatusLine());//得到请求结果
HttpEntity entity = response.getEntity();//得到请求回来的数据
setConnectTimeout:设置连接超时时间,单位毫秒。
setConnectionRequestTimeout:设置从connect Manager(连接池)获取Connection 超时时间,单位毫秒。这个属性是新加的属性,因为目前版本是可以共享连接池的。
setSocketTimeout:请求获取数据的超时时间(即响应时间),单位毫秒。 如果访问一个接口,多少时间内无法返回数据,就直接放弃此次调用。
HttpClient内部有三个超时时间设置:连接池获取可用连接超时,连接超时,读取数据超时
先看以下HttpClient的初始化代码:
RequestConfig requestConfig = RequestConfig.custom()
                    .setConnectionRequestTimeout(config.connReqTimeout)   //从连接池中获取连接的超时时间
                            //与服务器连接超时时间:httpclient会创建一个异步线程用以创建socket连接,此处设置该socket的连接超时时间
                    .setConnectTimeout(config.connTimeout)
                    .setSocketTimeout(config.socketTimeout)               //socket读数据超时时间:从服务器获取响应数据的超时时间
                    .build();
            httpClient = HttpClientBuilder.create()
                    .setMaxConnTotal(config.maxConnTotal)                   //连接池中最大连接数
                            /**
                             * 分配给同一个route(路由)最大的并发连接数。
                             * route:运行环境机器 到 目标机器的一条线路。
                             * 举例来说,我们使用HttpClient的实现来分别请求 www.baidu.com 的资源和 www.bing.com 的资源那么他就会产生两个route。
                             */
                    .setMaxConnPerRoute(config.maxConnPerRoute)
                    .setDefaultRequestConfig(requestConfig)
                    .build();
三个超时时间详解:
1.从连接池中获取可用连接超时
HttpClient中的要用连接时尝试从连接池中获取,若是在等待了一定的时间后还没有获取到可用连接(比如连接池中没有空闲连接了)则会抛出获取连接超时异常。
2.连接目标超时connectionTimeout
指的是连接目标url的连接超时时间,即客服端发送请求到与目标url建立起连接的最大时间。如果在该时间范围内还没有建立起连接,则就抛出connectionTimeOut异常。如测试的时候,将url改为一个不存在的url:“http://test.com” ,超时时间3000ms过后,系统报出异常: org.apache.commons.httpclient.ConnectTimeoutException:The host did not accept the connection within timeout of 3000 ms
3.等待响应超时(读取数据超时)socketTimeout
连接上一个url后,获取response的返回等待时间 ,即在与目标url建立连接后,等待放回response的最大时间,在规定时间内没有返回响应的话就抛出SocketTimeout。
测试的时候的连接url为我本地开启的一个url,http://localhost:8080/firstTest.htm?method=test,在我这个测试url里,当访问到这个链接时,线程sleep一段时间,来模拟返回response超时。
java代码:
@RequestMapping(params = "method=test")

public String testMethod(ModelMap model) {

try {

    Thread.sleep(10000);

 } catch (InterruptedException e) {

    // TODO Auto-generated catch block

     e.printStackTrace();

 }

       System.out.println("call testMethod method.");

       model.addAttribute("name", "test method");

 return "test";

   }
将读取response返回超时时间设的时间比那个sleep时间短之后,运行程序给出异常:java.net.SocketTimeoutException:Read timed out
HttpClient中的三种超时设置区别
最近项目中在使用HttpClient有三个超时(connectionRequestTimeout,connectTimeout,socketTimeout)时间理解得不是很透彻,API文档不是很理解,专门写Demo理解了一下。
API的描述如下:
/**
     * Returns the timeout in milliseconds used when requesting a connection
     * from the connection manager. A timeout value of zero is interpreted
     * as an infinite timeout.
     * <p>
     * A timeout value of zero is interpreted as an infinite timeout.
     * A negative value is interpreted as undefined (system default).
     * </p>
     * <p>
     * Default: {@code -1}
     * </p>
     */
    public int getConnectionRequestTimeout() {
        return connectionRequestTimeout;
    }

    /**
     * Determines the timeout in milliseconds until a connection is established.
     * A timeout value of zero is interpreted as an infinite timeout.
     * <p>
     * A timeout value of zero is interpreted as an infinite timeout.
     * A negative value is interpreted as undefined (system default).
     * </p>
     * <p>
     * Default: {@code -1}
     * </p>
     */
    public int getConnectTimeout() {
        return connectTimeout;
    }

    /**
     * Defines the socket timeout ({@code SO_TIMEOUT}) in milliseconds,
     * which is the timeout for waiting for data  or, put differently,
     * a maximum period inactivity between two consecutive data packets).
     * <p>
     * A timeout value of zero is interpreted as an infinite timeout.
     * A negative value is interpreted as undefined (system default).
     * </p>
     * <p>
     * Default: {@code -1}
     * </p>
     */
    public int getSocketTimeout() {
        return socketTimeout;
    }
正确解读
API中不能看出正式的含义是什么,经过demo之后,终于知道了各自含义
1. connectTimeOut:指建立连接的超时时间,比较容易理解
2. connectionRequestTimeOut:指从连接池获取到连接的超时时间,如果是非连接池的话,该参数暂时没有发现有什么用处
3. socketTimeOut:指客户端和服务进行数据交互的时间,是指两者之间如果两个数据包之间的时间大于该时间则认为超时,而不是整个交互的整体时间,比如如果设置1秒超时,如果每隔0.8秒传输一次数据,传输10次,总共8秒,这样是不超时的。而如果任意两个数据包之间的时间超过了1秒,则超时。
测试代码
首先是为这次demo写的服务代码,包含几个controller方法(Spring MVC)
package me.nabil.demo.springbootdemo;

import org.slf4j.Logger;
import org.slf4j.LoggerFactory;
import org.springframework.boot.SpringApplication;
import org.springframework.boot.autoconfigure.EnableAutoConfiguration;
import org.springframework.stereotype.Controller;
import org.springframework.web.bind.annotation.RequestMapping;
import org.springframework.web.bind.annotation.RequestMethod;
import org.springframework.web.bind.annotation.ResponseBody;

import javax.servlet.http.HttpServletRequest;
import javax.servlet.http.HttpServletResponse;
import java.io.IOException;

/**
 * 超时测试
 *
 * @author nabilzhang
 */
@Controller
@EnableAutoConfiguration
@RequestMapping(value = {"/test"}, method = {RequestMethod.GET})
public class TimeoutTestController {

    private static final Logger logger = LoggerFactory.getLogger(TimeoutTestController.class);

    /**
     * main方法
     *
     * @param args 参数数组
     */
    public static void main(String args[]) {
        SpringApplication.run(TimeoutTestController.class, args);
    }

    /**
     * 1.测试socketOutTimeout,三秒后返回数据
     *
     * @return
     * @throws InterruptedException
     */
    @RequestMapping(value = {"/socket_timeout"}, method = {RequestMethod.GET})
    @ResponseBody
    String socketTimeout() throws InterruptedException {
        logger.info("socket_timeout");
        Thread.sleep(3000);
        return "socket_timeout";
    }

    /**
     * 2.测试socketOutTimeout,每隔0.8秒返回数据
     *
     * @return
     * @throws InterruptedException
     */
    @RequestMapping(value = {"/socket_timeout_2"}, method = {RequestMethod.GET})
    void socketTimeout2(HttpServletResponse response) throws InterruptedException, IOException {
        logger.info("socket_timeout_2");
        for (int i = 0; i < 10; i++) {
            logger.info("{}", i);
            response.getWriter().println("" + i);
            response.flushBuffer();
            Thread.sleep(800);
        }
    }

    /**
     * 3.测试connectionRequestTimeout用的服务,三秒后返回数据
     *
     * @param request
     * @return
     * @throws InterruptedException
     */
    @RequestMapping(value = {"/connection_request_timeout"}, method = {RequestMethod.GET})
    @ResponseBody
    String connectionRequestTimeout(HttpServletRequest request) throws InterruptedException {
        logger.info("{}", request.getRequestURI());
        Thread.sleep(3000);
        return "connectionRequestTimeout";
    }
}
如下是客户端的测试Case,下面几个Case分别测试了几个超时时间的各种情况,Case全部通过才可以
package me.nabil.demo.springbootdemo;

import org.apache.http.client.ClientProtocolException;
import org.apache.http.client.config.RequestConfig;
import org.apache.http.client.methods.CloseableHttpResponse;
import org.apache.http.client.methods.HttpGet;
import org.apache.http.conn.ConnectTimeoutException;
import org.apache.http.impl.client.CloseableHttpClient;
import org.apache.http.impl.client.HttpClients;
import org.apache.http.impl.conn.BasicHttpClientConnectionManager;
import org.apache.http.impl.conn.PoolingHttpClientConnectionManager;
import org.apache.http.util.EntityUtils;
import org.junit.Assert;
import org.junit.Test;

import java.io.IOException;
import java.net.SocketTimeoutException;
import java.util.Date;
import java.util.concurrent.ExecutorService;
import java.util.concurrent.Executors;

/**
 * 测试HttpClient超时参数
 *
 * @author nabilzhang
 */
public class TimeoutTestControllerTest {

    /**
     * 1.connectionTimeout测试:IP无法链接,链接超时
     * @throws Exception
     */
    @Test
    public void connectionTimeout() throws Exception {
        CloseableHttpClient httpclient = HttpClients.createDefault();
        HttpGet httpGet = new HttpGet("http://74.125.203.100");
        RequestConfig requestConfig = RequestConfig.custom().setConnectionRequestTimeout(1000)
                .setSocketTimeout(1000).setConnectTimeout(1000).build();
        httpGet.setConfig(requestConfig);
        try {
            httpclient.execute(httpGet);
        } catch (ConnectTimeoutException exception) {
            Assert.assertTrue(exception.getMessage().contains("connect timed out"));
        }

    }

    /**
     * 2.socketTimeout测试,服务端没有指定时间内任何响应,会超时
     * @throws Exception
     */
    @Test
    public void socketTimeout() throws Exception {
        CloseableHttpClient httpclient = HttpClients.createDefault();
        HttpGet httpGet = new HttpGet("http://127.0.0.1:8080/test/socket_timeout");
        RequestConfig requestConfig = RequestConfig.custom()
                .setSocketTimeout(1000).build();
        httpGet.setConfig(requestConfig);
        try {
            httpclient.execute(httpGet);
        } catch (SocketTimeoutException exception) {
            Assert.assertEquals("Read timed out", exception.getMessage());
        }
    }

    /**
     * 3.socketTimeout测试:服务端隔800ms返回一点数据,不会超时
     * @throws Exception
     */
    @Test
    public void socketTimeoutNo() {
        CloseableHttpClient httpclient = HttpClients.createDefault();
        HttpGet httpGet = new HttpGet("http://127.0.0.1:8080/test/socket_timeout_2");
        RequestConfig requestConfig = RequestConfig.custom().setConnectionRequestTimeout(1000)
                .setSocketTimeout(1000).setConnectTimeout(1000).build();
        httpGet.setConfig(requestConfig);

        try {
            httpclient.execute(httpGet);
            CloseableHttpResponse response = httpclient.execute(httpGet);
            System.out.println(String.format("socketTimeoutNo, %s", EntityUtils.toString(response.getEntity())));
        } catch (Exception e) {
            Assert.fail("服务端隔800ms返回一点数据,不会超时");
        }


    }

    /**
     * 4.connectionRequestTimeout测试:指从连接管理器(例如连接池)中拿到连接的超时时间
     * @throws Exception
     */
    @Test
    public void connectionRequestTimeoutWithPoolingConnectionManager() throws Exception {
        PoolingHttpClientConnectionManager conMgr = new PoolingHttpClientConnectionManager();
        conMgr.setMaxTotal(2);

        final CloseableHttpClient httpclient = HttpClients.custom().setConnectionManager(conMgr).build();
        final HttpGet httpGet = new HttpGet("http://127.0.0.1:8080/test/connection_request_timeout");

        RequestConfig requestConfig = RequestConfig.custom().setConnectTimeout(1000)
                .setConnectionRequestTimeout(1000).setSocketTimeout(1000).build();
        httpGet.setConfig(requestConfig);

        // 如下多线程占满连接池
        ExecutorService executorService = Executors.newFixedThreadPool(10);
        for (int i = 0; i < 10; i++) {
            executorService.submit(new Runnable() {
                @Override
                public void run() {
                    try {
                        CloseableHttpResponse response = httpclient.execute(httpGet);
                        System.out.println(String.format("connectionRequestTimeoutTest: %s",
                                EntityUtils.toString(response.getEntity())));
                    } catch (SocketTimeoutException exception) {
                        System.out.println(exception.getMessage());
                    } catch (ClientProtocolException e) {
                        e.printStackTrace();
                    } catch (IOException e) {
                        e.printStackTrace();
                    }
                }
            });
        }

        // 在连接池占满的情况下,拿不到就会抛异常
        try {
            CloseableHttpResponse response = httpclient.execute(httpGet);
            System.out.println(String.format("connectionRequestTimeoutTest: %s",
                    EntityUtils.toString(response.getEntity())));
            Assert.fail();
        } catch (Exception exception) {
            // 异常是从连接池拿到连接超时
            Assert.assertEquals("Timeout waiting for connection from pool", exception.getMessage());
            System.out.println(exception.getMessage());
        }

    }

    /**
     * 5.connectionRequestTimeout测试,指从连接管理器中拿到连接的超时时间,由于使用基本的连接管理器,链接被占用时,直接无法分配链接
     * connectionRequestTimeout并未生效,目前看来该参数只在连接池奏效.
     * 该链接管理器(BasicHttpClientConnectionManager)是单线程情况下可以使用,多线程情况下不要使用。
     * @throws Exception
     */
    @Test
    public void connectionRequestTimeoutWithBasicConnectionManager() throws Exception {

        BasicHttpClientConnectionManager connManager = new BasicHttpClientConnectionManager();
        final CloseableHttpClient httpclient = HttpClients.custom()
                .setConnectionManager(connManager).setMaxConnPerRoute(1).build();
        final HttpGet httpGet = new HttpGet("http://127.0.0.1:8080/test/connection_request_timeout");

        RequestConfig requestConfig = RequestConfig.custom().setConnectTimeout(100000)
                .setConnectionRequestTimeout(1000000).setSocketTimeout(1000000).build();
        httpGet.setConfig(requestConfig);

        // 如下多线程占满连接
        ExecutorService executorService = Executors.newFixedThreadPool(10);
        for (int i = 0; i < 10; i++) {
            executorService.submit(new Runnable() {
                @Override
                public void run() {
                    CloseableHttpResponse response = null;
                    try {
                        response = httpclient.execute(httpGet);
                        System.out.println(String.format("connectionRequestTimeoutTest: %s",
                                EntityUtils.toString(response.getEntity())));
                    } catch (Exception exception) {
                        exception.printStackTrace();
                    } finally {
                        if (response != null) {
                            try {
                                response.close();
                                httpclient.close();
                            } catch (IOException e) {
                                e.printStackTrace();
                            }
                        }

                    }
                }
            });
        }
        System.out.println(new Date());
        // 在连接池占满的情况下,拿不到就会抛异常
        try {
            CloseableHttpResponse response = httpclient.execute(httpGet);
            System.out.println(String.format("connectionRequestTimeoutTest: %s",
                    EntityUtils.toString(response.getEntity())));
            Assert.fail();
        } catch (Exception exception) {
            System.out.println(new Date());
            exception.printStackTrace();
            // 异常是从连接池拿到连接超时
            Assert.assertEquals("Connection is still allocated", exception.getMessage());
            System.out.println(exception.getMessage());
        }

    }
 }
注:上面Case是使用httpclient版本4.5.2测试所得。
<dependency>
            <groupId>org.apache.httpcomponents</groupId>
            <artifactId>httpclient</artifactId>
            <version>4.5.2</version>
            <type>jar</type>
 </dependency>
更深理解可以参照:http://www.baeldung.com/httpclient-connection-management
使用HttpClient实现文件的上传下载
1 HTTP
HTTP 协议可能是现在 Internet 上使用得最多、最重要的协议了,越来越多的 Java 应用程序需要直接通过 HTTP 协议来访问网络资源。
虽然在 JDK 的 java.net 包中已经提供了访问 HTTP 协议的基本功能,但是对于大部分应用程序来说,JDK 库本身提供的功能还不够丰富和灵活。HttpClient 用来提供高效的、最新的、功能丰富的支持 HTTP 协议的客户端编程工具包,并且它支持 HTTP 协议最新的版本和建议。
一般的情况下我们都是使用Chrome或者其他浏览器来访问一个WEB服务器,用来浏览页面查看信息或者提交一些数据、文件上传下载等等。所访问的这些页面有的仅仅是一些普通的页面,有的需要用户登录后方可使用,或者需要认证以及是一些通过加密方式传输,例如HTTPS。目前我们使用的浏览器处理这些情况都不会构成问题。但是一旦我们有需求不通过浏览器来访问服务器的资源呢?那该怎么办呢?
下面以本地客户端发起文件的上传、下载为例做个小Demo。HttpClient有两种形式,一种是org.apache.http下的,一种是org.apache.commons.httpclient.HttpClient。
2 文件上传
文件上传可以使用两种方式实现,一种是PostMethod方式,一种是HttpPost方式。两者的处理大同小异。PostMethod是使用FileBody将文件包装流包装起来,HttpPost是使用FilePart将文件流包装起来。在传递文件流给服务端的时候,都可以同时传递其他的参数。
2.1 客户端处理
2.1.1 PostMethod方式
将文件封装到FilePart中,放入Part数组,同时,其他参数可以放入StringPart中,这里没有写,只是单纯的将参数以setParameter的方式进行设置。此处的HttpClient是org.apache.commons.httpclient.HttpClient。
public void upload(String localFile){
        File file = new File(localFile);
        PostMethod filePost = new PostMethod(URL_STR);
        HttpClient client = new HttpClient();

        try {
            // 通过以下方法可以模拟页面参数提交
            filePost.setParameter("userName", userName);
            filePost.setParameter("passwd", passwd);

            Part[] parts = { new FilePart(file.getName(), file) };
            filePost.setRequestEntity(new MultipartRequestEntity(parts, filePost.getParams()));

            client.getHttpConnectionManager().getParams().setConnectionTimeout(5000);

            int status = client.executeMethod(filePost);
            if (status == HttpStatus.SC_OK) {
                System.out.println("上传成功");
            } else {
                System.out.println("上传失败");
            }
        } catch (Exception ex) {
            ex.printStackTrace();
        } finally {
            filePost.releaseConnection();
        }
    }
记得搞完之后,要通过releaseConnection释放连接。
2.1.2 HttpPost方式
这种方式,与上面类似,只不过变成了FileBody。上面的Part数组在这里对应HttpEntity。此处的HttpClient是org.apache.http.client.methods下的。
public void upload(String localFile){
        CloseableHttpClient httpClient = null;
        CloseableHttpResponse response = null;
        try {
            httpClient = HttpClients.createDefault();

            // 把一个普通参数和文件上传给下面这个地址 是一个servlet
            HttpPost httpPost = new HttpPost(URL_STR);

            // 把文件转换成流对象FileBody
            FileBody bin = new FileBody(new File(localFile));

            StringBody userName = new StringBody("Scott", ContentType.create(
                    "text/plain", Consts.UTF_8));
            StringBody password = new StringBody("123456", ContentType.create(
                    "text/plain", Consts.UTF_8));

            HttpEntity reqEntity = MultipartEntityBuilder.create()
                    // 相当于<input type="file" name="file"/>
                    .addPart("file", bin)

                    // 相当于<input type="text" name="userName" value=userName>
                    .addPart("userName", userName)
                    .addPart("pass", password)
                    .build();

            httpPost.setEntity(reqEntity);

            // 发起请求 并返回请求的响应
            response = httpClient.execute(httpPost);

            System.out.println("The response value of token:" + response.getFirstHeader("token"));

            // 获取响应对象
            HttpEntity resEntity = response.getEntity();
            if (resEntity != null) {
                // 打印响应长度
                System.out.println("Response content length: " + resEntity.getContentLength());
                // 打印响应内容
                System.out.println(EntityUtils.toString(resEntity, Charset.forName("UTF-8")));
            }

            // 销毁
            EntityUtils.consume(resEntity);
        }catch (Exception e){
            e.printStackTrace();
        }finally {
            try {
                if(response != null){
                    response.close();
                }
            } catch (IOException e) {
                e.printStackTrace();
            }

            try {
                if(httpClient != null){
                    httpClient.close();
                }
            } catch (IOException e) {
                e.printStackTrace();
            }
        }
    }
2.2 服务端处理
无论客户端是哪种上传方式,服务端的处理都是一样的。在通过HttpServletRequest获得参数之后,把得到的Item进行分类,分为普通的表单和File表单。
通过ServletFileUpload 可以设置上传文件的大小及编码格式等。
总之,服务端的处理是把得到的参数当做HTML表单进行处理的。
public void processUpload(HttpServletRequest request, HttpServletResponse response){
        File uploadFile = new File(uploadPath);
        if (!uploadFile.exists()) {
            uploadFile.mkdirs();
        }

        System.out.println("Come on, baby .......");

        request.setCharacterEncoding("utf-8");
        response.setCharacterEncoding("utf-8");

        //检测是不是存在上传文件
        boolean isMultipart = ServletFileUpload.isMultipartContent(request);

        if(isMultipart){
            DiskFileItemFactory factory = new DiskFileItemFactory();

            //指定在内存中缓存数据大小,单位为byte,这里设为1Mb
            factory.setSizeThreshold(1024*1024);

            //设置一旦文件大小超过getSizeThreshold()的值时数据存放在硬盘的目录
            factory.setRepository(new File("D:\\temp"));

            // Create a new file upload handler
            ServletFileUpload upload = new ServletFileUpload(factory);

            // 指定单个上传文件的最大尺寸,单位:字节,这里设为50Mb
            upload.setFileSizeMax(50 * 1024 * 1024);

            //指定一次上传多个文件的总尺寸,单位:字节,这里设为50Mb
            upload.setSizeMax(50 * 1024 * 1024);
            upload.setHeaderEncoding("UTF-8");

            List<FileItem> items = null;

            try {
                // 解析request请求
                items = upload.parseRequest(request);
            } catch (FileUploadException e) {
                e.printStackTrace();
            }

            if(items!=null){
                //解析表单项目
                Iterator<FileItem> iter = items.iterator();
                while (iter.hasNext()) {
                    FileItem item = iter.next();

                    //如果是普通表单属性
                    if (item.isFormField()) {
                        //相当于input的name属性   <input type="text" name="content">
                        String name = item.getFieldName();

                        //input的value属性
                        String value = item.getString();

                        System.out.println("属性:" + name + " 属性值:" + value);
                    }
                    //如果是上传文件
                    else {
                        //属性名
                        String fieldName = item.getFieldName();

                        //上传文件路径
                        String fileName = item.getName();
                        fileName = fileName.substring(fileName.lastIndexOf("/") + 1);// 获得上传文件的文件名

                        try {
                            item.write(new File(uploadPath, fileName));
                        } catch (Exception e) {
                            e.printStackTrace();
                        }
                    }
                }
            }
        }

        response.addHeader("token", "hello");
    }
服务端在处理之后,可以在Header中设置返回给客户端的简单信息。如果返回客户端是一个流的话,流的大小必须提前设置!
response.setContentLength((int) file.length());
3 文件下载
文件的下载可以使用HttpClient的GetMethod实现,还可以使用HttpGet方式、原始的HttpURLConnection方式。
3.1 客户端处理
3.1.1 GetMethod方式
此处的HttpClient是org.apache.commons.httpclient.HttpClient。
public void downLoad(String remoteFileName, String localFileName) {
        HttpClient client = new HttpClient();
        GetMethod get = null;
        FileOutputStream output = null;

        try {
            get = new GetMethod(URL_STR);
            get.setRequestHeader("userName", userName);
            get.setRequestHeader("passwd", passwd);
            get.setRequestHeader("fileName", remoteFileName);

            int i = client.executeMethod(get);

            if (SUCCESS == i) {
                System.out.println("The response value of token:" + get.getResponseHeader("token"));

                File storeFile = new File(localFileName);
                output = new FileOutputStream(storeFile);

                // 得到网络资源的字节数组,并写入文件
                output.write(get.getResponseBody());
            } else {
                System.out.println("DownLoad file occurs exception, the error code is :" + i);
            }
        } catch (Exception e) {
            e.printStackTrace();
        } finally {
            try {
                if(output != null){
                    output.close();
                }
            } catch (IOException e) {
                e.printStackTrace();
            }

            get.releaseConnection();
            client.getHttpConnectionManager().closeIdleConnections(0);
        }
    }
3.1.2 HttpGet方式
此处的HttpClient是org.apache.http.client.methods下的。
public void downLoad(String remoteFileName, String localFileName) {
        DefaultHttpClient httpClient = new DefaultHttpClient();
        OutputStream out = null;
        InputStream in = null;

        try {
            HttpGet httpGet = new HttpGet(URL_STR);

            httpGet.addHeader("userName", userName);
            httpGet.addHeader("passwd", passwd);
            httpGet.addHeader("fileName", remoteFileName);

            HttpResponse httpResponse = httpClient.execute(httpGet);
            HttpEntity entity = httpResponse.getEntity();
            in = entity.getContent();

            long length = entity.getContentLength();
            if (length <= 0) {
                System.out.println("下载文件不存在!");
                return;
            }

            System.out.println("The response value of token:" + httpResponse.getFirstHeader("token"));

            File file = new File(localFileName);
            if(!file.exists()){
                file.createNewFile();
            }

            out = new FileOutputStream(file);
            byte[] buffer = new byte[4096];
            int readLength = 0;
            while ((readLength=in.read(buffer)) > 0) {
                byte[] bytes = new byte[readLength];
                System.arraycopy(buffer, 0, bytes, 0, readLength);
                out.write(bytes);
            }

            out.flush();

        } catch (IOException e) {
            e.printStackTrace();
        } catch (Exception e) {
            e.printStackTrace();
        }finally{
            try {
                if(in != null){
                    in.close();
                }
            } catch (IOException e) {
                e.printStackTrace();
            }

            try {
                if(out != null){
                    out.close();
                }
            } catch (IOException e) {
                e.printStackTrace();
            }
        }
    }
3.1.3 HttpURLConnection方式
public void download3(String remoteFileName, String localFileName) {
        FileOutputStream out = null;
        InputStream in = null;

        try{
            URL url = new URL(URL_STR);
            URLConnection urlConnection = url.openConnection();
            HttpURLConnection httpURLConnection = (HttpURLConnection) urlConnection;

            // true -- will setting parameters
            httpURLConnection.setDoOutput(true);
            // true--will allow read in from
            httpURLConnection.setDoInput(true);
            // will not use caches
            httpURLConnection.setUseCaches(false);
            // setting serialized
            httpURLConnection.setRequestProperty("Content-type", "application/x-java-serialized-object");
            // default is GET
            httpURLConnection.setRequestMethod("POST");
            httpURLConnection.setRequestProperty("connection", "Keep-Alive");
            httpURLConnection.setRequestProperty("Charsert", "UTF-8");
            // 1 min
            httpURLConnection.setConnectTimeout(60000);
            // 1 min
            httpURLConnection.setReadTimeout(60000);

            httpURLConnection.addRequestProperty("userName", userName);
            httpURLConnection.addRequestProperty("passwd", passwd);
            httpURLConnection.addRequestProperty("fileName", remoteFileName);

            // connect to server (tcp)
            httpURLConnection.connect();

            in = httpURLConnection.getInputStream();// send request to
                                                                // server
            File file = new File(localFileName);
            if(!file.exists()){
                file.createNewFile();
            }

            out = new FileOutputStream(file);
            byte[] buffer = new byte[4096];
            int readLength = 0;
            while ((readLength=in.read(buffer)) > 0) {
                byte[] bytes = new byte[readLength];
                System.arraycopy(buffer, 0, bytes, 0, readLength);
                out.write(bytes);
            }

            out.flush();
        }catch(Exception e){
            e.printStackTrace();
        }finally{
            try {
                if(in != null){
                    in.close();
                }
            } catch (IOException e) {
                e.printStackTrace();
            }

            try {
                if(out != null){
                    out.close();
                }
            } catch (IOException e) {
                e.printStackTrace();
            }
        }
    }
3.2 服务端处理
尽管客户端的处理方式不同,但是服务端是一样的。
public void processDownload(HttpServletRequest request, HttpServletResponse response){
        int BUFFER_SIZE = 4096;
        InputStream in = null;
        OutputStream out = null;

        System.out.println("Come on, baby .......");

        try{
            request.setCharacterEncoding("utf-8");
            response.setCharacterEncoding("utf-8");
            response.setContentType("application/octet-stream");

            String userName = request.getHeader("userName");
            String passwd = request.getHeader("passwd");
            String fileName = request.getHeader("fileName");

            System.out.println("userName:" + userName);
            System.out.println("passwd:" + passwd);
            System.out.println("fileName:" + fileName);

            //可以根据传递来的userName和passwd做进一步处理,比如验证请求是否合法等
            File file = new File(downloadPath + "\\" + fileName);
            response.setContentLength((int) file.length());
            response.setHeader("Accept-Ranges", "bytes");

            int readLength = 0;

            in = new BufferedInputStream(new FileInputStream(file), BUFFER_SIZE);
            out = new BufferedOutputStream(response.getOutputStream());

            byte[] buffer = new byte[BUFFER_SIZE];
            while ((readLength=in.read(buffer)) > 0) {
                byte[] bytes = new byte[readLength];
                System.arraycopy(buffer, 0, bytes, 0, readLength);
                out.write(bytes);
            }

            out.flush();

            response.addHeader("token", "hello 1");

        }catch(Exception e){
            e.printStackTrace();
             response.addHeader("token", "hello 2");
        }finally {
            if (in != null) {
                try {
                    in.close();
                } catch (IOException e) {
                }
            }
            if (out != null) {
                try {
                    out.close();
                } catch (IOException e) {
                }
            }
        }
    }
4 小结
HttpClient最基本的功能就是执行Http方法。一个Http方法的执行涉及到一个或者多个Http请求/Http响应的交互,通常这个过程都会自动被HttpClient处理,对用户透明。用户只需要提供Http请求对象,HttpClient就会将http请求发送给目标服务器,并且接收服务器的响应,如果http请求执行不成功,httpclient就会抛出异常。所以在写代码的时候注意finally的处理。
所有的Http请求都有一个请求列(request line),包括方法名、请求的URI和Http版本号。HttpClient支持HTTP/1.1这个版本定义的所有Http方法:GET,HEAD,POST,PUT,DELETE,TRACE和OPTIONS。上面的上传用到了Post,下载是Get。
目前来说,使用org.apache.commons.httpclient.HttpClient多一些。看自己了~
HttpClient 4.3连接池参数配置及源码解读
目前所在公司使用HttpClient 4.3.3版本发送Rest请求,调用接口。最近出现了调用查询接口服务慢的生产问题,在排查整个调用链可能存在的问题时(从客户端发起Http请求->ESB->服务端处理请求,查询数据并返回),发现原本的HttpClient连接池中的一些参数配置可能存在问题,如defaultMaxPerRoute、一些timeout时间的设置等,虽不能确定是由于此连接池导致接口查询慢,但确实存在可优化的地方,故花时间做一些研究。本文主要涉及HttpClient连接池、请求的参数配置,使用及源码解读。
以下是本文的目录大纲:
一、HttpClient连接池、请求参数含义
二、执行原理及源码解读
1、创建HttpClient,执行request
2、连接池管理
2.1、连接池结构
2.2、分配连接 & 建立连接
2.3、回收连接 & 保持连接
2.4、instream.close()、response.close()、httpclient.close()的区别
2.5、过期和空闲连接清理
三、如何设置合理的参数
一、HttpClient连接池、请求参数含义
import java.io.IOException;
import java.io.InputStream;
import java.io.InterruptedIOException;
import java.net.UnknownHostException;
import java.nio.charset.CodingErrorAction;
import javax.net.ssl.SSLException;
import org.apache.http.Consts;
import org.apache.http.HttpEntity;
import org.apache.http.HttpEntityEnclosingRequest;
import org.apache.http.HttpHost;
import org.apache.http.HttpRequest;
import org.apache.http.client.HttpRequestRetryHandler;
import org.apache.http.client.config.RequestConfig;
import org.apache.http.client.methods.CloseableHttpResponse;
import org.apache.http.client.methods.HttpGet;
import org.apache.http.client.protocol.HttpClientContext;
import org.apache.http.config.ConnectionConfig;
import org.apache.http.config.MessageConstraints;
import org.apache.http.config.SocketConfig;
import org.apache.http.conn.ConnectTimeoutException;
import org.apache.http.conn.routing.HttpRoute;
import org.apache.http.impl.client.CloseableHttpClient;
import org.apache.http.impl.client.DefaultHttpRequestRetryHandler;
import org.apache.http.impl.client.HttpClients;
import org.apache.http.impl.conn.PoolingHttpClientConnectionManager;
import org.apache.http.protocol.HttpContext;

public class HttpClientParamTest {
    public static void main(String[] args) {
        /**
         * 创建连接管理器,并设置相关参数
         */
        //连接管理器,使用无惨构造
        PoolingHttpClientConnectionManager connManager
                                    = new PoolingHttpClientConnectionManager();

        /**
         * 连接数相关设置
         */
        //最大连接数
        connManager.setMaxTotal(200);
        //默认的每个路由的最大连接数
        connManager.setDefaultMaxPerRoute(100);
        //设置到某个路由的最大连接数,会覆盖defaultMaxPerRoute
        connManager.setMaxPerRoute(new HttpRoute(new HttpHost("somehost", 80)), 150);

        /**
         * socket配置(默认配置 和 某个host的配置)
         */
        SocketConfig socketConfig = SocketConfig.custom()
                .setTcpNoDelay(true)     //是否立即发送数据,设置为true会关闭Socket缓冲,默认为false
                .setSoReuseAddress(true) //是否可以在一个进程关闭Socket后,即使它还没有释放端口,其它进程还可以立即重用端口
                .setSoTimeout(500)       //接收数据的等待超时时间,单位ms
                .setSoLinger(60)         //关闭Socket时,要么发送完所有数据,要么等待60s后,就关闭连接,此时socket.close()是阻塞的
                .setSoKeepAlive(true)    //开启监视TCP连接是否有效
                .build();
        connManager.setDefaultSocketConfig(socketConfig);
        connManager.setSocketConfig(new HttpHost("somehost", 80), socketConfig);

        /**
         * HTTP connection相关配置(默认配置 和 某个host的配置)
         * 一般不修改HTTP connection相关配置,故不设置
         */
        //消息约束
        MessageConstraints messageConstraints = MessageConstraints.custom()
                .setMaxHeaderCount(200)
                .setMaxLineLength(2000)
                .build();
        //Http connection相关配置
        ConnectionConfig connectionConfig = ConnectionConfig.custom()
                .setMalformedInputAction(CodingErrorAction.IGNORE)
                .setUnmappableInputAction(CodingErrorAction.IGNORE)
                .setCharset(Consts.UTF_8)
                .setMessageConstraints(messageConstraints)
                .build();
        //一般不修改HTTP connection相关配置,故不设置
        //connManager.setDefaultConnectionConfig(connectionConfig);
        //connManager.setConnectionConfig(new HttpHost("somehost", 80), ConnectionConfig.DEFAULT);

        /**
         * request请求相关配置
         */
        RequestConfig defaultRequestConfig = RequestConfig.custom()
                .setConnectTimeout(2 * 1000)         //连接超时时间
                .setSocketTimeout(2 * 1000)          //读超时时间(等待数据超时时间)
                .setConnectionRequestTimeout(500)    //从池中获取连接超时时间
                .setStaleConnectionCheckEnabled(true)//检查是否为陈旧的连接,默认为true,类似testOnBorrow
                .build();

        /**
         * 重试处理
         * 默认是重试3次
         */
        //禁用重试(参数:retryCount、requestSentRetryEnabled)
        HttpRequestRetryHandler requestRetryHandler = new DefaultHttpRequestRetryHandler(0, false);
        //自定义重试策略
        HttpRequestRetryHandler myRetryHandler = new HttpRequestRetryHandler() {

            public boolean retryRequest(IOException exception, int executionCount, HttpContext context) {
                //Do not retry if over max retry count
                if (executionCount >= 3) {
                    return false;
                }
                //Timeout
                if (exception instanceof InterruptedIOException) {
                    return false;
                }
                //Unknown host
                if (exception instanceof UnknownHostException) {
                    return false;
                }
                //Connection refused
                if (exception instanceof ConnectTimeoutException) {
                    return false;
                }
                //SSL handshake exception
                if (exception instanceof SSLException) {
                    return false;
                }

                HttpClientContext clientContext = HttpClientContext.adapt(context);
                HttpRequest request = clientContext.getRequest();
                boolean idempotent = !(request instanceof HttpEntityEnclosingRequest);
                //Retry if the request is considered idempotent
                //如果请求类型不是HttpEntityEnclosingRequest,被认为是幂等的,那么就重试
                //HttpEntityEnclosingRequest指的是有请求体的request,比HttpRequest多一个Entity属性
                //而常用的GET请求是没有请求体的,POST、PUT都是有请求体的
                //Rest一般用GET请求获取数据,故幂等,POST用于新增数据,故不幂等
                if (idempotent) {
                    return true;
                }

                return false;
            }
        };

        /**
         * 创建httpClient
         */
        CloseableHttpClient httpclient = HttpClients.custom()
                .setConnectionManager(connManager)             //连接管理器
                .setProxy(new HttpHost("myproxy", 8080))       //设置代理
                .setDefaultRequestConfig(defaultRequestConfig) //默认请求配置
                .setRetryHandler(myRetryHandler)               //重试策略
                .build();

        //创建一个Get请求,并重新设置请求参数,覆盖默认
        HttpGet httpget = new HttpGet("http://www.somehost.com/");
        RequestConfig requestConfig = RequestConfig.copy(defaultRequestConfig)
            .setSocketTimeout(5000)
            .setConnectTimeout(5000)
            .setConnectionRequestTimeout(5000)
            .setProxy(new HttpHost("myotherproxy", 8080))
            .build();
        httpget.setConfig(requestConfig);

        CloseableHttpResponse response = null;
        try {
            //执行请求
            response = httpclient.execute(httpget);

            HttpEntity entity = response.getEntity();

            // If the response does not enclose an entity, there is no need
            // to bother about connection release
            if (entity != null) {
                InputStream instream = entity.getContent();
                try {
                    instream.read();
                    // do something useful with the response
                }
                catch (IOException ex) {
                    // In case of an IOException the connection will be released
                    // back to the connection manager automatically
                    throw ex;
                }
                finally {
                    // Closing the input stream will trigger connection release
                    // 释放连接回到连接池
                    instream.close();
                }
            }
        }
        catch (Exception e) {
            e.printStackTrace();
        }
        finally{
            if(response != null){
                try {
                    //关闭连接(如果已经释放连接回连接池,则什么也不做)
                    response.close();
                } catch (IOException e) {
                    e.printStackTrace();
                }
            }

            if(httpclient != null){
                try {
                    //关闭连接管理器,并会关闭其管理的连接
                    httpclient.close();
                } catch (IOException e) {
                    e.printStackTrace();
                }
            }
        }
    }
}
上面的代码参考httpClient 4.3.x的官方样例,其实官方样例中可配置的更多,我只将一些觉得平时常用的摘了出来,其实我们在实际使用中也是使用默认的 socketConfig 和 connectionConfig。具体参数含义请看注释。
个人感觉在实际应用中连接数相关配置(如maxTotal、maxPerRoute),还有请求相关的超时时间设置(如connectionTimeout、socketTimeout、connectionRequestTimeout)是比较重要的。
连接数配置有问题就可能产生总的 连接数不够 或者 到某个路由的连接数太小 的问题,我们公司一些项目总连接数800,而defaultMaxPerRoute仅为20,这样导致真正需要比较多连接数,访问量比较大的路由也仅能从连接池中获取最大20个连接,应该在默认的基础上,针对访问量大的路由单独设置。
连接超时时间,读超时时间,从池中获取连接的超时时间如果不设置或者设置的太大,可能导致当业务高峰时,服务端响应较慢 或 连接池中确实没有空闲连接时,不能够及时将timeout异常抛出来,导致等待读取数据的,或者等待从池中获取连接的越积越多,像滚雪球一样,导致相关业务都开始变得缓慢,而如果配置合理的超时时间就可以及时抛出异常,发现问题。
后面会尽量去阐述这些重要参数的原理以及如何配置一个合适的值。
二、执行原理及源码解读
1、创建HttpClient,执行request
/**
 * 创建httpClient
 */
CloseableHttpClient httpclient = HttpClients.custom()
                                 .setConnectionManager(connManager)             //连接管理器
                                 .setDefaultRequestConfig(defaultRequestConfig) //默认请求配置
                                 .setRetryHandler(myRetryHandler)               //重试策略
                                 .build();
创建HttpClient的过程就是在设置了“连接管理器”、“请求相关配置”、“重试策略”后,调用 HttpClientBuilder.build()。
build()方法会根据设置的属性不同,创建不同的Executor执行器,如设置了retryHandler就会 new RetryExec(execChain, retryHandler),相当于retry Executor。当然有些Executor是必须创建的,如MainClientExec、ProtocolExec。最后new InternalHttpClient(execChain, connManager, routePlanner …)并返回。
CloseableHttpResponse httpResponse = httpClient.execute(httpUriRequest);
HttpClient使用了责任链模式,所有Executor都实现了ClientExecChain接口的execute()方法,每个Executor都持有下一个要执行的Executor的引用,这样就会形成一个Executor的执行链条,请求在这个链条上传递。按照上面的方式构造的httpClient形成的执行链条为:
HttpRequestExecutor                              //发送请求报文,并接收响应信息
MainClientExec(requestExec, connManager, ...)    //main Executor,负责连接管理相关
ProtocolExec(execChain, httpprocessor)           //HTTP协议封装
RetryExec(execChain, retryHandler)               //重试策略
RedirectExec(execChain, routePlanner, redirectStrategy)   //重定向
请求执行是按照从下到上的顺序(即每个下面的Executor都持有上面一个Executor的引用),每一个执行器都会负责请求过程中的一部分工作,最终返回response。
2、连接池管理
2.1、连接池结构
连接池结构图如下:
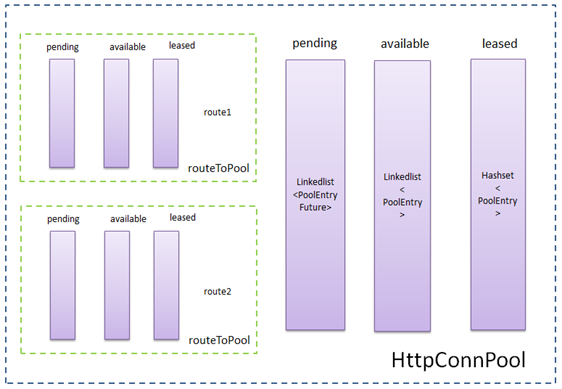
PoolEntry<HttpRoute, ManagedHttpClientConnection> — 连接池中的实体
包含ManagedHttpClientConnection连接;
连接的route路由信息;
以及连接存活时间相隔信息,如created(创建时间),updated(更新时间,释放连接回连接池时会更新),validUnit(用于初始化expiry过期时间,规则是如果timeToLive>0,则为created+timeToLive,否则为Long.MAX_VALUE),expiry(过期时间,人为规定的连接池可以保有连接的时间,除了初始化时等于validUnit,每次释放连接时也会更新,但是从newExpiry和validUnit取最小值)。timeToLive是在构造连接池时指定的连接存活时间,默认构造的timeToLive=-1。
ManagedHttpClientConnection是httpClient连接,真正建立连接后,其会bind绑定一个socket,用于传输HTTP报文。
LinkedList<PoolEntry> available — 存放可用连接
使用完后所有可重用的连接回被放到available链表头部,之后再获取连接时优先从available链表头部迭代可用的连接。
之所以使用LinkedList是利用了其队列的特性,即可以在队首和队尾分别插入、删除。入available链表时都是addFirst()放入头部,获取时都是从头部依次迭代可用的连接,这样可以获取到最新放入链表的连接,其离过期时间更远(这种策略可以尽量保证获取到的连接没有过期,而从队尾获取连接是可以做到在连接过期前尽量使用,但获取到过期连接的风险就大了),删除available链表中连接时是从队尾开始,即先删除最可能快要过期的连接。
HashSet<PoolEntry> leased — 存放被租用的连接
所有正在被使用的连接存放的集合,只涉及 add() 和 remove() 操作。
maxTotal限制的是外层httpConnPool中leased集合和available队列的总和的大小,leased和available的大小没有单独限制。
LinkedList<PoolEntryFuture> pending — 存放等待获取连接的线程的Future
当从池中获取连接时,如果available链表没有现成可用的连接,且当前路由或连接池已经达到了最大数量的限制,也不能创建连接了,此时不会阻塞整个连接池,而是将当前线程用于获取连接的Future放入pending链表的末尾,之后当前线程调用await(),释放持有的锁,并等待被唤醒。
当有连接被release()释放回连接池时,会从pending链表头获取future,并唤醒其线程继续获取连接,做到了先进先出。
routeToPool — 每个路由对应的pool
也有针对当前路由的available、leased、pending集合,与整个池的隔离。
maxPerRoute限制的是routeToPool中leased集合和available队列的总和的大小。
2.2、分配连接 & 建立连接
分配连接
分配连接指的是从连接池获取可用的PoolEntry,大致过程为:
1、获取route对应连接池routeToPool中可用的连接,有则返回该连接,若没有则转入下一步;
2、若routeToPool和外层HttpConnPool连接池均还有可用的空间,则新建连接,并将该连接作为可用连接返回,否则进行下一步;
3、挂起当前线程,将当前线程的Future放入pending队列,等待后续唤醒执行;
整个分配连接的过程采用了异步操作,只在前两步时锁住连接池,一旦发现无法获取连接则释放锁,等待后续继续获取连接。
建立连接
当分配到PoolEntry连接实体后,会调用establishRoute(),建立socket连接并与conn绑定。
2.3、回收连接 & 保持连接
回收连接
连接用完之后连接池需要进行回收(AbstractConnPool#release()),具体流程如下:
1、若当前连接标记为重用,则将该连接从routeToPool中的leased集合删除,并添加至available队首,同样的将该请求从外层httpConnPool的leased集合删除,并添加至其available队首。同时唤醒该routeToPool的pending队列的第一个PoolEntryFuture,将其从pending队列删除,并将其从外层httpConnPool的pending队列中删除。
2、若连接没有标记为重用,则分别从routeToPool和外层httpConnPool中删除该连接,并关闭该连接。
保持连接
MainClientExec#execute()是负责连接管理的,在执行完后续调用链,并得到response后,会调用保持连接的逻辑,如下:
// The connection is in or can be brought to a re-usable state.
// 根据response头中的信息判断是否保持连接
if (reuseStrategy.keepAlive(response, context)) {
    // Set the idle duration of this connection
    // 根据response头中的keep-alive中的timeout属性,得到连接可以保持的时间(ms)
    final long duration = keepAliveStrategy.getKeepAliveDuration(response, context);
    if (this.log.isDebugEnabled()) {
        final String s;
        if (duration > 0) {
            s = "for " + duration + " " + TimeUnit.MILLISECONDS;
        } else {
            s = "indefinitely";
        }
        this.log.debug("Connection can be kept alive " + s);
    }
    //设置连接保持时间,最终是调用 PoolEntry#updateExpiry
    connHolder.setValidFor(duration, TimeUnit.MILLISECONDS);
    connHolder.markReusable(); //设置连接reuse=true
}
else {
    connHolder.markNonReusable();
}
连接是否保持
客户端如果希望保持长连接,应该在发起请求时告诉服务器希望服务器保持长连接(http 1.0设置connection字段为keep-alive,http 1.1字段默认保持)。根据服务器的响应来确定是否保持长连接,判断原则如下:
1、检查返回response报文头的Transfer-Encoding字段,若该字段值存在且不为chunked,则连接不保持,直接关闭。其他情况进入下一步;
2、检查返回的response报文头的Content-Length字段,若该字段值为空或者格式不正确(多个长度,值不是整数)或者小于0,则连接不保持,直接关闭。其他情况进入下一步
3、检查返回的response报文头的connection字段(若该字段不存在,则为Proxy-Connection字段)值,如果字段存在,若字段值为close 则连接不保持,直接关闭,若字段值为keep-alive则连接标记为保持。如果这俩字段都不存在,则http 1.1版本默认为保持,将连接标记为保持, 1.0版本默认为连接不保持,直接关闭。
连接保持时间
连接交还至连接池时,若连接标记为保持reuse=true,则将由连接管理器保持一段时间;若连接没有标记为保持,则直接从连接池中删除并关闭entry。
连接保持时,会更新PoolEntry的expiry到期时间,计算逻辑为:
1、如果response头中的keep-alive字段中timeout属性值存在且为正值:newExpiry = 连接归还至连接池时间System.currentTimeMillis() + timeout;
2、如timeout属性值不存在或为负值:newExpiry = Long.MAX_VALUE(无穷)
3、最后会和PoolEntry原本的expiry到期时间比较,选出一个最小值作为新的到期时间。
2.4、instream.close()、response.close()、httpclient.close()的区别
/**
 * This example demonstrates the recommended way of using API to make sure
 * the underlying connection gets released back to the connection manager.
 */
public class ClientConnectionRelease {

    public final static void main(String[] args) throws Exception {
        CloseableHttpClient httpclient = HttpClients.createDefault();
        try {
            HttpGet httpget = new HttpGet("http://localhost/");

            System.out.println("Executing request " + httpget.getRequestLine());
            CloseableHttpResponse response = httpclient.execute(httpget);
            try {
                System.out.println("----------------------------------------");
                System.out.println(response.getStatusLine());

                // Get hold of the response entity
                HttpEntity entity = response.getEntity();

                // If the response does not enclose an entity, there is no need
                // to bother about connection release
                if (entity != null) {
                    InputStream instream = entity.getContent();
                    try {
                        instream.read();
                        // do something useful with the response
                    } catch (IOException ex) {
                        // In case of an IOException the connection will be released
                        // back to the connection manager automatically
                        throw ex;
                    } finally {
                        // Closing the input stream will trigger connection release
                        instream.close();
                    }
                }
            } finally {
                response.close();
            }
        } finally {
            httpclient.close();
        }
    }
}
在HttpClient Manual connection release的例子中可以看到,从内层依次调用的是instream.close()、response.close()、httpClient.close(),那么它们有什么区别呢?
instream.close()
在主动操作输入流,或者调用EntityUtils.toString(httpResponse.getEntity())时会调用instream.read()、instream.close()等方法。instream的实现类为org.apache.http.conn.EofSensorInputStream。
在每次通过instream.read()读取数据流后,都会判断流是否读取结束
@Override
public int read(final byte[] b, final int off, final int len) throws IOException {
    int l = -1;
    if (isReadAllowed()) {
        try {
            l = wrappedStream.read(b,  off,  len);
            checkEOF(l);
        } catch (final IOException ex) {
            checkAbort();
            throw ex;
        }
    }
    return l;
}
在EofSensorInputStream#checkEOF()方法中如果eof=-1,流已经读完,如果连接可重用,就会尝试释放连接,否则关闭连接。
protected void checkEOF(final int eof) throws IOException {
    if ((wrappedStream != null) && (eof < 0)) {
        try {
            boolean scws = true; // should close wrapped stream?
            if (eofWatcher != null) {
                scws = eofWatcher.eofDetected(wrappedStream);
            }
            if (scws) {
                wrappedStream.close();
            }
        } finally {
            wrappedStream = null;
        }
    }
}
ResponseEntityWrapper#eofDetected
public boolean eofDetected(final InputStream wrapped) throws IOException {
    try {
        // there may be some cleanup required, such as
        // reading trailers after the response body:
        wrapped.close();
        releaseConnection(); //释放连接 或 关闭连接
    } finally {
        cleanup();
    }
    return false;
}
ConnectionHolder#releaseConnection
public void releaseConnection() {
    synchronized (this.managedConn) {
        //如果连接已经释放,直接返回
        if (this.released) {
            return;
        }

        this.released = true;
        //连接可重用,释放回连接池
        if (this.reusable) {
            this.manager.releaseConnection(this.managedConn,
                    this.state, this.validDuration, this.tunit);
        }
        //不可重用,关闭连接
        else {
            try {
                this.managedConn.close();
                log.debug("Connection discarded");
            } catch (final IOException ex) {
                if (this.log.isDebugEnabled()) {
                    this.log.debug(ex.getMessage(), ex);
                }
            } finally {
                this.manager.releaseConnection(
                        this.managedConn, null, 0, TimeUnit.MILLISECONDS);
            }
        }
    }
}
如果没有instream.read()读取数据,在instream.close()时会调用EofSensorInputStream#checkClose(),也会有类似上面的逻辑。
所以就如官方例子注释的一样,在正常操作输入流后,会释放连接。
response.close()
最终是调用ConnectionHolder#abortConnection()
public void abortConnection() {
    synchronized (this.managedConn) {
        //如果连接已经释放,直接返回
        if (this.released) {
            return;
        }
        this.released = true;
        try {
            //关闭连接
            this.managedConn.shutdown();
            log.debug("Connection discarded");
        } catch (final IOException ex) {
            if (this.log.isDebugEnabled()) {
                this.log.debug(ex.getMessage(), ex);
            }
        } finally {
            this.manager.releaseConnection(
                    this.managedConn, null, 0, TimeUnit.MILLISECONDS);
        }
    }
}
所以,如果在调用response.close()之前,没有读取过输入流,也没有关闭输入流,那么连接没有被释放,released=false,就会关闭连接。
httpClient.close()
最终调用的是InternalHttpClient#close(),会关闭整个连接管理器,并关闭连接池中所有连接。
public void close() {
    this.connManager.shutdown();
    if (this.closeables != null) {
        for (final Closeable closeable: this.closeables) {
            try {
                closeable.close();
            } catch (final IOException ex) {
                this.log.error(ex.getMessage(), ex);
            }
        }
    }
}
总结:
1、使用连接池时,要正确释放连接需要通过读取输入流 或者 instream.close()方式;
2、如果已经释放连接,response.close()直接返回,否则会关闭连接;
3、httpClient.close()会关闭连接管理器,并关闭其中所有连接,谨慎使用。
2.5、过期和空闲连接清理
在连接池保持连接的这段时间,可能出现两种导致连接过期或失效的情况:
1、连接保持时间到期
每个连接对象PoolEntry都有expiry到期时间,在创建和释放归还连接是都会为expiry到期时间赋值,在连接池保持连接的这段时间,连接已经到了过期时间(注意,这个过期时间是为了管理连接所设定的,并不是指的TCP连接真的不能使用了)。
对于这种情况,在每次从连接池获取连接时,都会从routeToPool的available队列获取Entry并检测此时Entry是否已关闭或者已过期,若是则关闭并分别从routeToPool、httpConnPool的available队列移除该Entry,之后再次尝试获取连接。代码如下
/**AbstractConnPool#getPoolEntryBlocking()*/
for (;;) {
    //从availabe链表头迭代查找符合state的entry
    entry = pool.getFree(state);
    //找不到entry,跳出
    if (entry == null) {
        break;
    }
    //如果entry已关闭或已过期,关闭entry,并从routeToPool、httpConnPool的available队列移除
    if (entry.isClosed() || entry.isExpired(System.currentTimeMillis())) {
        entry.close();
        this.available.remove(entry);
        pool.free(entry, false);
    }
    else {  //找到可用连接
        break;
    }
}
2、底层连接已被关闭
在连接池保持连接的时候,可能会出现连接已经被服务端关闭的情况,而此时连接的客户端并没有阻塞着去接收服务端的数据,所以客户端不知道连接已关闭,无法关闭自身的socket。
对于这种情况,在从连接池获取可用连接时无法知晓,在获取到可用连接后,如果连接是打开的,会有判断连接是否陈旧的逻辑,如下
/**MainClientExec#execute()*/
if (config.isStaleConnectionCheckEnabled()) {
    // validate connection
    if (managedConn.isOpen()) {
        this.log.debug("Stale connection check");
        if (managedConn.isStale()) {
            this.log.debug("Stale connection detected");
            managedConn.close();
        }
    }
}
isOpen()会通过连接的状态判断连接是否是open状态;
isStale()会通过socket输入流尝试读取数据,在读取前暂时将soTimeout设置为1ms,如果读取到的字节数小于0,即已经读到了输入流的末尾,或者发生了IOException,可能连接已经关闭,那么isStale()返回true,需要关闭连接;如果读到的字节数大于0,或者发生了SocketTimeoutException,可能是读超时,isStale()返回false,连接还可用。
/**BHttpConnectionBase#isStale()*/
public boolean isStale() {
    if (!isOpen()) {
        return true;
    }
    try {
        final int bytesRead = fillInputBuffer(1);
        return bytesRead < 0;
    } catch (final SocketTimeoutException ex) {
        return false;
    } catch (final IOException ex) {
        return true;
    }
}
如果在整个判断过程中发现连接是陈旧的,就会关闭连接,那么这个从连接池获取的连接就是不可用的,后面的代码逻辑里会重建当前PoolEntry的socket连接,继续后续请求逻辑。
后台监控线程检查连接
上述过程是在从连接池获取连接后,检查连接是否可用,如不可用需重新建立socket连接,建立连接的过程是比较耗时的,可能导致性能问题,也失去了连接池的意义,针对这种情况,HttpClient采取一个策略,通过一个后台的监控线程定时的去检查连接池中连接是否还“新鲜”,如果过期了,或者空闲了一定时间则就将其从连接池里删除掉。
ClientConnectionManager提供了 closeExpiredConnections()和closeIdleConnections()两个方法,关闭过期或空闲了一段时间的连接,并从连接池删除。
closeExpiredConnections()
该方法关闭超过连接保持时间的连接,并从池中移除。
closeIdleConnections(timeout,tunit)
该方法关闭空闲时间超过timeout的连接,空闲时间从交还给连接池时开始,不管是否已过期,超过空闲时间则关闭。
下面是httpClient官方给出的清理过期、空闲连接的例子
public static class IdleConnectionMonitorThread extends Thread {

    private final ClientConnectionManager connMgr;
    private volatile boolean shutdown;

    public IdleConnectionMonitorThread(ClientConnectionManager connMgr) {
        super();
        this.connMgr = connMgr;
    }

    @Override
    public void run() {
        try {
            while (!shutdown) {
                synchronized (this) {
                    wait(5000);
                    // Close expired connections
                    connMgr.closeExpiredConnections();
                    // Optionally, close connections
                    // that have been idle longer than 30 sec
                    connMgr.closeIdleConnections(30, TimeUnit.SECONDS);
                }
            }
        } catch (InterruptedException ex) {
            // terminate
        }
    }

    public void shutdown() {
        shutdown = true;
        synchronized (this) {
            notifyAll();
        }
    }
}
三、如何设置合理的参数
关于设置合理的参数,这个说起来真的不是一个简单的话题,需要考虑的方面也听到,是需要一定经验的,这里先简单的说一下自己的理解,欢迎各位批评指教。
这里主要涉及两部分参数:连接数相关参数、超时时间相关参数
1、连接数相关参数
根据“利尔特法则”可以得到简单的公式:

简单地说,利特尔法则解释了这三种变量的关系:L—系统里的请求数量、λ—请求到达的速率、W—每个请求的处理时间。例如,如果每秒10个请求到达,处理一个请求需要1秒,那么系统在每个时刻都有10个请求在处理。如果处理每个请求的时间翻倍,那么系统每时刻需要处理的请求数也翻倍为20,因此需要20个线程。连接池的大小可以参考 L。
qps指标可以作为“λ—请求到达的速率”,由于httpClient是作为http客户端,故需要通过一些监控手段得到服务端集群访问量较高时的qps,如客户端集群为4台,服务端集群为2台,监控到每台服务端机器的qps为100,如果每个请求处理时间为1秒,那么2台服务端每个时刻总共有 100 * 2 * 1s = 200 个请求访问,平均到4台客户端机器,每台要负责50,即每台客户端的连接池大小可以设置为50。
当然实际的情况是更复杂的,上面的请求平均处理时间1秒只是一种业务的,实际情况的业务情况更多,评估请求平均处理时间更复杂。所以在设置连接数后,最好通过比较充分性能测试验证是否可以满足要求。
还有一些Linux系统级的配置需要考虑,如单个进程能够打开的最大文件描述符数量open files默认为1024,每个与服务端建立的连接都需要占用一个文件描述符,如果open files值太小会影响建立连接。
还要注意,连接数主要包含maxTotal-连接总数、maxPerRoute-路由最大连接数,尤其是maxPerRoute默认值为2,很小,设置不好的话即使maxTotal再大也无法充分利用连接池。
2、超时时间相关参数
connectTimeout — 连接超时时间
根据网络情况,内网、外网等,可设置连接超时时间为2秒,具体根据业务调整
socketTimeout — 读超时时间(等待数据超时时间)
需要根据具体请求的业务而定,如请求的API接口从接到请求到返回数据的平均处理时间为1秒,那么读超时时间可以设置为2秒,考虑并发量较大的情况,也可以通过性能测试得到一个相对靠谱的值。
socketTimeout有默认值,也可以针对每个请求单独设置。
connectionRequestTimeout — 从池中获取连接超时时间
建议设置500ms即可,不要设置太大,这样可以使连接池连接不够时不用等待太久去获取连接,不要让大量请求堆积在获取连接处,尽快抛出异常,发现问题。