
目录:
【python常用代码】
【python常用模块】
【python常用库】
【python第三方标准库】
python常用代码
判断文件或者文件夹是否存在
if(os.path.exists(rootdir) == False)
创建文件夹
os.mkdir(rootdir)
调用系统命令
os.system(cmd)
字典循环
for key,value in dict.items()
打开文件并读取内容进行处理
fd = open(‘xxxx.txt’, encoding=’utf-8′)
for line in fd:
print line
fd.close()
创建文件并写入内容
fd = open(‘xxxx.txt’, ‘a+’, encoding=’utf-8′)
fd.write(‘aaaaa’ + ‘\n’)
fd.close()
使用xlrd读取EXCEL
导入
import xlrd
打开excel
data = xlrd.open_workbook(‘demo.xls’) #注意这里的workbook首字母是小写
查看文件中包含sheet的名称
data.sheet_names()
得到第一个工作表,或者通过索引顺序 或 工作表名称
table = data.sheets()[0]
table = data.sheet_by_index(0)
table = data.sheet_by_name(u’Sheet1′)
获取行数和列数
nrows = table.nrows
ncols = table.ncols
获取整行和整列的值(数组)
table.row_values(i)
table.col_values(i)
循环行,得到索引的列表
for rownum in range(table.nrows):
print table.row_values(rownum)
单元格
cell_A1 = table.cell(0,0).value
cell_C4 = table.cell(2,3).value
分别使用行列索引
cell_A1 = table.row(0)[0].value
cell_A2 = table.col(1)[0].value
简单的写入
row = 0
col = 0
ctype = 1 # 类型 0 empty,1 string, 2 number, 3 date, 4 boolean, 5 error
value = ‘lixiaoluo’
xf = 0 # 扩展的格式化 (默认是0)
table.put_cell(row, col, ctype, value, xf)
table.cell(0,0) # 文本:u’lixiaoluo’
table.cell(0,0).value # ‘lixiaoluo’
使用xlwt写入EXCEL
导入xlwt
import xlwt
新建一个excel文件
file = xlwt.Workbook() #注意这里的Workbook首字母是大写,无语吧
新建一个sheet
table = file.add_sheet(‘sheet name’)
写入数据table.write(行,列,value)
table.write(0,0,’test’)
如果对一个单元格重复操作,会引发
returns error:
Exception: Attempt to overwrite cell:
sheetname=u’sheet 1′ rowx=0 colx=0
所以在打开时加cell_overwrite_ok=True解决
table = file.add_sheet(‘sheet name’,cell_overwrite_ok=True)
保存文件
file.save(‘demo.xls’)
另外,使用style
style = xlwt.XFStyle() #初始化样式
font = xlwt.Font() #为样式创建字体
font.name = ‘Times New Roman’
font.bold = True
style.font = font #为样式设置字体
table.write(0, 0, ‘some bold Times text’, style) # 使用样式
命令行getopt
try:
options,args = getopt.getopt(sys.argv[1:],”hp:i:”,[“help”,”ip=”,”port=”])
except getopt.GetoptError:
sys.exit()
for name,value in options:
if name in (“-h”,”–help”):
usage()
if name in (“-i”,”–ip”):
print(value)
if name in (“-p”,”–port”):
print(value)
简单爬虫
import requests
AGENT = ‘Mozilla/5.0 (Macintosh; Intel Mac OS X 10_10_3) AppleWebKit/537.36 (KHTML, like Gecko) Chrome/52.0.2743.116 Safari/537.36’
HEADERS = {
‘User-Agent’: AGENT,
‘Content-Type’:’application/x-www-form-urlencoded; charset=UTF-8′,
‘X-Requested-With’:’XMLHttpRequest’,
‘Accept’:’/‘
session = requests.session()
模拟登录
postdata = {
‘defaults’:’xxx’,
‘fromLogin’:’xxx’,
‘userName’:’xxx’,
‘password’:’xxxx’
}
url = ‘xxxxxxxx’
login_info = session.post(url, headers = HEADERS, data = postdata,verify = False)
if(login_info.status_code == requests.codes.ok):
print(‘login success’)
return True
else:
print(‘login err’)
return False
}
下载html页面
def downloadUrl(rootdir, url, orgid, page):
html = session.get(url, headers=global_config.HEADERS, verify=False)
if(html.text[1:7] == ‘script’):
print(html.text)
return “err”
if(len(html.text) < 60):
return “err”
sample = open(rootdir + “/” + str(orgid) + ‘_’ + str(page) + “.html”, “w”, encoding=’utf-8′)
sample.write(html.text)
sample.close()
return ‘ok’
解析JOSN文件内容
def scrapy_by_file(json_file_name):
#读取JSON文件的内容
text = open(json_file_name, encoding=’utf-8′).read()
#特殊处理,去除从WINDOWS系统带过来的BOM特殊字符
if text.startswith(u’\ufeff’):
text = text.encode(‘utf8’)[3:].decode(‘utf8’)
#将文本内容的JSON数据转换成自定义的JSON对象
try:
json_data = json.loads(text)
except:
print(json_file_name)
return
for row in json_data[‘rows’]:
def scrapy_by_row(row):
try:
orgid = row[‘organization’][‘id’]
familyid = row[‘censusRegisterFamily’][‘id’]
except:
print(‘errrr’)
return
scrapy_by_row(row)
遍历文件夹
遍历目录(rootdir) 遍历到的每个文件都执行dirFunc
def waklThroughDir(rootdir, dirFunc):
for parent, dirnames, filenames in os.walk(rootdir):
for filename in filenames:
print(filename)
#获取后缀为txt的文件
if(filename.split(‘.’)[-1] == ‘html’):
dirFunc(os.path.join(parent, filename))
采集温州房产网基本信息
–– coding: utf-8 ––
import re
import requests
import time
—————————–用于解析的正则表达式常量——————————————————————
解析页数
PAGE_NUM = ‘共找到 (.*?) 符合条件的记录’
解析小区名称
NAME = ‘texttext_title”>’
解析小区价格
PRICE = ‘class=”hot_price”>(.*?)’
解析小区地址
ADDRESS = ‘text_moreinfo”>(.*?)’
文件生成路径
ROOTDIR = ‘F:\test\’
—————————–模拟请求的头部信息,否则将被识别出是程序抓包而被拦截————————————–
HEADERS = {
‘Accept’: ‘text/html,application/xhtml+xml,application/xml;q=0.9,image/webp,/;q=0.8′,
‘Accept-Encoding’: ‘gzip, deflate, sdch’,
‘User-Agent’: ‘Mozilla/5.0 (Windows NT 6.1; WOW64) AppleWebKit/537.36 (KHTML, like Gecko) Chrome/51.0.2704.106 Safari/537.36’,
‘Host’: ‘www.0577home.net’,
‘Upgrade-Insecure-Requests’: ‘1’
}
—————————–抓取某一页的房产信息,pageNo为页号——————————————————–
def getHouseListByPageno(pageNo):
#建立一个连接用于后续发起请求
session = requests.session()
url = ‘http://www.tianqiweiqi.com/xiaoqu/list_0_0_0_0_0_0_0_’ + str(pageNo) + ‘.html’
houseList = session.get(url, headers = HEADERS, verify = False)
#以写入模式打开文件
fh = open(ROOTDIR + “houseList_pageNo” + str(pageNo) + “.txt”, ‘w’ ,encoding=’utf-8′)
#将movieList写入文件
fh.write(houseList.text)
#关闭文件
fh.close()
——————————-获取需要抓取的页面总数——————————————————————
def getPageNum():
#打开已经下载好的第一页房产内容
f = open(ROOTDIR + ‘houseList_pageNo1.txt’, encoding=’utf-8′)
#获取文件内容
rawContent = f.read()
#用正则表达式解析页面内容
pageNum = re.findall(PAGE_NUM, rawContent)
#返回页面号
return int(pageNum[0]) / 20 + 1
def parseHouseListToFile(srcFile, dstFile):
#打开待解析的文件
f = open(srcFile, encoding=’utf-8′)
#读取文件内容以备解析
rawContent = f.read()
p = re.compile(‘\s+’)
content = re.sub(p, ”, rawContent)
dnames = re.findall(NAME, content)
names = []
for dname in dnames:
idx = dname.rfind(‘>’)
names.append(dname[idx + 1:])
prices = re.findall(PRICE, content)
daddress = re.findall(ADDRESS, content)
address = []
for daddr in daddress:
id = daddr.rfind(‘>’)
address.append(daddr[id + 1:])
i = 0
for x in names:
#写入时用’$’做分割,结尾加上回车符
dstFile.write(names[i] + ‘$’ + prices[i] + ‘$’ + address[i] + ‘\n’)
i = i + 1
——————————-主函数,下载并解析房产信息————————————————————–
if name == ‘main‘:
#———————抓取页面—————————–
#抓取第一页房产信息
getHouseListByPageno(1)
#通过第一页房产信息获取总共要抓取的页面数量
pageNum = getPageNum()
#抓取剩余的页面
for i in range(2, int(pageNum) + 1):
getHouseListByPageno(str(i))
#———————解析页面—————————–
#获取当前年月日
localtime = time.strftime(‘%Y%m%d’, time.localtime(time.time()))
#创建一个文件,文件名前面带上年月日
f = open(ROOTDIR + localtime + ‘_houseList.txt’, ‘a+’, encoding=’utf-8′)
#解析所有的页面
#for k in range(1, int(pageNum) + 1):
for k in range(1, 115):
parseHouseListToFile(ROOTDIR + “houseList_pageNo” + str(k) + “.txt”, f)
#关闭文件
f.close()
采集温州房产网详细信息
–– coding: utf-8 ––
import re
import requests
import time
import os
—————————–用于解析的正则表达式常量——————————————————————
解析页数
PAGE_NUM = ‘共找到 (.*?) 符合条件的记录’
解析小区名称
NAME = ‘texttext_title”>’
解析小区价格
PRICE = ‘class=”hot_price”>(.*?)’
解析小区地址
ADDRESS = ‘text_moreinfo”>(.*?)’
解析小区编号
ID = ‘class=”picdiv_left”><ahref=”http://www.tianqiweiqi.com/xiaoqu/(.*?).html’
解析小区所属区域
LOCATION = ‘所属区域:(.*?)’
解析小区占地面积
AREA = ‘占地面积:(.*?)’
解析小区绿化率
GREENINGRATE = ‘绿化率:(.*?)’
解析小区楼总数
LAYER = ‘楼总数:(.*?)’
解析小区物业类型
TYPE = ‘物业类型:(.*?)’
解析小区所属小学
PRIMARYSCHOOL = ‘所属小学:(.*?)’
解析小区总建筑面积
BUILDINGAREA = ‘总建筑面积:(.*?)’
解析小区容积率
PLOTRATIO = ‘容积率:(.*?)’
解析小区开发商
DEVEPLOPER = ‘开发商:(.*?)’
文件生成路径
ROOTDIR = ‘F:\test\’
—————————–模拟请求的头部信息,否则将被识别出是程序抓包而被拦截————————————–
HEADERS = {
‘Accept’: ‘text/html,application/xhtml+xml,application/xml;q=0.9,image/webp,/;q=0.8′,
‘Accept-Encoding’: ‘gzip, deflate, sdch’,
‘User-Agent’: ‘Mozilla/5.0 (Windows NT 6.1; WOW64) AppleWebKit/537.36 (KHTML, like Gecko) Chrome/51.0.2704.106 Safari/537.36’,
‘Host’: ‘www.0577home.net’,
‘Upgrade-Insecure-Requests’: ‘1’
}
—————————–抓取某一页的房产信息,pageNo为页号——————————————————–
def getHouseListByPageno(pageNo):
#建立一个连接用于后续发起请求
session = requests.session()
url = ‘http://www.tianqiweiqi.com/xiaoqu/list_0_0_0_0_0_0_0_’ + str(pageNo) + ‘.html’
houseList = session.get(url, headers = HEADERS, verify = False)
#以写入模式打开文件
fh = open(ROOTDIR + “houseList_pageNo” + str(pageNo) + “.txt”, ‘w’ ,encoding=’utf-8′)
#将movieList写入文件
fh.write(houseList.text)
#关闭文件
fh.close()
def getHouseInfoByPageno(pageNo, k):
if(os.path.exists(ROOTDIR + “houseInfo_pageNo” + str(pageNo) + “.html”)):
return
print(‘downloading !, count %s, page %s’ % (str(k), str(pageNo)))
#建立一个连接用于后续发起请求
session = requests.session()
url = ‘http://www.tianqiweiqi.com/xiaoqu/detail_’ + str(pageNo) + ‘.html’
houseList = session.get(url, headers = HEADERS, verify = False)
#以写入模式打开文件
fh = open(ROOTDIR + "houseInfo_pageNo" + str(pageNo) + ".html",  'w' ,encoding='utf-8')
#将movieList写入文件
fh.write(houseList.text)
#关闭文件
fh.close()
——————————-获取需要抓取的页面总数——————————————————————
def getPageNum():
#打开已经下载好的第一页房产内容
f = open(ROOTDIR + ‘houseList_pageNo1.txt’, encoding=’utf-8′)
#获取文件内容
rawContent = f.read()
#用正则表达式解析页面内容
pageNum = re.findall(PAGE_NUM, rawContent)
#返回页面号
return int(pageNum[0]) / 20 + 1
def parseHouseInfo(srcFile):
#打开待解析的文件
f = open(srcFile, encoding=’utf-8′)
#读取文件内容以备解析
content = f.read()
# p = re.compile(‘\s+’)
# content = re.sub(p, ”, rawContent)
location = re.findall(LOCATION, content)[0]
location = location.split(‘ ‘)
category1 = location[0]
category2 = location[1]
area = re.findall(AREA, content)[0]
greeningrate = re.findall(GREENINGRATE, content)[0]
layer = re.findall(LAYER, content)[0]
type = re.findall(TYPE, content)[0]
primaryschool = re.findall(PRIMARYSCHOOL, content)[0]
buildingarea = re.findall(BUILDINGAREA, content)[0]
plotratio = re.findall(PLOTRATIO, content)[0]
developer = re.findall(DEVEPLOPER, content)[0]
f.close()
return (category1, category2, area, greeningrate, layer, type, primaryschool, buildingarea, plotratio, developer)
def parseHouseListToFile(srcFile, dstFile):
#打开待解析的文件
f = open(srcFile, encoding=’utf-8′)
#读取文件内容以备解析
rawContent = f.read()
p = re.compile(‘\s+’)
content = re.sub(p, ”, rawContent)
dnames = re.findall(NAME, content)
names = []
for dname in dnames:
idx = dname.rfind(‘>’)
names.append(dname[idx + 1:])
prices = re.findall(PRICE, content)
daddress = re.findall(ADDRESS, content)
ids = re.findall(ID, content)
address = []
for daddr in daddress:
id = daddr.rfind(‘>’)
address.append(daddr[id + 1:])
i = 0
f.close()
for x in names:
#写入时用’$’做分割,结尾加上回车符
dstFile.write(names[i] + ‘$’ + prices[i] + ‘$’ + address[i] + ‘$’ + ids[i] + ‘\n’)
i = i + 1
——————————-主函数,下载并解析房产信息————————————————————–
if name == ‘main‘:
#———————抓取页面—————————–
#抓取第一页房产信息
# getHouseListByPageno(1)
# #通过第一页房产信息获取总共要抓取的页面数量
# pageNum = getPageNum()
# #抓取剩余的页面
# for i in range(2, int(pageNum) + 1):
# getHouseListByPageno(str(i))
#———————解析页面—————————–
#获取当前年月日
localtime = time.strftime(‘%Y%m%d’, time.localtime(time.time()))
#创建一个文件,文件名前面带上年月日
f = open(ROOTDIR + localtime + ‘_houseList.txt’, ‘a+’, encoding=’utf-8′)
#解析所有的页面
#for k in range(1, int(pageNum) + 1):
for k in range(1, 115):
parseHouseListToFile(ROOTDIR + “houseList_pageNo” + str(k) + “.txt”, f)
#关闭文件
f.close()
f = open(ROOTDIR + localtime + ‘_houseList.txt’, encoding=’utf-8′)
fd = open(ROOTDIR + localtime + ‘_houseInfo.txt’, ‘w’, encoding=’utf-8′)
k = 0
for line in f:
data = line.strip(‘\n’)
data = data.split(‘$’)
idx = data[3]
getHouseInfoByPageno(idx, k)
houseInfo = parseHouseInfo(ROOTDIR + “houseInfo_pageNo” + str(idx) + “.html”)
print(str(k) + “$”.join(data) + ‘$’ + “$”.join(houseInfo))
fd.write(“$”.join(data) + ‘$’ + “$”.join(houseInfo) + ‘\n’)
k += 1
f.close()
fd.close()
读取csv文件
with open(‘job.csv’, ‘r’) as f:
reader = csv.reader(f)
for row in reader:
print(row)
写入csv文件
创建CSV文件并写入第一行
def createCsv(file):
if not os.path.exists(file):
csvfile = open(file, ‘a+’, encoding=’utf-8′, newline=”)
writer = csv.writer(csvfile)
writer.writerow(paramname)
else:
csvfile = open(file, ‘a+’, newline=”)
writer = csv.writer(csvfile)
return writer
python调用JAVA
import sys
import jpype
name = sys.argv[1]
jarpath = ‘/home/dsadm/why/python’
jpype.startJVM(jpype.getDefaultJVMPath(), “-Djava.ext.dirs=%s” % jarpath)
DECRYPT = jpype.JClass(‘why.fmrt.decrypt.DECRYPT’)
upperName =DECRYPT.decrypt(name)
print(upperName)
jpype.shutdownJVM()
简单验证码破解
from urllib.request import urlretrieve
from urllib.request import urlopen
from bs4 import BeautifulSoup
import subprocess
import requests
from PIL import Image
from PIL import ImageOps
def cleanImage(imagePath):
image = Image.open(imagePath)
image = image.point(lambda x: 0 if x<143 else 255)
borderImage = ImageOps.expand(image,border=20,fill=’white’)
borderImage.save(imagePath)
html = urlopen(“http://www.pythonscraping.com/humans-only”)
bsObj = BeautifulSoup(html, “html.parser”)
Gather prepopulated form values
imageLocation = bsObj.find(“img”, {“title”: “Image CAPTCHA”})[“src”]
formBuildId = bsObj.find(“input”, {“name”:”form_build_id”})[“value”]
captchaSid = bsObj.find(“input”, {“name”:”captcha_sid”})[“value”]
captchaToken = bsObj.find(“input”, {“name”:”captcha_token”})[“value”]
captchaUrl = “http://pythonscraping.com”+imageLocation
urlretrieve(captchaUrl, “captcha.jpg”)
cleanImage(“captcha.jpg”)
p = subprocess.Popen([“tesseract”, “captcha.jpg”, “captcha”], stdout=
subprocess.PIPE,stderr=subprocess.PIPE)
p.wait()
f = open(“captcha.txt”, “r”)
Clean any whitespace characters
captchaResponse = f.read().replace(” “, “”).replace(“\n”, “”)
print(“Captcha solution attempt: “+captchaResponse)
if len(captchaResponse) == 5:
params = {“captcha_token”:captchaToken, “captcha_sid”:captchaSid,
“form_id”:”comment_node_page_form”, “form_build_id”: formBuildId,
“captcha_response”:captchaResponse, “name”:”Ryan Mitchell”,
“subject”: “I come to seek the Grail”,
“comment_body[und][0][value]”:
“…and I am definitely not a bot”}
r = requests.post(“http://www.pythonscraping.com/comment/reply/10”,
data=params)
responseObj = BeautifulSoup(r.text)
if responseObj.find(“div”, {“class”:”messages”}) is not None:
print(responseObj.find(“div”, {“class”:”messages”}).get_text())
else:
print(“There was a problem reading the CAPTCHA correctly!”)
滑块验证码破解
from selenium import webdriver
from selenium.webdriver.support.ui import WebDriverWait
from selenium.webdriver.common.action_chains import ActionChains
import PIL.Image as image
import time,re, random
import requests
try:
from StringIO import StringIO
except ImportError:
from io import StringIO
爬虫模拟的浏览器头部信息
agent = ‘Mozilla/5.0 (Windows NT 5.1; rv:33.0) Gecko/20100101 Firefox/33.0’
headers = {
‘User-Agent’: agent
}
根据位置对图片进行合并还原
filename:图片
location_list:图片位置
内部两个图片处理函数的介绍
crop函数带的参数为(起始点的横坐标,起始点的纵坐标,宽度,高度)
paste函数的参数为(需要修改的图片,粘贴的起始点的横坐标,粘贴的起始点的纵坐标)
def get_merge_image(filename,location_list):
#打开图片文件
im = image.open(filename)
#创建新的图片,大小为260*116
new_im = image.new(‘RGB’, (260,116))
im_list_upper=[]
im_list_down=[]
# 拷贝图片
for location in location_list:
#上面的图片
if location[‘y’]==-58:
im_list_upper.append(im.crop((abs(location[‘x’]),58,abs(location[‘x’])+10,166)))
#下面的图片
if location[‘y’]==0:
im_list_down.append(im.crop((abs(location[‘x’]),0,abs(location[‘x’])+10,58)))
new_im = image.new(‘RGB’, (260,116))
x_offset = 0
#黏贴图片
for im in im_list_upper:
new_im.paste(im, (x_offset,0))
x_offset += im.size[0]
x_offset = 0
for im in im_list_down:
new_im.paste(im, (x_offset,58))
x_offset += im.size[0]
return new_im
下载并还原图片
driver:webdriver
div:图片的div
def get_image(driver,div):
#找到图片所在的div
background_images=driver.find_elements_by_xpath(div)
location_list=[]
imageurl=”
#图片是被CSS按照位移的方式打乱的,我们需要找出这些位移,为后续还原做好准备
for background_image in background_images:
location={}
#在html里面解析出小图片的url地址,还有长高的数值
location[‘x’]=int(re.findall(“background-image: url\”(.∗)\”\”(.∗)\”; background-position: (.)px (.)px;”,background_image.get_attribute(‘style’))[0][1])
location[‘y’]=int(re.findall(“background-image: url\”(.∗)\”\”(.∗)\”; background-position: (.)px (.)px;”,background_image.get_attribute(‘style’))[0][2])
imageurl=re.findall(“background-image: url\”(.∗)\”\”(.∗)\”; background-position: (.)px (.)px;”,background_image.get_attribute(‘style’))[0][0]
location_list.append(location)
#替换图片的后缀,获得图片的URL
imageurl=imageurl.replace(“webp”,”jpg”)
#获得图片的名字
imageName = imageurl.split(‘/’)[-1]
#获得图片
session = requests.session()
r = session.get(imageurl, headers = headers, verify = False)
#下载图片
with open(imageName, ‘wb’) as f:
f.write(r.content)
f.close()
#重新合并还原图片
image=get_merge_image(imageName, location_list)
return image
对比RGB值
def is_similar(image1,image2,x,y):
pass
#获取指定位置的RGB值
pixel1=image1.getpixel((x,y))
pixel2=image2.getpixel((x,y))
for i in range(0,3):
# 如果相差超过50则就认为找到了缺口的位置
if abs(pixel1[i]-pixel2[i])>=50:
return False
return True
计算缺口的位置
def get_diff_location(image1,image2):
i=0
# 两张原始图的大小都是相同的260*116
# 那就通过两个for循环依次对比每个像素点的RGB值
# 如果相差超过50则就认为找到了缺口的位置
for i in range(0,260):
for j in range(0,116):
if is_similar(image1,image2,i,j)==False:
return i
根据缺口的位置模拟x轴移动的轨迹
def get_track(length):
pass
list=[]
#间隔通过随机范围函数来获得,每次移动一步或者两步
x=random.randint(1,3)
#生成轨迹并保存到list内
while length-x>=5:
list.append(x)
length=length-x
x=random.randint(1,3)
#最后五步都是一步步移动
for i in range(length):
list.append(1)
return list
滑动验证码破解程序
def main():
#打开火狐浏览器
driver = webdriver.Firefox()
#用火狐浏览器打开网页
driver.get(“http://www.tianqiweiqi.com/exp_embed”)
#等待页面的上元素刷新出来
WebDriverWait(driver, 30).until(lambda the_driver: the_driver.find_element_by_xpath(“//div[@class=’gt_slider_knob gt_show’]”).is_displayed())
WebDriverWait(driver, 30).until(lambda the_driver: the_driver.find_element_by_xpath(“//div[@class=’gt_cut_bg gt_show’]”).is_displayed())
WebDriverWait(driver, 30).until(lambda the_driver: the_driver.find_element_by_xpath(“//div[@class=’gt_cut_fullbg gt_show’]”).is_displayed())
#下载图片
image1=get_image(driver, “//div[@class=’gt_cut_bg gt_show’]/div”)
image2=get_image(driver, “//div[@class=’gt_cut_fullbg gt_show’]/div”)
#计算缺口位置
loc=get_diff_location(image1, image2)
#生成x的移动轨迹点
track_list=get_track(loc)
#找到滑动的圆球
element=driver.find_element_by_xpath(“//div[@class=’gt_slider_knob gt_show’]”)
location=element.location
#获得滑动圆球的高度
y=location[‘y’]
#鼠标点击元素并按住不放
print (“第一步,点击元素”)
ActionChains(driver).click_and_hold(on_element=element).perform()
time.sleep(0.15)
print (“第二步,拖动元素”)
track_string = “”
for track in track_list:
#不能移动太快,否则会被认为是程序执行
track_string = track_string + “{%d,%d},” % (track, y – 445)
#xoffset=track+22:这里的移动位置的值是相对于滑动圆球左上角的相对值,而轨迹变量里的是圆球的中心点,所以要加上圆球长度的一半。
#yoffset=y-445:这里也是一样的。不过要注意的是不同的浏览器渲染出来的结果是不一样的,要保证最终的计算后的值是22,也就是圆球高度的一半
ActionChains(driver).move_to_element_with_offset(to_element=element, xoffset=track+22, yoffset=y-445).perform()
#间隔时间也通过随机函数来获得,间隔不能太快,否则会被认为是程序执行
time.sleep(random.randint(10,50)/100)
print (track_string)
#xoffset=21,本质就是向后退一格。这里退了5格是因为圆球的位置和滑动条的左边缘有5格的距离
ActionChains(driver).move_to_element_with_offset(to_element=element, xoffset=21, yoffset=y-445).perform()
time.sleep(0.1)
ActionChains(driver).move_to_element_with_offset(to_element=element, xoffset=21, yoffset=y-445).perform()
time.sleep(0.1)
ActionChains(driver).move_to_element_with_offset(to_element=element, xoffset=21, yoffset=y-445).perform()
time.sleep(0.1)
ActionChains(driver).move_to_element_with_offset(to_element=element, xoffset=21, yoffset=y-445).perform()
time.sleep(0.1)
ActionChains(driver).move_to_element_with_offset(to_element=element, xoffset=21, yoffset=y-445).perform()
print (“第三步,释放鼠标”)
#释放鼠标
ActionChains(driver).release(on_element=element).perform()
time.sleep(3)
#点击验证
# submit = driver.find_element_by_xpath(“//div[@class=’gt_ajax_tip success’]”)
# print(submit.location)
# time.sleep(5)
#关闭浏览器,为了演示方便,暂时注释掉.
#driver.quit()
主函数入口
if name == ‘main‘:
pass
main()
python构建web页面
import os
import tornado.httpserver
import tornado.ioloop
import tornado.options
import tornado.web
from view import *
from tornado.options import define, options
define(“port”, default=8000, help=”run on the given port”, type=int)
class Application(tornado.web.Application):
def init(self):
handlers = [
(r”/”, Indexhandler),
]
settings = dict(
template_path=os.path.join(os.path.dirname(file), ‘templates’),
autoescape=None,
debug=False,
)
tornado.web.Application.init(self, handlers, **settings)
if name == “main“:
tornado.options.parse_command_line()
http_server = tornado.httpserver.HTTPServer(Application(), xheaders=True)
http_server.listen(options.port)
tornado.ioloop.IOLoop.instance().start()
定时任务
! /usr/bin/env python
coding=utf-8
import time, os, sched
第一个参数确定任务的时间,返回从某个特定的时间到现在经历的秒数
第二个参数以某种人为的方式衡量时间
schedule = sched.scheduler(time.time, time.sleep)
def perform_command(cmd, inc):
# 安排inc秒后再次运行自己,即周期运行
schedule.enter(inc, 0, perform_command, (cmd, inc))
os.system(cmd)
def timming_exe(cmd, inc=60):
# enter用来安排某事件的发生时间,从现在起第n秒开始启动
schedule.enter(inc, 0, perform_command, (cmd, inc))
# 持续运行,直到计划时间队列变成空为止
schedule.run()
每隔一天调用getMovieList.py程序
timming_exe(“getMovieList.py”, 60 * 60 * 24)
通过百度地图API,标准化地址
from urllib.request import urlopen
from urllib.parse import urlencode
from urllib.error import URLError
import json
class xBaiduMap:<br>
    def <strong>init</strong>(self, key='mgf2Gxr7EgnfPVQnpClZnsug'):<br>
        self.host = 'http://api.map.baidu.com'<br>
        self.path = '/geocoder?'<br>
        self.param = {'address': None, 'output': 'json', 'key': key, 'location': None, 'city': None}
def getLocation(self, address, city=None):
    rlt = self.geocoding('address', address, city)
    if rlt != None:
        l = rlt['result']
        if isinstance(l, list):
            return None
        return l['location']['lat'], l['location']['lng']

def getAddress(self, lat, lng):
    rlt = self.geocoding('location', "{0},{1}".format(lat, lng))
    if rlt != None:
        l = rlt['result']
        #return l['formatted_address']
        # Here you can get more details about the location with 'addressComponent' key
        ld=rlt['result']['addressComponent']
        return (ld['city']+';'+ld['district']+';'+ld['street']+";"+ld['street_number'])

def geocoding(self, key, value, city=None):
    if key == 'location':
        if 'city' in self.param:
            del self.param['city']
        if 'address' in self.param:
            del self.param['address']

    elif key == 'address':
        if 'location' in self.param:
            del self.param['location']
        if city == None and 'city' in self.param:
            del self.param['city']
        else:
            self.param['city'] = city
    self.param[key] = value
    try:
        r = urlopen(self.host + self.path + urlencode(self.param)).read()
    except URLError:
        print ("URLError")
        return None

    str_response = r.decode('utf-8')
    rlt = json.loads(str_response)
    if rlt['status'] == 'OK':
        return rlt
    else:
        print ("Decoding Failed")
        return None
多进程
import multiprocessing
for process_id in range(PROCESS_NUM):
p = multiprocessing.Process(target=worker, args=(process_id,))
jobs.append(p)
p.start()
文件切割小程序
def split_file(file_name, file_num):
#文件已经存在
if(os.path.exists(“split_0.txt”)):
return
#统计文件的总行数
count = -1
file = open(file_name, encoding='utf-8')
for count, line in enumerate(file):
    pass
count += 1
file.close()

#每个文件的行数
count_per_file = count / file_num

#创建file_num个新文件
for i in range(file_num):
    file = open("split_" + str(i) + ".txt", 'w', encoding='utf-8')
    file.close()

#分割成file_num个新文件
file = open(file_name, encoding='utf-8')
count = -1
for count, line in enumerate(file):
    file_index = (int)(count /count_per_file)
    sub_file = open("split_" + str(file_index) + ".txt", "a+", encoding='utf-8')
    if(sub_file != None):
        sub_file.write(line)
python操作DB2
import ibm_db
con = ibm_db.connect(“DATABASE=FMRT;HOSTNAME=XX.XX.XX.XX;PORT=60000;PORTOCOL=TCPIP;UID=db2inst1;PWD=db2inst1;”, “”, “”)
sql = getSql(inputfile)
stmt = ibm_db.exec_immediate(con, sql)
result = ibm_db.fetch_both(stmt)
rowidx = 0
while (result):
#DO SOMETHING
result = ibm_db.fetch_both(stmt)
ibm_db.close(con)
jieba中文分词
import jieba
seg_list = jieba.cut(“我来到北京清华大学”, cut_all=True)
for line in seg_list:
print(line)
print(“Full Mode: ” + “/ “.join(seg_list)) # 全模式
seg_list = jieba.cut(“我来到北京清华大学”, cut_all=False)
print(“Default Mode: ” + “/ “.join(seg_list)) # 精确模式
seg_list = jieba.cut(“他来到了网易杭研大厦”) # 默认是精确模式
print(“, “.join(seg_list))
seg_list = jieba.cut_for_search(“小明硕士毕业于中国科学院计算所,后在日本京都大学深造”) # 搜索引擎模式
print(“, “.join(seg_list))
月末判断
import calendar
import sys
def isMonthEnd(datetime):
year = int(datetime[0:4])
month = int(datetime[4:6])
day = int(datetime[6:8])
wday, monthrange = calendar.monthrange(year, month)
if(day == monthrange):
return 1
else:
return 0
isMonthEnd(sys.argv[1])
移除中文分隔符
cmd = “sed ‘:a;N;$ s/\r\n//g;ba’ ” + oldfile + ” > ” + newfile
os.system(cmd)
多线程
–– coding: utf-8 ––
“””
thread
~~~~
Thread framework
:copyright: (c) 2016 by why.
:license: MIT, see LICENSE for more details.
“””
import threading
class Threadconfig():
def init(self, thread_size):
self.thread_size = thread_size
def topen(self):
    self.thread_tasks = []

def build(self, func, **kwargs):
    self.thread_task = threading.Thread(target=func, kwargs=(kwargs))
    self.thread_tasks.append(self.thread_task)

def run(self):
    for thread_task in self.thread_tasks:
        thread_task.setDaemon(True)
        thread_task.start()
    while 1:
        alive = False
        for thread_num in range(0, self.thread_size):
            alive = alive or self.thread_tasks[thread_num].isAlive()
        if not alive:
            break

def __del__(self):
self.thread_tasks = []
python常用库
python常用模块
OS 模块

#os模块就是对操作系统进行操作,使用该模块必须先导入模块:
import os

#getcwd() 获取当前工作目录(当前工作目录默认都是当前文件所在的文件夹)
result = os.getcwd()
print(result)

#chdir()改变当前工作目录
os.chdir('/home/sy')
result = os.getcwd()
print(result)

open('02.txt','w')

#操作时如果书写完整的路径则不需要考虑默认工作目录的问题,按照实际书写路径操作
open('/home/sy/下载/02.txt','w')

#listdir() 获取指定文件夹中所有内容的名称列表
result = os.listdir('/home/sy')
print(result)

#mkdir()  创建文件夹
#os.mkdir('girls')
#os.mkdir('boys',0o777)

#makedirs()  递归创建文件夹
#os.makedirs('/home/sy/a/b/c/d')

#rmdir() 删除空目录
#os.rmdir('girls')

#removedirs 递归删除文件夹  必须都是空目录
#os.removedirs('/home/sy/a/b/c/d')

#rename() 文件或文件夹重命名
#os.rename('/home/sy/a','/home/sy/alibaba'
#os.rename('02.txt','002.txt')

#stat() 获取文件或者文件夹的信息
#result = os.stat('/home/sy/PycharmProject/Python3/10.27/01.py)
#print(result)

#system() 执行系统命令(危险函数)
#result = os.system('ls -al')  #获取隐藏文件
#print(result)

#环境变量
'''
环境变量就是一些命令的集合
操作系统的环境变量就是操作系统在执行系统命令时搜索命令的目录的集合
'''
#getenv() 获取系统的环境变量
result = os.getenv('PATH')
print(result.split(':'))

#putenv() 将一个目录添加到环境变量中(临时增加仅对当前脚本有效)
#os.putenv('PATH','/home/sy/下载')
#os.system('syls')

#exit() 退出终端的命令

#os模块中的常用值
#curdir  表示当前文件夹   .表示当前文件夹  一般情况下可以省略
print(os.curdir)

#pardir  表示上一层文件夹   ..表示上一层文件夹  不可省略!
print(os.pardir)

#os.mkdir('../../../man')#相对路径  从当前目录开始查找
#os.mkdir('/home/sy/man1')#绝对路径  从根目录开始查找

#name 获取代表操作系统的名称字符串
print(os.name) #posix -> linux或者unix系统  nt -> window系统

#sep 获取系统路径间隔符号  window ->\    linux ->/
print(os.sep)

#extsep 获取文件名称和后缀之间的间隔符号  window & linux -> .
print(os.extsep)

#linesep  获取操作系统的换行符号  window -> \r\n  linux/unix -> \n
print(repr(os.linesep))


#导入os模块
import os

#以下内容都是os.path子模块中的内容

#abspath()  将相对路径转化为绝对路径
path = './boys'#相对
result = os.path.abspath(path)
print(result)

#dirname()  获取完整路径当中的目录部分  &  basename()获取完整路径当中的主体部分
path = '/home/sy/boys'
result = os.path.dirname(path)
print(result)

result = os.path.basename(path)
print(result)

#split() 将一个完整的路径切割成目录部分和主体部分
path = '/home/sy/boys'
result = os.path.split(path)
print(result)

#join() 将2个路径合并成一个
var1 = '/home/sy'
var2 = '000.py'
result = os.path.join(var1,var2)
print(result)

#splitext() 将一个路径切割成文件后缀和其他两个部分,主要用于获取文件的后缀
path = '/home/sy/000.py'
result = os.path.splitext(path)
print(result)

#getsize()  获取文件的大小
#path = '/home/sy/000.py'
#result = os.path.getsize(path)
#print(result)

#isfile() 检测是否是文件
path = '/home/sy/000.py'
result = os.path.isfile(path)
print(result)

#isdir()  检测是否是文件夹
result = os.path.isdir(path)
print(result)

#islink() 检测是否是链接
path = '/initrd.img.old'
result = os.path.islink(path)
print(result)

#getctime() 获取文件的创建时间 get create time
#getmtime() 获取文件的修改时间 get modify time
#getatime() 获取文件的访问时间 get active time

import time

filepath = '/home/sy/下载/chls'

result = os.path.getctime(filepath)
print(time.ctime(result))

result = os.path.getmtime(filepath)
print(time.ctime(result))

result = os.path.getatime(filepath)
print(time.ctime(result))

#exists() 检测某个路径是否真实存在
filepath = '/home/sy/下载/chls'
result = os.path.exists(filepath)
print(result)

#isabs() 检测一个路径是否是绝对路径
path = '/boys'
result = os.path.isabs(path)
print(result)

#samefile() 检测2个路径是否是同一个文件
path1 = '/home/sy/下载/001'
path2 = '../../../下载/001'
result = os.path.samefile(path1,path2)
print(result)


#os.environ 用于获取和设置系统环境变量的内置值
import os
#获取系统环境变量  getenv() 效果
print(os.environ['PATH'])

#设置系统环境变量 putenv()
os.environ['PATH'] += ':/home/sy/下载'
os.system('chls')
os 常用方法

os.remove(‘path/filename’) 删除文件

os.rename(oldname, newname) 重命名文件

os.walk() 生成目录树下的所有文件名

os.chdir('dirname') 改变目录

os.mkdir/makedirs('dirname')创建目录/多层目录

os.rmdir/removedirs('dirname') 删除目录/多层目录

os.listdir('dirname') 列出指定目录的文件

os.getcwd() 取得当前工作目录

os.chmod() 改变目录权限

os.path.basename(‘path/filename’) 去掉目录路径,返回文件名

os.path.dirname(‘path/filename’) 去掉文件名,返回目录路径

os.path.join(path1[,path2[,...]]) 将分离的各部分组合成一个路径名

os.path.split('path') 返回( dirname(), basename())元组

os.path.splitext() 返回 (filename, extension) 元组

os.path.getatime\ctime\mtime 分别返回最近访问、创建、修改时间

os.path.getsize() 返回文件大小

os.path.exists() 是否存在

os.path.isabs() 是否为绝对路径

os.path.isdir() 是否为目录

os.path.isfile() 是否为文件

 sys 模块

sys.argv 命令行参数List,第一个元素是程序本身路径

sys.modules.keys() 返回所有已经导入的模块列表

sys.exc_info() 获取当前正在处理的异常类,exc_type、exc_value、exc_traceback当前处理的异常详细信息

sys.exit(n) 退出程序,正常退出时exit(0)

sys.hexversion 获取Python解释程序的版本值,16进制格式如:0x020403F0

sys.version 获取Python解释程序的版本信息

sys.maxint 最大的Int值

sys.maxunicode 最大的Unicode值

sys.modules 返回系统导入的模块字段,key是模块名,value是模块

sys.path 返回模块的搜索路径,初始化时使用PYTHONPATH环境变量的值

sys.platform 返回操作系统平台名称

sys.stdout 标准输出

sys.stdin 标准输入

sys.stderr 错误输出

sys.exc_clear() 用来清除当前线程所出现的当前的或最近的错误信息

sys.exec_prefix 返回平台独立的python文件安装的位置

sys.byteorder 本地字节规则的指示器,big-endian平台的值是'big',little-endian平台的值是'little'

sys.copyright 记录python版权相关的东西

sys.api_version 解释器的C的API版本


sys.stdin,sys.stdout,sys.stderr

stdin , stdout , 以及stderr 变量包含与标准I/O 流对应的流对象. 如果需要更好地控制输出,而print 不能满足你的要求, 它们就是你所需要的. 你也可以替换它们, 这时候你就可以重定向输出和输入到其它设备( device ), 或者以非标准的方式处理它们

我们常用print和raw_input来进行输入和打印,那么print 和 raw_input是如何与标准输入/输出流建立关系的呢?
其实Python程序的标准输入/输出/出错流定义在sys模块中,分别 为: sys.stdin,sys.stdout, sys.stderr
下列的程序也可以用来输入和输出是一样的:
import sys

sys.stdout.write('HelloWorld!')

print 'Please enter yourname:',
name=sys.stdin.readline()[:-1]
print 'Hi, %s!' % name

那么sys.stdin, sys.stdout, stderr到底是什么呢?我们在Python运行环境中输入以下代码:
import sys
for f in (sys.stdin,sys.stdout, sys.stderr): print f
输出为:
<open file'<stdin>', mode 'r' at 892210>
<open file'<stdout>', mode 'w' at 892270>
<open file'<stderr>', mode 'w at 8922d0>

由此可以看出stdin, stdout, stderr在Python中无非都是文件属性的对象,他们在Python启动时自动与Shell 环境中的标准输入,输出,出错关联。
而Python程序的在Shell中的I/O重定向与本文开始时举的DOS命令的重定向完全相同,其实这种重定向是由Shell来提供的,与Python 本身并无关系。那么我们是否可以在Python程序内部将stdin,stdout,stderr读写操作重定向到一个内部对象呢?答案是肯定的。
Python提供了一个StringIO模块来完成这个设想,比如:
from StringIO import StringIO
import sys
buff =StringIO()

temp =sys.stdout                              #保存标准I/O流
sys.stdout =buff                                #将标准I/O流重定向到buff对象
print 42, 'hello', 0.001

sys.stdout=temp                                #恢复标准I/O流
print buff.getvalue()


time模块
 time模块中时间表现的格式主要有三种:
  a、timestamp时间戳,时间戳表示的是从1970年1月1日00:00:00开始按秒计算的偏移量
  b、struct_time时间元组,共有九个元素组。
  c、format time 格式化时间,已格式化的结构使时间更具可读性。包括自定义格式和固定格式。
1、时间格式转换图:
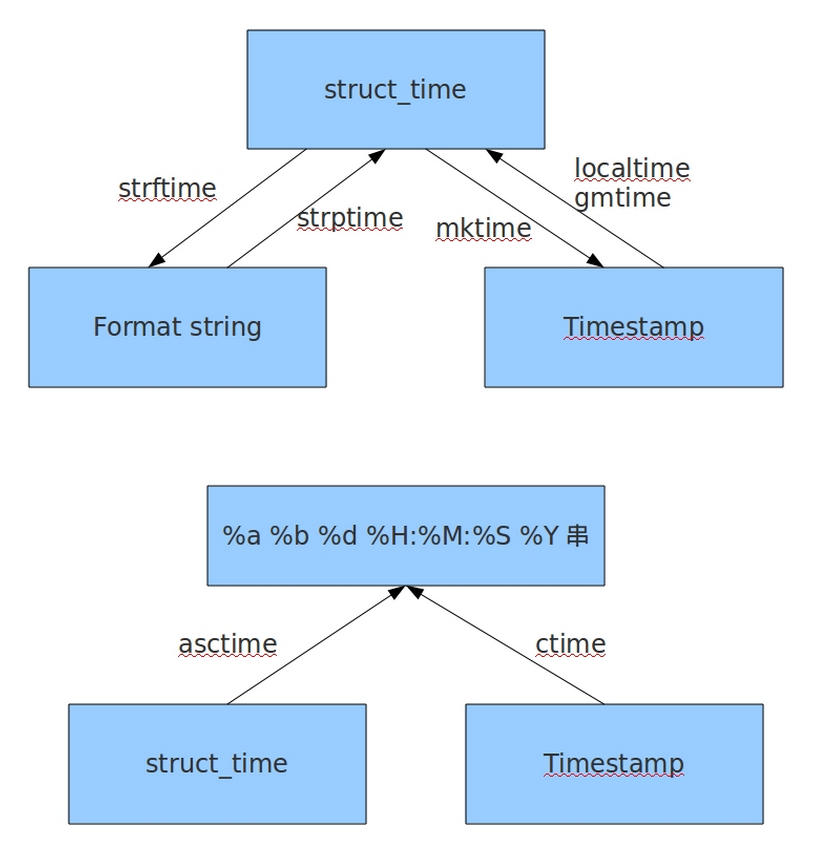
2、主要time生成方法和time格式转换方法实例:
#! /usr/bin/env python
# -*- coding:utf-8 -*-
# __author__ = "TKQ"

import time

# 生成timestamp
time.time()
# 1477471508.05
#struct_time to timestamp
time.mktime(time.localtime())
#生成struct_time
# timestamp to struct_time 本地时间
time.localtime()
time.localtime(time.time())
# time.struct_time(tm_year=2016, tm_mon=10, tm_mday=26, tm_hour=16, tm_min=45, tm_sec=8, tm_wday=2, tm_yday=300, tm_isdst=0)

# timestamp to struct_time 格林威治时间
time.gmtime()
time.gmtime(time.time())
# time.struct_time(tm_year=2016, tm_mon=10, tm_mday=26, tm_hour=8, tm_min=45, tm_sec=8, tm_wday=2, tm_yday=300, tm_isdst=0)

#format_time to struct_time
time.strptime('2011-05-05 16:37:06', '%Y-%m-%d %X')
# time.struct_time(tm_year=2011, tm_mon=5, tm_mday=5, tm_hour=16, tm_min=37, tm_sec=6, tm_wday=3, tm_yday=125, tm_isdst=-1)

#生成format_time
#struct_time to format_time
time.strftime("%Y-%m-%d %X")
time.strftime("%Y-%m-%d %X",time.localtime())
# 2016-10-26 16:48:41


#生成固定格式的时间表示格式
time.asctime(time.localtime())
time.ctime(time.time())
# Wed Oct 26 16:45:08 2016
struct_time元组元素结构
属性                            值
tm_year(年)                  比如2011
tm_mon(月)                   1 - 12
tm_mday(日)                  1 - 31
tm_hour(时)                  0 - 23
tm_min(分)                   0 - 59
tm_sec(秒)                   0 - 61
tm_wday(weekday)             0 - 6(0表示周日)
tm_yday(一年中的第几天)        1 - 366
tm_isdst(是否是夏令时)        默认为-1
format time结构化表示
| 格式 | 含义 |
| %a | 本地(locale)简化星期名称 |
| %A | 本地完整星期名称 |
| %b | 本地简化月份名称 |
| %B | 本地完整月份名称 |
| %c | 本地相应的日期和时间表示 |
| %d | 一个月中的第几天(01 – 31) |
| %H | 一天中的第几个小时(24小时制,00 – 23) |
| %I | 第几个小时(12小时制,01 – 12) |
| %j | 一年中的第几天(001 – 366) |
| %m | 月份(01 – 12) |
| %M | 分钟数(00 – 59) |
| %p | 本地am或者pm的相应符 |
| %S | 秒(01 – 61) |
| %U | 一年中的星期数。(00 – 53星期天是一个星期的开始。)第一个星期天之前的所有天数都放在第0周。 |
| %w | 一个星期中的第几天(0 – 6,0是星期天) |
| %W | 和%U基本相同,不同的是%W以星期一为一个星期的开始。 |
| %x | 本地相应日期 |
| %X | 本地相应时间 |
| %y | 去掉世纪的年份(00 – 99) |
| %Y | 完整的年份 |
| %Z | 时区的名字(如果不存在为空字符) |
| %% | ‘%’字符 |
常见结构化时间组合:
print time.strftime("%Y-%m-%d %X")
#2016-10-26 20:50:13
3、time加减
#timestamp加减单位以秒为单位
import time
t1 = time.time()
t2=t1+10

print time.ctime(t1)#Wed Oct 26 21:15:30 2016
print time.ctime(t2)#Wed Oct 26 21:15:40 2016
datetime模块
datatime模块重新封装了time模块,提供更多接口,提供的类有:date,time,datetime,timedelta,tzinfo。
1、date类
datetime.date(year, month, day)
静态方法和字段
date.max、date.min:date对象所能表示的最大、最小日期;
date.resolution:date对象表示日期的最小单位。这里是天。
date.today():返回一个表示当前本地日期的date对象;
date.fromtimestamp(timestamp):根据给定的时间戮,返回一个date对象;
方法和属性
d1 = date(2011,06,03)#date对象
d1.year、date.month、date.day:年、月、日;
d1.replace(year, month, day):生成一个新的日期对象,用参数指定的年,月,日代替原有对象中的属性。(原有对象仍保持不变)
d1.timetuple():返回日期对应的time.struct_time对象;
d1.weekday():返回weekday,如果是星期一,返回0;如果是星期2,返回1,以此类推;
d1.isoweekday():返回weekday,如果是星期一,返回1;如果是星期2,返回2,以此类推;
d1.isocalendar():返回格式如(year,month,day)的元组;
d1.isoformat():返回格式如'YYYY-MM-DD’的字符串;
d1.strftime(fmt):和time模块format相同。
2、time类
datetime.time(hour[ , minute[ , second[ , microsecond[ , tzinfo] ] ] ] )
静态方法和字段
time.min、time.max:time类所能表示的最小、最大时间。
其中,
time.min = time(0, 0, 0, 0),
time.max = time(23, 59, 59, 999999);
time.resolution:时间的最小单位,这里是1微秒;
方法和属性
t1 = datetime.time(10,23,15)#time对象<br>t1.hour、t1.minute、t1.second、t1.microsecond:时、分、秒、微秒;
t1.tzinfo:时区信息;
t1.replace([ hour[ , minute[ , second[ , microsecond[ , tzinfo] ] ] ] ] ):创建一个新的时间对象,用参数指定的时、分、秒、微秒代替原有对象中的属性(原有对象仍保持不变);
t1.isoformat():返回型如"HH:MM:SS"格式的字符串表示;
t1.strftime(fmt):同time模块中的format;
3、datetime类
datetime相当于date和time结合起来。
datetime.datetime (year, month, day[ , hour[ , minute[ , second[ , microsecond[ , tzinfo] ] ] ] ] )
静态方法和字段
datetime.today():返回一个表示当前本地时间的datetime对象;
datetime.now([tz]):返回一个表示当前本地时间的datetime对象,如果提供了参数tz,则获取tz参数所指时区的本地时间;
datetime.utcnow():返回一个当前utc时间的datetime对象;#格林威治时间
datetime.fromtimestamp(timestamp[, tz]):根据时间戮创建一个datetime对象,参数tz指定时区信息;
datetime.utcfromtimestamp(timestamp):根据时间戮创建一个datetime对象;
datetime.combine(date, time):根据date和time,创建一个datetime对象;
datetime.strptime(date_string, format):将格式字符串转换为datetime对象;
方法和属性
dt=datetime.now()#datetime对象
dt.year、month、day、hour、minute、second、microsecond、tzinfo:
dt.date():获取date对象;
dt.time():获取time对象;
dt. replace ([ year[ , month[ , day[ , hour[ , minute[ , second[ , microsecond[ , tzinfo] ] ] ] ] ] ] ]):
dt. timetuple ()
dt. utctimetuple ()
dt. toordinal ()
dt. weekday ()
dt. isocalendar ()
dt. isoformat ([ sep] )
dt. ctime ():返回一个日期时间的C格式字符串,等效于time.ctime(time.mktime(dt.timetuple()));
dt. strftime (format)
4.timedelta类,时间加减
使用timedelta可以很方便的在日期上做天days,小时hour,分钟,秒,毫秒,微妙的时间计算,如果要计算月份则需要另外的办法。
#coding:utf-8
from  datetime import *

dt = datetime.now()
#日期减一天
dt1 = dt + timedelta(days=-1)#昨天
dt2 = dt - timedelta(days=1)#昨天
dt3 = dt + timedelta(days=1)#明天
delta_obj = dt3-dt
print type(delta_obj),delta_obj#<type 'datetime.timedelta'> 1 day, 0:00:00
print delta_obj.days ,delta_obj.total_seconds()#1 86400.0
5、tzinfo时区类
#! /usr/bin/python
# coding=utf-8

from datetime import datetime, tzinfo,timedelta

"""
tzinfo是关于时区信息的类
tzinfo是一个抽象类,所以不能直接被实例化
"""
class UTC(tzinfo):
    """UTC"""
    def __init__(self,offset = 0):
        self._offset = offset

    def utcoffset(self, dt):
        return timedelta(hours=self._offset)

    def tzname(self, dt):
        return "UTC +%s" % self._offset

    def dst(self, dt):
        return timedelta(hours=self._offset)

#北京时间
beijing = datetime(2011,11,11,0,0,0,tzinfo = UTC(8))
print "beijing time:",beijing
#曼谷时间
bangkok = datetime(2011,11,11,0,0,0,tzinfo = UTC(7))
print "bangkok time",bangkok
#北京时间转成曼谷时间
print "beijing-time to bangkok-time:",beijing.astimezone(UTC(7))

#计算时间差时也会考虑时区的问题
timespan = beijing - bangkok
print "时差:",timespan

#Output==================
# beijing time: 2011-11-11 00:00:00+08:00
# bangkok time 2011-11-11 00:00:00+07:00
# beijing-time to bangkok-time: 2011-11-10 23:00:00+07:00
# 时差: -1 day, 23:00:00
hashlib加密
hashlib主要提供字符加密功能,将md5和sha模块整合到了一起,支持md5,sha1, sha224, sha256, sha384, sha512等算法
具体应用
#!/usr/bin/env python
# -*- coding: UTF-8 -*-
#pyversion:python3.5
#owner:fuzj

import hashlib

# ######## md5 ########

string = "beyongjie"


md5 = hashlib.md5()
md5.update(string.encode('utf-8'))     #注意转码
res = md5.hexdigest()
print("md5加密结果:",res)

# ######## sha1 ########

sha1 = hashlib.sha1()
sha1.update(string.encode('utf-8'))
res = sha1.hexdigest()
print("sha1加密结果:",res)

# ######## sha256 ########

sha256 = hashlib.sha256()
sha256.update(string.encode('utf-8'))
res = sha256.hexdigest()
print("sha256加密结果:",res)


# ######## sha384 ########

sha384 = hashlib.sha384()
sha384.update(string.encode('utf-8'))
res = sha384.hexdigest()
print("sha384加密结果:",res)

# ######## sha512 ########

sha512= hashlib.sha512()
sha512.update(string.encode('utf-8'))
res = sha512.hexdigest()
print("sha512加密结果:",res)
输出结果:
md5加密结果: 0e725e477851ff4076f774dc312d4748
sha1加密结果: 458d32be8ea38b66300174970ab0a8c0b734252f
sha256加密结果: 1e62b55bfd02977943f885f6a0998af7cc9cfb95c8ac4a9f30ecccb7c05ec9f4
sha384加密结果: e91cdf0d2570de5c96ee84e8a12cddf16508685e7a03b3e811099cfcd54b7f52183e20197cff7c07f312157f0ba4875b
sha512加密结果: 3f0020a726e9c1cb5d22290c967f3dd1bcecb409a51a8088db520750c876aaec3f17a70d7981cd575ed4b89471f743f3f24a146a39d59f215ae3e208d0170073
注意:hashlib 加密啊的字符串类型为二进制编码,直接加密字符串会报如下错误:
sha1 = hashlib.sha1()
sha1.update(string)
res = sha1.hexdigest()
print("sha1加密结果:",res)


TypeError: Unicode-objects must be encoded before hashing
可以使用encode进行转换
shaa1 = hashlib.sha1()
shaa1.update(string.encode('utf-8'))
res = shaa1.hexdigest()
print("sha1采用encode转换加密结果:",res)
或者使用byte转换为二进制
shab1 = hashlib.sha1()
shab1.update(bytes(string,encoding='utf-8'))
res = shab1.hexdigest()
print("sha1采用byte转换的结果:",res)
以上输出:
sha1采用encode转换加密结果: 458d32be8ea38b66300174970ab0a8c0b734252f
sha1采用byte转换的结果: 458d32be8ea38b66300174970ab0a8c0b734252f
常用方法
- hash.update(arg) 更新哈希对象以字符串参数, 注意:如果同一个hash对象重复调用该方法,则m.update(a); m.update(b) 等效于 m.update(a+b),看下面例子
m = hashlib.md5()
m.update('a'.encode('utf-8'))
res = m.hexdigest()
print("第一次a加密:",res)

m.update('b'.encode('utf-8'))
res = m.hexdigest()
print("第二次b加密:",res)


m1 = hashlib.md5()
m1.update('b'.encode('utf-8'))
res = m1.hexdigest()
print("b单独加密:",res)

m2 = hashlib.md5()
m2.update('ab'.encode('utf-8'))
res = m2.hexdigest()
print("ab单独加密:",res)


输出结果:
第一次a加密: 0cc175b9c0f1b6a831c399e269772661
第二次b加密: 187ef4436122d1cc2f40dc2b92f0eba0
b单独加密: 92eb5ffee6ae2fec3ad71c777531578f
ab单独加密: 187ef4436122d1cc2f40dc2b92f0eba0
- hash.digest() 返回摘要,作为二进制数据字符串值,
- hash.hexdigest() 返回摘要,作为十六进制数据字符串值,
- hash.copy() 复制
高级加密
以上加密算法虽然依然非常厉害,但时候存在缺陷,即:通过撞库可以反解。所以,有必要对加密算法中添加自定义key再来做加密。
low = hashlib.md5()
low.update('ab'.encode('utf-8'))
res = low.hexdigest()
print("普通加密:",res)

high = hashlib.md5(b'beyondjie')
high.update('ab'.encode('utf-8'))
res = high.hexdigest()
print("采用key加密:",res)

输出结果:
普通加密: 187ef4436122d1cc2f40dc2b92f0eba0
采用key加密: 1b073f6b8cffe609751e4c98537b7653
附加HMAC-SHA1各语言版本实现
在各大开放平台大行其道的互联网开发潮流中,调用各平台的API接口过程中,无一例外都会用到计算签名值(sig值)。而在各种计算签名的方法中,经常被采用的就是HMAC-SHA1,现对HMAC-SHA1做一个简单的介绍:

        HMAC,散列消息鉴别码,基于密钥的Hash算法认证协议。实现原理为:利用已经公开的Hash函数和私有的密钥,来生成固定长度的消息鉴别码;

        SHA1、MD5等Hash算法是比较常用的不可逆Hash签名计算方法;

        BASE64,将任意序列的8字节字符转换为人眼无法直接识别的符号编码的一种方法;

        各个语言版本的实现为:

        Python版:

              import hmac

              import hashlib

              import base64

              hmac.new(Token,data,hashlib.sha1).digest().encode('base64').rstrip()

Token:即接口的key

data:要加密的数据

        PHP版:
              base64_encode(hash_hmac("SHA1",clientStr,Token , true))
          C++版(Openssl):

               HMAC(  EVP_sha1(),

                   /*key data*/ strKey.data(),
                   /*key len*/  strKey.size(),
                   /*data  */(unsigned char*) strRandom.data(),
                   /*data len*/ strRandom.size(), digest, &digest_len))
       Shell版:
              echo -n '3f88a95c532bea70' | openssl dgst -hmac '123' -sha1 -binary | base64<br><br><br>
1 logging模块简介
logging模块是Python内置的标准模块,主要用于输出运行日志,可以设置输出日志的等级、日志保存路径、日志文件回滚等;相比print,具备如下优点:
- 可以通过设置不同的日志等级,在release版本中只输出重要信息,而不必显示大量的调试信息;
- print将所有信息都输出到标准输出中,严重影响开发者从标准输出中查看其它数据;logging则可以由开发者决定将信息输出到什么地方,以及怎么输出;
2 logging模块使用
2.1 基本使用
配置logging基本的设置,然后在控制台输出日志,
import logging
logging.basicConfig(level = logging.INFO,format = '%(asctime)s - %(name)s - %(levelname)s - %(message)s')
logger = logging.getLogger(__name__)

logger.info("Start print log")
logger.debug("Do something")
logger.warning("Something maybe fail.")
logger.info("Finish")
运行时,控制台输出,
2016-10-09 19:11:19,434 - __main__ - INFO - Start print log
2016-10-09 19:11:19,434 - __main__ - WARNING - Something maybe fail.
2016-10-09 19:11:19,434 - __main__ - INFO - Finish
logging中可以选择很多消息级别,如debug、info、warning、error以及critical。通过赋予logger或者handler不同的级别,开发者就可以只输出错误信息到特定的记录文件,或者在调试时只记录调试信息。
例如,我们将logger的级别改为DEBUG,再观察一下输出结果,
logging.basicConfig(level = logging.DEBUG,format = '%(asctime)s - %(name)s - %(levelname)s - %(message)s')
控制台输出,可以发现,输出了debug的信息。
2016-10-09 19:12:08,289 - __main__ - INFO - Start print log
2016-10-09 19:12:08,289 - __main__ - DEBUG - Do something
2016-10-09 19:12:08,289 - __main__ - WARNING - Something maybe fail.
2016-10-09 19:12:08,289 - __main__ - INFO - Finish
logging.basicConfig函数各参数:
filename:指定日志文件名;
filemode:和file函数意义相同,指定日志文件的打开模式,’w’或者’a’;
format:指定输出的格式和内容,format可以输出很多有用的信息,
参数:作用

%(levelno)s:打印日志级别的数值
%(levelname)s:打印日志级别的名称
%(pathname)s:打印当前执行程序的路径,其实就是sys.argv[0]
%(filename)s:打印当前执行程序名
%(funcName)s:打印日志的当前函数
%(lineno)d:打印日志的当前行号
%(asctime)s:打印日志的时间
%(thread)d:打印线程ID
%(threadName)s:打印线程名称
%(process)d:打印进程ID
%(message)s:打印日志信息
datefmt:指定时间格式,同time.strftime();
level:设置日志级别,默认为logging.WARNNING;
stream:指定将日志的输出流,可以指定输出到sys.stderr,sys.stdout或者文件,默认输出到sys.stderr,当stream和filename同时指定时,stream被忽略;
2.2 将日志写入到文件
2.2.1 将日志写入到文件
设置logging,创建一个FileHandler,并对输出消息的格式进行设置,将其添加到logger,然后将日志写入到指定的文件中,
import logging
logger = logging.getLogger(__name__)
logger.setLevel(level = logging.INFO)
handler = logging.FileHandler("log.txt")
handler.setLevel(logging.INFO)
formatter = logging.Formatter('%(asctime)s - %(name)s - %(levelname)s - %(message)s')
handler.setFormatter(formatter)
logger.addHandler(handler)

logger.info("Start print log")
logger.debug("Do something")
logger.warning("Something maybe fail.")
logger.info("Finish")
log.txt中日志数据为,
2016-10-09 19:01:13,263 - __main__ - INFO - Start print log
2016-10-09 19:01:13,263 - __main__ - WARNING - Something maybe fail.
2016-10-09 19:01:13,263 - __main__ - INFO - Finish
2.2.2 将日志同时输出到屏幕和日志文件
logger中添加StreamHandler,可以将日志输出到屏幕上,
import logging
logger = logging.getLogger(__name__)
logger.setLevel(level = logging.INFO)
handler = logging.FileHandler("log.txt")
handler.setLevel(logging.INFO)
formatter = logging.Formatter('%(asctime)s - %(name)s - %(levelname)s - %(message)s')
handler.setFormatter(formatter)

console = logging.StreamHandler()
console.setLevel(logging.INFO)

logger.addHandler(handler)
logger.addHandler(console)

logger.info("Start print log")
logger.debug("Do something")
logger.warning("Something maybe fail.")
logger.info("Finish")
可以在log.txt文件和控制台中看到,
2016-10-09 19:20:46,553 - __main__ - INFO - Start print log
2016-10-09 19:20:46,553 - __main__ - WARNING - Something maybe fail.
2016-10-09 19:20:46,553 - __main__ - INFO - Finish
可以发现,logging有一个日志处理的主对象,其他处理方式都是通过addHandler添加进去,logging中包含的handler主要有如下几种,
handler名称:位置;作用

StreamHandler:logging.StreamHandler;日志输出到流,可以是sys.stderr,sys.stdout或者文件
FileHandler:logging.FileHandler;日志输出到文件
BaseRotatingHandler:logging.handlers.BaseRotatingHandler;基本的日志回滚方式
RotatingHandler:logging.handlers.RotatingHandler;日志回滚方式,支持日志文件最大数量和日志文件回滚
TimeRotatingHandler:logging.handlers.TimeRotatingHandler;日志回滚方式,在一定时间区域内回滚日志文件
SocketHandler:logging.handlers.SocketHandler;远程输出日志到TCP/IP sockets
DatagramHandler:logging.handlers.DatagramHandler;远程输出日志到UDP sockets
SMTPHandler:logging.handlers.SMTPHandler;远程输出日志到邮件地址
SysLogHandler:logging.handlers.SysLogHandler;日志输出到syslog
NTEventLogHandler:logging.handlers.NTEventLogHandler;远程输出日志到Windows NT/2000/XP的事件日志
MemoryHandler:logging.handlers.MemoryHandler;日志输出到内存中的指定buffer
HTTPHandler:logging.handlers.HTTPHandler;通过"GET"或者"POST"远程输出到HTTP服务器
2.2.3 日志回滚
使用RotatingFileHandler,可以实现日志回滚,
import logging
from logging.handlers import RotatingFileHandler
logger = logging.getLogger(__name__)
logger.setLevel(level = logging.INFO)
#定义一个RotatingFileHandler,最多备份3个日志文件,每个日志文件最大1K
rHandler = RotatingFileHandler("log.txt",maxBytes = 1*1024,backupCount = 3)
rHandler.setLevel(logging.INFO)
formatter = logging.Formatter('%(asctime)s - %(name)s - %(levelname)s - %(message)s')
rHandler.setFormatter(formatter)

console = logging.StreamHandler()
console.setLevel(logging.INFO)
console.setFormatter(formatter)

logger.addHandler(rHandler)
logger.addHandler(console)

logger.info("Start print log")
logger.debug("Do something")
logger.warning("Something maybe fail.")
logger.info("Finish")
可以在工程目录中看到,备份的日志文件,
2016/10/09  19:36               732 log.txt
2016/10/09  19:36               967 log.txt.1
2016/10/09  19:36               985 log.txt.2
2016/10/09  19:36               976 log.txt.3
2.3 设置消息的等级
可以设置不同的日志等级,用于控制日志的输出,
日志等级:使用范围

FATAL:致命错误
CRITICAL:特别糟糕的事情,如内存耗尽、磁盘空间为空,一般很少使用
ERROR:发生错误时,如IO操作失败或者连接问题
WARNING:发生很重要的事件,但是并不是错误时,如用户登录密码错误
INFO:处理请求或者状态变化等日常事务
DEBUG:调试过程中使用DEBUG等级,如算法中每个循环的中间状态
2.4 捕获traceback
Python中的traceback模块被用于跟踪异常返回信息,可以在logging中记录下traceback,
代码,
import logging
logger = logging.getLogger(__name__)
logger.setLevel(level = logging.INFO)
handler = logging.FileHandler("log.txt")
handler.setLevel(logging.INFO)
formatter = logging.Formatter('%(asctime)s - %(name)s - %(levelname)s - %(message)s')
handler.setFormatter(formatter)

console = logging.StreamHandler()
console.setLevel(logging.INFO)

logger.addHandler(handler)
logger.addHandler(console)

logger.info("Start print log")
logger.debug("Do something")
logger.warning("Something maybe fail.")
try:
    open("sklearn.txt","rb")
except (SystemExit,KeyboardInterrupt):
    raise
except Exception:
    logger.error("Faild to open sklearn.txt from logger.error",exc_info = True)

logger.info("Finish")
控制台和日志文件log.txt中输出,
Start print log
Something maybe fail.
Faild to open sklearn.txt from logger.error
Traceback (most recent call last):
  File "G:\zhb7627\Code\Eclipse WorkSpace\PythonTest\test.py", line 23, in <module>
    open("sklearn.txt","rb")
IOError: [Errno 2] No such file or directory: 'sklearn.txt'
Finish
也可以使用logger.exception(msg,_args),它等价于logger.error(msg,exc_info = True,_args),
将
logger.error("Faild to open sklearn.txt from logger.error",exc_info = True)
替换为,
logger.exception("Failed to open sklearn.txt from logger.exception")
控制台和日志文件log.txt中输出,
Start print log
Something maybe fail.
Failed to open sklearn.txt from logger.exception
Traceback (most recent call last):
  File "G:\zhb7627\Code\Eclipse WorkSpace\PythonTest\test.py", line 23, in <module>
    open("sklearn.txt","rb")
IOError: [Errno 2] No such file or directory: 'sklearn.txt'
Finish
2.5 多模块使用logging
主模块mainModule.py,
import logging
import subModule
logger = logging.getLogger("mainModule")
logger.setLevel(level = logging.INFO)
handler = logging.FileHandler("log.txt")
handler.setLevel(logging.INFO)
formatter = logging.Formatter('%(asctime)s - %(name)s - %(levelname)s - %(message)s')
handler.setFormatter(formatter)

console = logging.StreamHandler()
console.setLevel(logging.INFO)
console.setFormatter(formatter)

logger.addHandler(handler)
logger.addHandler(console)


logger.info("creating an instance of subModule.subModuleClass")
a = subModule.SubModuleClass()
logger.info("calling subModule.subModuleClass.doSomething")
a.doSomething()
logger.info("done with  subModule.subModuleClass.doSomething")
logger.info("calling subModule.some_function")
subModule.som_function()
logger.info("done with subModule.some_function")
子模块subModule.py,
import logging

module_logger = logging.getLogger("mainModule.sub")
class SubModuleClass(object):
    def __init__(self):
        self.logger = logging.getLogger("mainModule.sub.module")
        self.logger.info("creating an instance in SubModuleClass")
    def doSomething(self):
        self.logger.info("do something in SubModule")
        a = []
        a.append(1)
        self.logger.debug("list a = " + str(a))
        self.logger.info("finish something in SubModuleClass")

def som_function():
    module_logger.info("call function some_function")
执行之后,在控制和日志文件log.txt中输出,
2016-10-09 20:25:42,276 - mainModule - INFO - creating an instance of subModule.subModuleClass
2016-10-09 20:25:42,279 - mainModule.sub.module - INFO - creating an instance in SubModuleClass
2016-10-09 20:25:42,279 - mainModule - INFO - calling subModule.subModuleClass.doSomething
2016-10-09 20:25:42,279 - mainModule.sub.module - INFO - do something in SubModule
2016-10-09 20:25:42,279 - mainModule.sub.module - INFO - finish something in SubModuleClass
2016-10-09 20:25:42,279 - mainModule - INFO - done with  subModule.subModuleClass.doSomething
2016-10-09 20:25:42,279 - mainModule - INFO - calling subModule.some_function
2016-10-09 20:25:42,279 - mainModule.sub - INFO - call function some_function
2016-10-09 20:25:42,279 - mainModule - INFO - done with subModule.some_function
首先在主模块定义了logger’mainModule’,并对它进行了配置,就可以在解释器进程里面的其他地方通过getLogger(‘mainModule’)得到的对象都是一样的,不需要重新配置,可以直接使用。定义的该logger的子logger,都可以共享父logger的定义和配置,所谓的父子logger是通过命名来识别,任意以’mainModule’开头的logger都是它的子logger,例如’mainModule.sub’。
实际开发一个application,首先可以通过logging配置文件编写好这个application所对应的配置,可以生成一个根logger,如’PythonAPP’,然后在主函数中通过fileConfig加载logging配置,接着在application的其他地方、不同的模块中,可以使用根logger的子logger,如’PythonAPP.Core’,’PythonAPP.Web’来进行log,而不需要反复的定义和配置各个模块的logger。
3 通过JSON或者YAML文件配置logging模块
尽管可以在Python代码中配置logging,但是这样并不够灵活,最好的方法是使用一个配置文件来配置。在Python 2.7及以后的版本中,可以从字典中加载logging配置,也就意味着可以通过JSON或者YAML文件加载日志的配置。
3.1 通过JSON文件配置
JSON配置文件,
{
    "version":1,
    "disable_existing_loggers":false,
    "formatters":{
        "simple":{
            "format":"%(asctime)s - %(name)s - %(levelname)s - %(message)s"
        }
    },
    "handlers":{
        "console":{
            "class":"logging.StreamHandler",
            "level":"DEBUG",
            "formatter":"simple",
            "stream":"ext://sys.stdout"
        },
        "info_file_handler":{
            "class":"logging.handlers.RotatingFileHandler",
            "level":"INFO",
            "formatter":"simple",
            "filename":"info.log",
            "maxBytes":"10485760",
            "backupCount":20,
            "encoding":"utf8"
        },
        "error_file_handler":{
            "class":"logging.handlers.RotatingFileHandler",
            "level":"ERROR",
            "formatter":"simple",
            "filename":"errors.log",
            "maxBytes":10485760,
            "backupCount":20,
            "encoding":"utf8"
        }
    },
    "loggers":{
        "my_module":{
            "level":"ERROR",
            "handlers":["info_file_handler"],
            "propagate":"no"
        }
    },
    "root":{
        "level":"INFO",
        "handlers":["console","info_file_handler","error_file_handler"]
    }
}
通过JSON加载配置文件,然后通过logging.dictConfig配置logging,
import json
import logging.config
import os

def setup_logging(default_path = "logging.json",default_level = logging.INFO,env_key = "LOG_CFG"):
    path = default_path
    value = os.getenv(env_key,None)
    if value:
        path = value
    if os.path.exists(path):
        with open(path,"r") as f:
            config = json.load(f)
            logging.config.dictConfig(config)
    else:
        logging.basicConfig(level = default_level)

def func():
    logging.info("start func")

    logging.info("exec func")

    logging.info("end func")

if __name__ == "__main__":
    setup_logging(default_path = "logging.json")
    func()
3.2 通过YAML文件配置
通过YAML文件进行配置,比JSON看起来更加简介明了,
version: 1
disable_existing_loggers: False
formatters:
        simple:
            format: "%(asctime)s - %(name)s - %(levelname)s - %(message)s"
handlers:
    console:
            class: logging.StreamHandler
            level: DEBUG
            formatter: simple
            stream: ext://sys.stdout
    info_file_handler:
            class: logging.handlers.RotatingFileHandler
            level: INFO
            formatter: simple
            filename: info.log
            maxBytes: 10485760
            backupCount: 20
            encoding: utf8
    error_file_handler:
            class: logging.handlers.RotatingFileHandler
            level: ERROR
            formatter: simple
            filename: errors.log
            maxBytes: 10485760
            backupCount: 20
            encoding: utf8
loggers:
    my_module:
            level: ERROR
            handlers: [info_file_handler]
            propagate: no
root:
    level: INFO
    handlers: [console,info_file_handler,error_file_handler]
通过YAML加载配置文件,然后通过logging.dictConfig配置logging,
import yaml
import logging.config
import os

def setup_logging(default_path = "logging.yaml",default_level = logging.INFO,env_key = "LOG_CFG"):
    path = default_path
    value = os.getenv(env_key,None)
    if value:
        path = value
    if os.path.exists(path):
        with open(path,"r") as f:
            config = yaml.load(f)
            logging.config.dictConfig(config)
    else:
        logging.basicConfig(level = default_level)

def func():
    logging.info("start func")

    logging.info("exec func")

    logging.info("end func")

if __name__ == "__main__":
    setup_logging(default_path = "logging.yaml")
    func()
subprocess模块
subprocess是Python 2.4中新增的一个模块,它允许你生成新的进程,连接到它们的 input/output/error 管道,并获取它们的返回(状态)码。这个模块的目的在于替换几个旧的模块和方法,如:
- os.system
- os.spawn*
1. subprocess模块中的常用函数
| 函数 | 描述 |
|---|---|
| subprocess.run() | Python 3.5中新增的函数。执行指定的命令,等待命令执行完成后返回一个包含执行结果的CompletedProcess类的实例。 |
| subprocess.call() | 执行指定的命令,返回命令执行状态,其功能类似于os.system(cmd)。 |
| subprocess.check_call() | Python 2.5中新增的函数。 执行指定的命令,如果执行成功则返回状态码,否则抛出异常。其功能等价于subprocess.run(…, check=True)。 |
| subprocess.check_output() | Python 2.7中新增的的函数。执行指定的命令,如果执行状态码为0则返回命令执行结果,否则抛出异常。 |
| subprocess.getoutput(cmd) | 接收字符串格式的命令,执行命令并返回执行结果,其功能类似于os.popen(cmd).read()和commands.getoutput(cmd)。 |
| subprocess.getstatusoutput(cmd) | 执行cmd命令,返回一个元组(命令执行状态, 命令执行结果输出),其功能类似于commands.getstatusoutput()。 |
说明:
- 在Python 3.5之后的版本中,官方文档中提倡通过subprocess.run()函数替代其他函数来使用subproccess模块的功能;
- 在Python 3.5之前的版本中,我们可以通过subprocess.call(),subprocess.getoutput()等上面列出的其他函数来使用subprocess模块的功能;
- subprocess.run()、subprocess.call()、subprocess.check_call()和subprocess.check_output()都是通过对subprocess.Popen的封装来实现的高级函数,因此如果我们需要更复杂功能时,可以通过subprocess.Popen来完成。
- subprocess.getoutput()和subprocess.getstatusoutput()函数是来自Python 2.x的commands模块的两个遗留函数。它们隐式的调用系统shell,并且不保证其他函数所具有的安全性和异常处理的一致性。另外,它们从Python 3.3.4开始才支持Windows平台。
2. 上面各函数的定义及参数说明
函数参数列表:
subprocess.run(args, *, stdin=None, input=None, stdout=None, stderr=None, shell=False, timeout=None, check=False, universal_newlines=False)

subprocess.call(args, *, stdin=None, stdout=None, stderr=None, shell=False, timeout=None)

subprocess.check_call(args, *, stdin=None, stdout=None, stderr=None, shell=False, timeout=None)

subprocess.check_output(args, *, stdin=None, stderr=None, shell=False, universal_newlines=False, timeout=None)

subprocess.getstatusoutput(cmd)

subprocess.getoutput(cmd)
参数说明:
- args: 要执行的shell命令,默认应该是一个字符串序列,如[‘df’, ‘-Th’]或(‘df’, ‘-Th’),也可以是一个字符串,如’df -Th’,但是此时需要把shell参数的值置为True。
- shell: 如果shell为True,那么指定的命令将通过shell执行。如果我们需要访问某些shell的特性,如管道、文件名通配符、环境变量扩展功能,这将是非常有用的。当然,python本身也提供了许多类似shell的特性的实现,如glob、fnmatch、os.walk()、os.path.expandvars()、os.expanduser()和shutil等。
- check: 如果check参数的值是True,且执行命令的进程以非0状态码退出,则会抛出一个CalledProcessError的异常,且该异常对象会包含 参数、退出状态码、以及stdout和stderr(如果它们有被捕获的话)。
- stdout, stderr:
- run()函数默认不会捕获命令执行结果的正常输出和错误输出,如果我们向获取这些内容需要传递subprocess.PIPE,然后可以通过返回的CompletedProcess类实例的stdout和stderr属性或捕获相应的内容;
- call()和check_call()函数返回的是命令执行的状态码,而不是CompletedProcess类实例,所以对于它们而言,stdout和stderr不适合赋值为subprocess.PIPE;
- check_output()函数默认就会返回命令执行结果,所以不用设置stdout的值,如果我们希望在结果中捕获错误信息,可以执行stderr=subprocess.STDOUT。
- input: 该参数是传递给Popen.communicate(),通常该参数的值必须是一个字节序列,如果universal_newlines=True,则其值应该是一个字符串。
- universal_newlines: 该参数影响的是输入与输出的数据格式,比如它的值默认为False,此时stdout和stderr的输出是字节序列;当该参数的值设置为True时,stdout和stderr的输出是字符串。
3. subprocess.CompletedProcess类介绍
需要说明的是,subprocess.run()函数是Python3.5中新增的一个高级函数,其返回值是一个subprocess.CompletedPorcess类的实例,因此,subprocess.completedPorcess类也是Python 3.5中才存在的。它表示的是一个已结束进程的状态信息,它所包含的属性如下:
- args: 用于加载该进程的参数,这可能是一个列表或一个字符串
- returncode: 子进程的退出状态码。通常情况下,退出状态码为0则表示进程成功运行了;一个负值-N表示这个子进程被信号N终止了
- stdout: 从子进程捕获的stdout。这通常是一个字节序列,如果run()函数被调用时指定universal_newlines=True,则该属性值是一个字符串。如果run()函数被调用时指定stderr=subprocess.STDOUT,那么stdout和stderr将会被整合到这一个属性中,且stderr将会为None
- stderr: 从子进程捕获的stderr。它的值与stdout一样,是一个字节序列或一个字符串。如果stderr灭有被捕获的话,它的值就为None
- check_returncode(): 如果returncode是一个非0值,则该方法会抛出一个CalledProcessError异常。
4. 实例
subprocess.run()
>>> subprocess.run(["ls", "-l"])  # doesn't capture output
CompletedProcess(args=['ls', '-l'], returncode=0)

>>> subprocess.run("exit 1", shell=True, check=True)
Traceback (most recent call last):
  ...
subprocess.CalledProcessError: Command 'exit 1' returned non-zero exit status 1

>>> subprocess.run(["ls", "-l", "/dev/null"], stdout=subprocess.PIPE)
CompletedProcess(args=['ls', '-l', '/dev/null'], returncode=0,
stdout=b'crw-rw-rw- 1 root root 1, 3 Jan 23 16:23 /dev/null\n')
subprocess.call()
>>> subprocess.call(['ls',  '-l'])
总用量 160
drwxr-xr-x  2 wader wader   4096 12月  7  2015 公共的
drwxr-xr-x  2 wader wader   4096 12月  7  2015 模板
drwxr-xr-x  2 wader wader   4096 12月  7  2015 视频
drwxr-xr-x  2 wader wader   4096 12月  7  2015 图片
drwxr-xr-x  2 wader wader   4096 12月  7  2015 文档
drwxr-xr-x  2 wader wader   4096  4月 13  2016 下载
drwxr-xr-x  2 wader wader   4096 12月  7  2015 音乐
drwxr-xr-x  7 wader wader   4096  5月 26  2016 桌面
0
>>> subprocess.call('ls -l', shell=True)
总用量 160
drwxr-xr-x  2 wader wader   4096 12月  7  2015 公共的
drwxr-xr-x  2 wader wader   4096 12月  7  2015 模板
drwxr-xr-x  2 wader wader   4096 12月  7  2015 视频
drwxr-xr-x  2 wader wader   4096 12月  7  2015 图片
drwxr-xr-x  2 wader wader   4096 12月  7  2015 文档
drwxr-xr-x  2 wader wader   4096  4月 13  2016 下载
drwxr-xr-x  2 wader wader   4096 12月  7  2015 音乐
drwxr-xr-x  7 wader wader   4096  5月 26  2016 桌面
0
>>> subprocess.call(['ls',  '-l'], stdout=subprocess.DEVNULL)
0
>>> subprocess.call(['ls',  '-l', '/test'])
ls: 无法访问/test: 没有那个文件或目录
2
suprocess.check_call()
>>> subprocess.check_call(['ls',  '-l'])
总用量 160
drwxr-xr-x  2 wader wader   4096 12月  7  2015 公共的
drwxr-xr-x  2 wader wader   4096 12月  7  2015 模板
drwxr-xr-x  2 wader wader   4096 12月  7  2015 视频
drwxr-xr-x  2 wader wader   4096 12月  7  2015 图片
drwxr-xr-x  2 wader wader   4096 12月  7  2015 文档
drwxr-xr-x  2 wader wader   4096  4月 13  2016 下载
drwxr-xr-x  2 wader wader   4096 12月  7  2015 音乐
drwxr-xr-x  7 wader wader   4096  5月 26  2016 桌面
0
>>> subprocess.check_call('ls -l', shell=True)
总用量 160
drwxr-xr-x  2 wader wader   4096 12月  7  2015 公共的
drwxr-xr-x  2 wader wader   4096 12月  7  2015 模板
drwxr-xr-x  2 wader wader   4096 12月  7  2015 视频
drwxr-xr-x  2 wader wader   4096 12月  7  2015 图片
drwxr-xr-x  2 wader wader   4096 12月  7  2015 文档
drwxr-xr-x  2 wader wader   4096  4月 13  2016 下载
drwxr-xr-x  2 wader wader   4096 12月  7  2015 音乐
drwxr-xr-x  7 wader wader   4096  5月 26  2016 桌面
0
>>> subprocess.check_call('ls -l /test', shell=True)
ls: 无法访问/test: 没有那个文件或目录
Traceback (most recent call last):
  File "<stdin>", line 1, in <module>
  File "/usr/lib/python3.4/subprocess.py", line 557, in check_call
    raise CalledProcessError(retcode, cmd)
subprocess.CalledProcessError: Command 'ls -l /test' returned non-zero exit status 2
sbuprocess.check_output()
>>> ret = subprocess.check_output(['ls',  '-l'])
>>> print(ret)
b' \xe5\x85\xac\xe5\x85\xb1\xe7\x9a\x84\ndrwxr-xr-x  2 wader wader   4096 12\xe6\x9c\x88  7  2015 \xe6\xa8\xa1\xe6\x9d\xbf\ndrwxr-xr-x  2 wader wader   4096 12\xe6\x9c\x88  7  2015 \xe8\xa7\x86\xe9\xa2\x91\ndrwxr-xr-x  2 wader wader   4096 12\xe6\x9c\x88  7  2015 \xe5\x9b\xbe\xe7\x89\x87\ndrwxr-xr-x  2 wader wader   4096 12\xe6\x9c\x88  7  2015 \xe6\x96\x87\xe6\xa1\xa3\ndrwxr-xr-x  2 wader wader   4096  4\xe6\x9c\x88 13  2016 \xe4\xb8\x8b\xe8\xbd\xbd\ndrwxr-xr-x  2 wader wader   4096 12\xe6\x9c\x88  7  2015 \xe9\x9f\xb3\xe4\xb9\x90\ndrwxr-xr-x  7 wader wader   4096  5\xe6\x9c\x88 26  2016 \xe6\xa1\x8c\xe9\x9d\xa2\n'
>>> ret = subprocess.check_output(['ls',  '-l'], universal_newlines=True)
>>> print(ret)
总用量 160
drwxr-xr-x  2 wader wader   4096 12月  7  2015 公共的
drwxr-xr-x  2 wader wader   4096 12月  7  2015 模板
drwxr-xr-x  2 wader wader   4096 12月  7  2015 视频
drwxr-xr-x  2 wader wader   4096 12月  7  2015 图片
drwxr-xr-x  2 wader wader   4096 12月  7  2015 文档
drwxr-xr-x  2 wader wader   4096  4月 13  2016 下载
drwxr-xr-x  2 wader wader   4096 12月  7  2015 音乐
drwxr-xr-x  7 wader wader   4096  5月 26  2016 桌面
subprocess.getoutput()与subprocess.getstatusoutput()
>>> ret = subprocess.getoutput('ls -l')
>>> print(ret)
总用量 160
drwxr-xr-x  2 wader wader   4096 12月  7  2015 公共的
drwxr-xr-x  2 wader wader   4096 12月  7  2015 模板
drwxr-xr-x  2 wader wader   4096 12月  7  2015 视频
drwxr-xr-x  2 wader wader   4096 12月  7  2015 图片
drwxr-xr-x  2 wader wader   4096 12月  7  2015 文档
drwxr-xr-x  2 wader wader   4096  4月 13  2016 下载
drwxr-xr-x  2 wader wader   4096 12月  7  2015 音乐
drwxr-xr-x  7 wader wader   4096  5月 26  2016 桌面
>>> retcode, output = subprocess.getstatusoutput('ls -l')
>>> print(retcode)
0
>>> print(output)
总用量 160
drwxr-xr-x  2 wader wader   4096 12月  7  2015 公共的
drwxr-xr-x  2 wader wader   4096 12月  7  2015 模板
drwxr-xr-x  2 wader wader   4096 12月  7  2015 视频
drwxr-xr-x  2 wader wader   4096 12月  7  2015 图片
drwxr-xr-x  2 wader wader   4096 12月  7  2015 文档
drwxr-xr-x  2 wader wader   4096  4月 13  2016 下载
drwxr-xr-x  2 wader wader   4096 12月  7  2015 音乐
drwxr-xr-x  7 wader wader   4096  5月 26  2016 桌面
>>> retcode, output = subprocess.getstatusoutput('ls -l /test')
>>> print(retcode)
2
>>> print(output)
ls: 无法访问/test: 没有那个文件或目录
三、subprocess.Popen介绍
该类用于在一个新的进程中执行一个子程序。前面我们提到过,上面介绍的这些函数都是基于subprocess.Popen类实现的,通过使用这些被封装后的高级函数可以很方面的完成一些常见的需求。由于subprocess模块底层的进程创建和管理是由Popen类来处理的,因此,当我们无法通过上面哪些高级函数来实现一些不太常见的功能时就可以通过subprocess.Popen类提供的灵活的api来完成。
1.subprocess.Popen的构造函数
class subprocess.Popen(args, bufsize=-1, executable=None, stdin=None, stdout=None, stderr=None,
    preexec_fn=None, close_fds=True, shell=False, cwd=None, env=None, universal_newlines=False,
    startup_info=None, creationflags=0, restore_signals=True, start_new_session=False, pass_fds=())
参数说明:
- args: 要执行的shell命令,可以是字符串,也可以是命令各个参数组成的序列。当该参数的值是一个字符串时,该命令的解释过程是与平台相关的,因此通常建议将args参数作为一个序列传递。
- bufsize: 指定缓存策略,0表示不缓冲,1表示行缓冲,其他大于1的数字表示缓冲区大小,负数 表示使用系统默认缓冲策略。
- stdin, stdout, stderr: 分别表示程序标准输入、输出、错误句柄。
- preexec_fn: 用于指定一个将在子进程运行之前被调用的可执行对象,只在Unix平台下有效。
- close_fds: 如果该参数的值为True,则除了0,1和2之外的所有文件描述符都将会在子进程执行之前被关闭。
- shell: 该参数用于标识是否使用shell作为要执行的程序,如果shell值为True,则建议将args参数作为一个字符串传递而不要作为一个序列传递。
- cwd: 如果该参数值不是None,则该函数将会在执行这个子进程之前改变当前工作目录。
- env: 用于指定子进程的环境变量,如果env=None,那么子进程的环境变量将从父进程中继承。如果env!=None,它的值必须是一个映射对象。
- universal_newlines: 如果该参数值为True,则该文件对象的stdin,stdout和stderr将会作为文本流被打开,否则他们将会被作为二进制流被打开。
- startupinfo和creationflags: 这两个参数只在Windows下有效,它们将被传递给底层的CreateProcess()函数,用于设置子进程的一些属性,如主窗口的外观,进程优先级等。
2. subprocess.Popen类的实例可调用的方法
| 方法 | 描述 |
|---|---|
| Popen.poll() | 用于检查子进程(命令)是否已经执行结束,没结束返回None,结束后返回状态码。 |
| Popen.wait(timeout=None) | 等待子进程结束,并返回状态码;如果在timeout指定的秒数之后进程还没有结束,将会抛出一个TimeoutExpired异常。 |
| Popen.communicate(input=None, timeout=None) | 该方法可用来与进程进行交互,比如发送数据到stdin,从stdout和stderr读取数据,直到到达文件末尾。 |
| Popen.send_signal(signal) | 发送指定的信号给这个子进程。 |
| Popen.terminate() | 停止该子进程。 |
| Popen.kill() | 杀死该子进程。 |
关于communicate()方法的说明:
- 该方法中的可选参数 input 应该是将被发送给子进程的数据,或者如没有数据发送给子进程,该参数应该是None。input参数的数据类型必须是字节串,如果universal_newlines参数值为True,则input参数的数据类型必须是字符串。
- 该方法返回一个元组(stdout_data, stderr_data),这些数据将会是字节穿或字符串(如果universal_newlines的值为True)。
- 如果在timeout指定的秒数后该进程还没有结束,将会抛出一个TimeoutExpired异常。捕获这个异常,然后重新尝试通信不会丢失任何输出的数据。但是超时之后子进程并没有被杀死,为了合理的清除相应的内容,一个好的应用应该手动杀死这个子进程来结束通信。
- 需要注意的是,这里读取的数据是缓冲在内存中的,所以,如果数据大小非常大或者是无限的,就不应该使用这个方法。
3. subprocess.Popen使用实例
实例1:
>>> import subprocess
>>>
>>> p = subprocess.Popen('df -Th', stdout=subprocess.PIPE, shell=True)
>>> print(p.stdout.read())
Filesystem     Type      Size  Used Avail Use% Mounted on
/dev/vda1      ext4       40G   12G   26G  31% /
devtmpfs       devtmpfs  3.9G     0  3.9G   0% /dev
tmpfs          tmpfs     3.9G     0  3.9G   0% /dev/shm
tmpfs          tmpfs     3.9G  386M  3.5G  10% /run
tmpfs          tmpfs     3.9G     0  3.9G   0% /sys/fs/cgroup
tmpfs          tmpfs     783M     0  783M   0% /run/user/0
tmpfs          tmpfs     783M     0  783M   0% /run/user/1000
实例2:
>>> obj = subprocess.Popen(["python"], stdin=subprocess.PIPE, stdout=subprocess.PIPE, stderr=subprocess.PIPE)
>>> obj.stdin.write('print(1) \n')
>>> obj.stdin.write('print(2) \n')
>>> obj.stdin.write('print(3) \n')
>>> out,err = obj.communicate()
>>> print(out)
1
2
3

>>> print(err)
实例3:
>>> obj = subprocess.Popen(["python"], stdin=subprocess.PIPE, stdout=subprocess.PIPE, stderr=subprocess.PIPE)
>>> out,err = obj.communicate(input='print(1) \n')
>>> print(out)
1

>>> print(err)
实例4:
实现类似df -Th | grep data命令的功能,实际上就是实现shell中管道的共功能。
>>>
>>> p1 = subprocess.Popen(['df', '-Th'], stdout=subprocess.PIPE)
>>> p2 = subprocess.Popen(['grep', 'data'], stdin=p1.stdout, stdout=subprocess.PIPE)
>>> out,err = p2.communicate()
>>> print(out)
/dev/vdb1      ext4      493G  4.8G  463G   2% /data
/dev/vdd1      ext4     1008G  420G  537G  44% /data1
/dev/vde1      ext4      985G  503G  432G  54% /data2

>>> print(err)
None
四、总结
那么我们到底该用哪个模块、哪个函数来执行命令与系统及系统进行交互呢?下面我们来做个总结:
- 首先应该知道的是,Python2.4版本引入了subprocess模块用来替换os.system()、os.popen()、os.spawn*()等函数以及commands模块;也就是说如果你使用的是Python 2.4及以上的版本就应该使用subprocess模块了。
- 如果你的应用使用的Python 2.4以上,但是是Python 3.5以下的版本,Python官方给出的建议是使用subprocess.call()函数。Python 2.5中新增了一个subprocess.check_call()函数,Python 2.7中新增了一个subprocess.check_output()函数,这两个函数也可以按照需求进行使用。
- 如果你的应用使用的是Python 3.5及以上的版本(目前应该还很少),Python官方给出的建议是尽量使用subprocess.run()函数。
- 当subprocess.call()、subprocess.check_call()、subprocess.check_output()和subprocess.run()这些高级函数无法满足需求时,我们可以使用subprocess.Popen类来实现我们需要的复杂功能。
json ,pickle模块
JSON(JavaScript Object Notation, JS 对象标记) 是一种轻量级的数据交换格式。JSON的数据格式其实就是python里面的字典格式,里面可以包含方括号括起来的数组,也就是python里面的列表。
在python中,有专门处理json格式的模块—— json 和 picle模块
Json 模块提供了四个方法: dumps、dump、loads、loadpickle 模块也提供了四个功能:dumps、dump、loads、load 一. dumps 和 dump: dumps和dump 序列化方法 dumps只完成了序列化为str, dump必须传文件描述符,将序列化的str保存到文件中 查看源码:
def dumps(obj, skipkeys=False, ensure_ascii=True, check_circular=True,
        allow_nan=True, cls=None, indent=None, separators=None,
        default=None, sort_keys=False, **kw):
    # Serialize ``obj`` to a JSON formatted ``str``.
    # 序列号 “obj” 数据类型 转换为 JSON格式的字符串
def dump(obj, fp, skipkeys=False, ensure_ascii=True, check_circular=True,
        allow_nan=True, cls=None, indent=None, separators=None,
        default=None, sort_keys=False, **kw):
    """Serialize ``obj`` as a JSON formatted stream to ``fp`` (a
    ``.write()``-supporting file-like object).
     我理解为两个动作,一个动作是将”obj“转换为JSON格式的字符串,还有一个动作是将字符串写入到文件中,也就是说文件描述符fp是必须要的参数 """
示例代码:
>>> import json
>>> json.dumps([])    # dumps可以格式化所有的基本数据类型为字符串
'[]'
>>> json.dumps(1)    # 数字
'1'
>>> json.dumps('1')   # 字符串
'"1"'
>>> dict = {"name":"Tom", "age":23}
>>> json.dumps(dict)     # 字典
'{"name": "Tom", "age": 23}'
a = {"name":"Tom", "age":23}
with open("test.json", "w", encoding='utf-8') as f:
    # indent 超级好用,格式化保存字典,默认为None,小于0为零个空格
    f.write(json.dumps(a, indent=4))
    # json.dump(a,f,indent=4)   # 和上面的效果一样
保存的文件效果:
二. loads 和 load
loads和load 反序列化方法 loads 只完成了反序列化, load 只接收文件描述符,完成了读取文件和反序列化
查看源码:
def loads(s, encoding=None, cls=None, object_hook=None, parse_float=None, parse_int=None, parse_constant=None, object_pairs_hook=None, **kw):
    """Deserialize ``s`` (a ``str`` instance containing a JSON document) to a Python object.
       将包含str类型的JSON文档反序列化为一个python对象"""
def load(fp, cls=None, object_hook=None, parse_float=None, parse_int=None, parse_constant=None, object_pairs_hook=None, **kw):
    """Deserialize ``fp`` (a ``.read()``-supporting file-like object containing a JSON document) to a Python object.
        将一个包含JSON格式数据的可读文件饭序列化为一个python对象"""
实例:
>>> json.loads('{"name":"Tom", "age":23}')
{'age': 23, 'name': 'Tom'}
import json
with open("test.json", "r", encoding='utf-8') as f:
    aa = json.loads(f.read())
    f.seek(0)
    bb = json.load(f)    # 与 json.loads(f.read())
print(aa)
print(bb)

# 输出:
{'name': 'Tom', 'age': 23}
{'name': 'Tom', 'age': 23}
三. json 和 pickle 模块
json模块和pickle模块都有 dumps、dump、loads、load四种方法,而且用法一样。
不用的是json模块序列化出来的是通用格式,其它编程语言都认识,就是普通的字符串,
而picle模块序列化出来的只有python可以认识,其他编程语言不认识的,表现为乱码
不过picle可以序列化函数,但是其他文件想用该函数,在该文件中需要有该文件的定义(定义和参数必须相同,内容可以不同)
四. python对象(obj) 与json对象的对应关系
    +-------------------+---------------+
    | Python            | JSON          |
    +===================+===============+
    | dict              | object        |
    +-------------------+---------------+
    | list, tuple       | array         |
    +-------------------+---------------+
    | str               | string        |
    +-------------------+---------------+
    | int, float        | number        |
    +-------------------+---------------+
    | True              | true          |
    +-------------------+---------------+
    | False             | false         |
    +-------------------+---------------+
    | None              | null          |
    +-------------------+---------------+
五. 总结
1. json序列化方法:
dumps:无文件操作 dump:序列化+写入文件
2. json反序列化方法:
loads:无文件操作 load: 读文件+反序列化
3. json模块序列化的数据 更通用
picle模块序列化的数据 仅python可用,但功能强大,可以序列号函数
4. json模块可以序列化和反序列化的 数据类型 见 python对象(obj) 与json对象的对应关系表
5. 格式化写入文件利用 indent = 4
ElementTree是python的XML处理模块
ElementTree是python的XML处理模块,它提供了一个轻量级的对象模型。它在Python2.5以后成为Python标准库的一部分,但是Python2.4之前需要单独安装。在使用ElementTree模块时,需要import xml.etree.ElementTree的操作。ElementTree表示整个XML节点树,而Element表示节点数中的一个单独的节点。
构建
ElementTree(tag),其中tag表示根节点,初始化一个ElementTree对象。 Element(tag, attrib={}, **extra)函数用来构造XML的一个根节点,其中tag表示根节点的名称,attrib是一个可选项,表示节点的属性。 SubElement(parent, tag, attrib={}, **extra)用来构造一个已经存在的节点的子节点 Element.text和SubElement.text表示element对象的额外的内容属性,Element.tag和Element.attrib分别表示element对象的标签和属性。 ElementTree.write(file, encoding=’us-ascii’, xml_declaration=None, default_namespace=None, method=’xml’),函数新建一个XML文件,并且将节点数数据写入XML文件中。
#encoding=utf-8
import xml.etree.ElementTree as ET

#新建xml文件
def buildNewsXmlFile():
        #设置一个新节点,并设置其标签为root
        root = ET.Element("root")

        #在root下新建两个子节点,设置其名称分别为sina和chinabyte
        sina = ET.SubElement(root, "sina")
        chinabyte = ET.SubElement(root, "chinabyte")

        #在sina下新建两个子节点,设置其节点名称分别为number和first
        sina_number = ET.SubElement(sina, "number")
        sina_number.text = "1"
        sina_first = ET.SubElement(sina, "first")
        sina_first.text = "http://roll.tech.sina.com.cn/internet_all/index_1.shtml"

        #在chinabyte下新建两个子节点,设置其节点名称为number和first
        chinabyte_number = ET.SubElement(chinabyte, "number")
        chinabyte_number.text = "1"
        chinabyte_first = ET.SubElement(chinabyte, "first")
        chinabyte_first.text = "http://www.chinabyte.com/more/124566.shtml"

        #将节点数信息保存在ElementTree中,并且保存为XML格式文件
        tree = ET.ElementTree(root)
        tree.write("urlfile.xml")

解析和修改XML文件
ElementTree.parse(source, parser=None),将xml文件加载并返回ElementTree对象。parser是一个可选的参数,如果为空,则默认使用标准的XMLParser解析器。
ElementTree.getroot(),得到根节点。返回根节点的element对象。
Element.remove(tag),删除root下名称为tag的子节点
以下函数,ElementTree和Element的对象都包含。 find(match),得到第一个匹配match的子节点,match可以是一个标签名称或者是路径。返回个element findtext(match,default=None),得到第一个配置的match的element的内容 findall(match),得到匹配match下的所有的子节点,match可以是一个标签或者是路径,它会返回一个list,包含匹配的elements的信息 iter(tag),创建一个以当前节点为根节点的iterator。
这里有一个xml文件
<?xml version="1.0"?>
<data>
    <country name="Liechtenstein">
        <rank>1</rank>
        <year>2008</year>
        <gdppc>141100</gdppc>
        <neighbor name="Austria" direction="E"/>
        <neighbor name="Switzerland" direction="W"/>
    </country>
    <country name="Singapore">
        <rank>4</rank>
        <year>2011</year>
        <gdppc>59900</gdppc>
        <neighbor name="Malaysia" direction="N"/>
    </country>
    <country name="Panama">
        <rank>68</rank>
        <year>2011</year>
        <gdppc>13600</gdppc>
        <neighbor name="Costa Rica" direction="W"/>
        <neighbor name="Colombia" direction="E"/>
    </country>
</data>
现在是解析xml文件的代码
#解析Xml文件
def parseXmlFile(xml_name):
        #将XMl文件加载并返回一个ELementTree对象
        tree = ET.parse(xml_name)

        #得到第一个匹配sina标签的Element对象
        sina = tree.find("contry")

        #得到sina的SubElement
        for sub_tag in sina:
                print sub_tag.text

        #得到所有匹配sina标签的Element对象的list集合
        list_contry = tree.findall("contry")

        for contry in list_contry:
                for sub_tag in contry:
                        print sub_tag.text
	#修改xml文件
        for rank in tree.iter('rank')
        new_rank = int(rank.text)+1
        rank.text = str(new_rank)
        rank.set('updated', 'yes')
        tree.write(xml_name)
第一次的输出是:1,2008,14100
第二次的输出是:1,2008,14100,4,2011,59900,68,2011,13600
修改后的xml文件为
<?xml version="1.0"?>
<data>
    <country name="Liechtenstein">
        <rank updated="yes">2</rank>
        <year>2008</year>
        <gdppc>141100</gdppc>
        <neighbor name="Austria" direction="E"/>
        <neighbor name="Switzerland" direction="W"/>
    </country>
    <country name="Singapore">
        <rank updated="yes">5</rank>
        <year>2011</year>
        <gdppc>59900</gdppc>
        <neighbor name="Malaysia" direction="N"/>
    </country>
    <country name="Panama">
        <rank updated="yes">69</rank>
        <year>2011</year>
        <gdppc>13600</gdppc>
        <neighbor name="Costa Rica" direction="W"/>
        <neighbor name="Colombia" direction="E"/>
    </country>
</data>
configparser 简介
configparser 是 Pyhton 标准库中用来解析配置文件的模块,并且内置方法和字典非常接近。Python2.x 中名为 ConfigParser,3.x 已更名小写,并加入了一些新功能。
配置文件的格式如下:
[DEFAULT]
ServerAliveInterval = 45
Compression = yes
CompressionLevel = 9
ForwardX11 = yes

[bitbucket.org]
User = Tom

[topsecret.com]
Port: 50022
ForwardX11: no
“[ ]”包含的为 section,section 下面为类似于 key – value 的配置内容;
configparser 默认支持 ‘=’ ‘:’ 两种分隔。
configparser 常用方法
初始化实例
使用 configparser 首先需要初始化实例,并读取配置文件:
>>> import configparser
>>> config = configparser.ConfigParser()    # 注意大小写
>>> config.read("config.ini")   # 配置文件的路径
["config.ini"]
或者可以直接读字典
>>> parser = configparser.ConfigParser()
>>> parser.read_dict({'section1': {'key1': 'value1',
...                                'key2': 'value2',
...                                'key3': 'value3'},
...                   'section2': {'keyA': 'valueA',
...                                'keyB': 'valueB',
...                                'keyC': 'valueC'},
...                   'section3': {'foo': 'x',
...                                'bar': 'y',
...                                'baz': 'z'}
... })
获取所有 sections
>>> config.sections()
['bitbucket.org', 'topsecret.com']    # 注意会过滤掉[DEFAULT]
获取指定 section 的 keys & values
>>> config.items('topsecret.com')
>>>> [('port', '50022'), ('forwardx11', 'no')]    # 注意items()返回的字符串会全变成小写
获取指定 section 的 keys
>>> config.options('topsecret.com')
['Port', 'ForwardX11']
>>> for option in config['topsecret.com']:
...     print(option)
Port
ForwardX11
获取指定 key 的 value
>>> config['bitbucket.org']['User']
'Tom'
>>> config.get('bitbucket.org', 'User')
'Tom'
>>> config.getint('topsecret.com', 'Port')
50022
检查
>>> 'DEFAULT' in config
True
>>> 'test' in config['section_test']
False
>>> 'Tom' in config['bitbucket.org']['User']
True
>>> config.has_section('bitbucket.org')
True
>>> config.has_option('section_test', 'test')
False
添加
>>> config.add_section('Section_1')
>>> config.set('Section_1', 'key_1', 'value_1')    # 注意键值是用set()方法
>>> config.write(open('config.ini', 'w'))    # 一定要写入才生效
删除
>>> config.remove_option('Section_1', 'key_1')
True
>>> config.remove_section('Section_1')
True
>>> config.clear()  # 清空除[DEFAULT]之外所有内容
>>> config.write(open('config.ini', 'w'))
关于 [DEFAULT]
[DEFAULT] 一般包含 ini 格式配置文件的默认项,所以 configparser 部分方法会自动跳过这个 section 。
前面已经提到 sections() 是获取不到的,还有删除方法对 [DEFAULT] 也无效:
>>> config.remove_section('DEFAULT')
False
>>> config.clear()
>>> 'DEFAULT' in config
True
>>> 'ForwardX11' in config['DEFAULT']
True
>>> config.sections()
[]
但指定删除和修改 [DEFAULT] 里的 keys & values 是可以的:
>>> config.remove_option('DEFAULT', 'ForwardX11')
True
>>> config.set('DEFAULT', 'ForwardX11','no')
>>> config['DEFAULT']['ForwardX11']
'no'
还有个特殊的是,has_section() 也无效,可以和 in 区别使用
>>> config.has_section('DEFAULT')
False
>>> 'DEFAULT' in config
True
更多用法请看官方文档:https://docs.python.org/3.6/library/configparser.html
randmon(获取随机数)
random.random
random.random()用于生成一个0到1的随机符点数: 0 <= n < 1.0
random.uniform
random.uniform(a, b),用于生成一个指定范围内的随机符点数,两个参数其中一个是上限,一个是下限。如果a > b,则生成的随机数n: a <= n <= b。如果 a <b, 则 b <= n <= a复制代码 代码如下:
print random.uniform(10, 20)
print random.uniform(20, 10)
# 18.7356606526
# 12.5798298022
random.randint
random.randint(a, b),用于生成一个指定范围内的整数。其中参数a是下限,参数b是上限,生成的随机数n: a <= n <= b复制代码 代码如下:
print random.randint(12, 20) # 生成的随机数 n: 12 <= n <= 20
print random.randint(20, 20) # 结果永远是20
# print random.randint(20, 10) # 该语句是错误的。下限必须小于上限
random.randrange
random.randrange([start], stop[, step]),从指定范围内,按指定基数递增的集合中 获取一个随机数。如:random.randrange(10, 100, 2),结果相当于从[10, 12, 14, 16, … 96, 98]序列中获取一个随机数。random.randrange(10, 100, 2)在结果上与 random.choice(range(10, 100, 2) 等效
random.choice
random.choice从序列中获取一个随机元素。其函数原型为:random.choice(sequence)。参数sequence表示一个有序类型。这里要说明 一下:sequence在python不是一种特定的类型,而是泛指一系列的类型。list, tuple, 字符串都属于sequence。有关sequence可以查看python手册数据模型这一章。下面是使用choice的一些例子:复制代码 代码如下:
print random.choice(“学习Python”)
print random.choice([“JGood”, “is”, “a”, “handsome”, “boy”])
print random.choice((“Tuple”, “List”, “Dict”))
random.shuffle
random.shuffle(x[, random]),用于将一个列表中的元素打乱。如:复制代码 代码如下:
p = [“Python”, “is”, “powerful”, “simple”, “and so on…”]
random.shuffle(p)
print p
# [‘powerful’, ‘simple’, ‘is’, ‘Python’, ‘and so on…’]
random.sample
random.sample(sequence, k),从指定序列中随机获取指定长度的片断。sample函数不会修改原有序列复制代码 代码如下:
list = [1, 2, 3, 4, 5, 6, 7, 8, 9, 10]
slice = random.sample(list, 5) # 从list中随机获取5个元素,作为一个片断返回
print slice
print list # 原有序列并没有改变
随机整数:复制代码 代码如下:>>> import random
>>> random.randint(0,99)
# 21
随机选取0到100间的偶数:复制代码 代码如下:>>> import random
>>> random.randrange(0, 101, 2)
# 42
随机浮点数:复制代码 代码如下:>>> import random
>>> random.random()
0.85415370477785668
>>> random.uniform(1, 10)
# 5.4221167969800881
随机字符:复制代码 代码如下:>>> import random
>>> random.choice(‘abcdefg&#%^*f’)
# ‘d’
多个字符中选取特定数量的字符:复制代码 代码如下:>>> import random
random.sample(‘abcdefghij’, 3)
# [‘a’, ‘d’, ‘b’]
多个字符中选取特定数量的字符组成新字符串:复制代码 代码如下:>>> import random
>>> import string
>>> string.join( random.sample([‘a’,’b’,’c’,’d’,’e’,’f’,’g’,’h’,’i’,’j’], 3) ).replace(” “,””)
# ‘fih’
随机选取字符串:复制代码 代码如下:>>> import random
>>> random.choice ( [‘apple’, ‘pear’, ‘peach’, ‘orange’, ‘lemon’] )
# ‘lemon’
洗牌:复制代码 代码如下:>>> import random
>>> items = [1, 2, 3, 4, 5, 6]
>>> random.shuffle(items)
>>> items
# [3, 2, 5, 6, 4, 1]
shutil模块
引入: import shutil
copy()
功能:复制文件
格式:shutil.copy('来源文件','目标地址')
返回值:复制之后的路径
copy2()
功能:复制文件,保留元数据
格式:shutil.copy2('来源文件','目标地址')
返回值:复制之后的路径
copyfileobj()
将一个文件的内容拷贝的另外一个文件当中
格式:shutil.copyfileobj(open(来源文件,'r'),open('目标文件','w'))
返回值:无
copyfile()
功能:将一个文件的内容拷贝的另外一个文件当中
格式:shutil.copyfile(来源文件,目标文件)
返回值:目标文件的路径
copytree()
功能:复制整个文件目录
格式:shutil.copytree(来源目录,目标目录)
返回值:目标目录的路径
注意:无论文件夹是否为空,均可以复制,而且会复制文件夹中的所有内容
copymode()
功能:拷贝权限
copystat()
功能:拷贝元数据(状态)
rmtree()
功能:移除整个目录,无论是否空
格式:shutil.rmtree(目录路径)
返回值:无
move()
功能:移动文件或者文件夹
格式:shutil.move(来源地址,目标地址)
返回值:目标地址
which()
功能:检测命令对应的文件路径
格式:shutil.which(‘命令字符串’)
返回值:命令文件所在位置
注意:window和linux不太一样。 window的命令都是.exe结尾,linux则不是
disk_usage()
功能:检测磁盘使用信息
格式:disk_usage(‘盘符’)
返回值:元组
归档和解包操作
归档:将多个文件合并到一个文件当中,这种操作方式就是归档。
解包:将归档的文件进行释放。
压缩:压缩时将多个文件进行有损或者无损的合并到一个文件当中。
解压缩:就是压缩的反向操作,将压缩文件中的多个文件,释放出来。
注意:压缩属于归档!
make_archive()
功能:归档函数,归档操作
格式:shutil.make_archive('目标文件路径','归档文件后缀','需要归档的目录')
返回值:归档文件的最终路径
unpack_archive()
功能:解包操作
格式:shutil.unpack_archive('归档文件路径','解包目标文件夹')
返回值:None
注意:文件夹不存在会新建文件夹
get_archive_formats()
功能:获取当前系统已注册的归档文件格式(后缀)
格式:shutil.get_archive_formats()
返回值:列表   [(后缀,解释),(后缀,解释),(后缀,解释)...]
get_unpack_formats()
功能:获取当前系统已经注册的解包文件格式(后缀)
格式:shutil.get_unpack_formats()
返回值:列表   [(后缀,解释),(后缀,解释),(后缀,解释)...]
paramiko
paramiko是一个用于做远程控制的模块,使用该模块可以对远程服务器进行命令或文件操作,值得一说的是,fabric和ansible内部的远程管理就是使用的paramiko来现实。
1、下载安装
| 123 | pycrypto,由于 paramiko 模块内部依赖pycrypto,所以先下载安装pycryptopip3 install pycryptopip3 install paramiko |
2、模块使用
#!/usr/bin/env python
#coding:utf-8

import paramiko

ssh = paramiko.SSHClient()
ssh.set_missing_host_key_policy(paramiko.AutoAddPolicy())
ssh.connect('192.168.1.108', 22, 'alex', '123')
stdin, stdout, stderr = ssh.exec_command('df')
print stdout.read()
ssh.close();
import paramiko

private_key_path = '/home/auto/.ssh/id_rsa'
key = paramiko.RSAKey.from_private_key_file(private_key_path)

ssh = paramiko.SSHClient()
ssh.set_missing_host_key_policy(paramiko.AutoAddPolicy())
ssh.connect('主机名 ', 端口, '用户名', key)

stdin, stdout, stderr = ssh.exec_command('df')
print stdout.read()
ssh.close()
import os,sys
import paramiko

t = paramiko.Transport(('182.92.219.86',22))
t.connect(username='wupeiqi',password='123')
sftp = paramiko.SFTPClient.from_transport(t)
sftp.put('/tmp/test.py','/tmp/test.py')
t.close()


import os,sys
import paramiko

t = paramiko.Transport(('182.92.219.86',22))
t.connect(username='wupeiqi',password='123')
sftp = paramiko.SFTPClient.from_transport(t)
sftp.get('/tmp/test.py','/tmp/test2.py')
t.close()
import paramiko

pravie_key_path = '/home/auto/.ssh/id_rsa'
key = paramiko.RSAKey.from_private_key_file(pravie_key_path)

t = paramiko.Transport(('182.92.219.86',22))
t.connect(username='wupeiqi',pkey=key)

sftp = paramiko.SFTPClient.from_transport(t)
sftp.put('/tmp/test3.py','/tmp/test3.py')

t.close()

import paramiko

pravie_key_path = '/home/auto/.ssh/id_rsa'
key = paramiko.RSAKey.from_private_key_file(pravie_key_path)

t = paramiko.Transport(('182.92.219.86',22))
t.connect(username='wupeiqi',pkey=key)

sftp = paramiko.SFTPClient.from_transport(t)
sftp.get('/tmp/test3.py','/tmp/test4.py')

t.close()
requests
Python标准库中提供了:urllib等模块以供Http请求,但是,它的 API 太渣了。它是为另一个时代、另一个互联网所创建的。它需要巨量的工作,甚至包括各种方法覆盖,来完成最简单的任务。
import urllib.request


f = urllib.request.urlopen('http://www.webxml.com.cn//webservices/qqOnlineWebService.asmx/qqCheckOnline?qqCode=424662508')
result = f.read().decode('utf-8')
import urllib.request

req = urllib.request.Request('http://www.example.com/')
req.add_header('Referer', 'http://www.python.org/')
r = urllib.request.urlopen(req)

result = f.read().decode('utf-8')
注:更多见Python官方文档:https://docs.python.org/3.5/library/urllib.request.html#module-urllib.request
Requests 是使用 Apache2 Licensed 许可证的 基于Python开发的HTTP 库,其在Python内置模块的基础上进行了高度的封装,从而使得Pythoner进行网络请求时,变得美好了许多,使用Requests可以轻而易举的完成浏览器可有的任何操作。
1、安装模块
| 1 | pip3 install requests |
2、使用模块
# 1、无参数实例

import requests

ret = requests.get('https://github.com/timeline.json')

print(ret.url)
print(ret.text)


# 2、有参数实例

import requests

payload = {'key1': 'value1', 'key2': 'value2'}
ret = requests.get("http://httpbin.org/get", params=payload)

print(ret.url)
print(ret.text)
# 1、基本POST实例

import requests

payload = {'key1': 'value1', 'key2': 'value2'}
ret = requests.post("http://httpbin.org/post", data=payload)

print(ret.text)


# 2、发送请求头和数据实例

import requests
import json

url = 'https://api.github.com/some/endpoint'
payload = {'some': 'data'}
headers = {'content-type': 'application/json'}

ret = requests.post(url, data=json.dumps(payload), headers=headers)

print(ret.text)
print(ret.cookies)
requests.get(url, params=None, **kwargs)
requests.post(url, data=None, json=None, **kwargs)
requests.put(url, data=None, **kwargs)
requests.head(url, **kwargs)
requests.delete(url, **kwargs)
requests.patch(url, data=None, **kwargs)
requests.options(url, **kwargs)

# 以上方法均是在此方法的基础上构建
requests.request(method, url, **kwargs)
更多requests模块相关的文档见:http://cn.python-requests.org/zh_CN/latest/
3、Http请求和XML实例
实例:检测QQ账号是否在线
import urllib
import requests
from xml.etree import ElementTree as ET

# 使用内置模块urllib发送HTTP请求,或者XML格式内容
"""
f = urllib.request.urlopen('http://www.webxml.com.cn//webservices/qqOnlineWebService.asmx/qqCheckOnline?qqCode=424662508')
result = f.read().decode('utf-8')
"""


# 使用第三方模块requests发送HTTP请求,或者XML格式内容
r = requests.get('http://www.webxml.com.cn//webservices/qqOnlineWebService.asmx/qqCheckOnline?qqCode=424662508')
result = r.text

# 解析XML格式内容
node = ET.XML(result)

# 获取内容
if node.text == "Y":
    print("在线")
else:
    print("离线")
实例:查看火车停靠信息
import urllib
import requests
from xml.etree import ElementTree as ET

# 使用内置模块urllib发送HTTP请求,或者XML格式内容
"""
f = urllib.request.urlopen('http://www.webxml.com.cn/WebServices/TrainTimeWebService.asmx/getDetailInfoByTrainCode?TrainCode=G666&UserID=')
result = f.read().decode('utf-8')
"""

# 使用第三方模块requests发送HTTP请求,或者XML格式内容
r = requests.get('http://www.webxml.com.cn/WebServices/TrainTimeWebService.asmx/getDetailInfoByTrainCode?TrainCode=G666&UserID=')
result = r.text

# 解析XML格式内容
root = ET.XML(result)
for node in root.iter('TrainDetailInfo'):
    print(node.find('TrainStation').text,node.find('StartTime').text,node.tag,node.attrib)
paramiko模块
import paramiko

# 创建SSH对象
ssh = paramiko.SSHClient()
# 允许连接不在known_hosts文件上的主机
ssh.set_missing_host_key_policy(paramiko.AutoAddPolicy())
# 连接服务器
ssh.connect(hostname="192.168.0.99", port=22, username="root", password="rootroot")
# 执行命令
stdin, stdout, stderr = ssh.exec_command('df')
# 获取结果
result = stdout.read().decode()
# 获取错误提示(stdout、stderr只会输出其中一个)
err = stderr.read()
# 关闭连接
ssh.close()
print(stdin, result, err)
注:如果注释“ssh.set_missing_host_key_policy(paramiko.AutoAddPolicy())”这句,会报错。
类似问题可以为linux系统中~/.ssh/known_hosts文件中的内容。
二、实现SFTP功能
import paramiko
# 连接虚拟机centos上的ip及端口
transport = paramiko.Transport(("192.168.0.99", 22))
transport.connect(username="root", password="rootroot")
# 将实例化的Transport作为参数传入SFTPClient中
sftp = paramiko.SFTPClient.from_transport(transport)
# 将“calculator.py”上传到filelist文件夹中
sftp.put('D:\python库\Python_shell\day05\calculator.py', '/filelist/calculator.py')
# 将centos中的aaa.txt文件下载到桌面
sftp.get('/filedir/aaa.txt', r'C:\Users\duany_000\Desktop\test_aaa.txt')
transport.close()
注:如果遇到Windows中路径问题,链接如下网址http://blog.csdn.net/elang6962/article/details/68068126
三、使用秘钥实现SSH功能
import paramiko
private_key = paramiko.RSAKey.from_private_key_file('id_rsa31')
# 创建SSH对象
ssh = paramiko.SSHClient()
ssh.set_missing_host_key_policy(paramiko.AutoAddPolicy())
# 连接服务器
ssh.connect(hostname='192.168.79.9', port=22, username='root', pkey=private_key)
stdin, stdout, stderr = ssh.exec_command('ifconfig')
res_out = stdout.read()
print(res_out.decode())
ssh.close()
四、使用秘钥实现SFTP功能
import paramiko
private_key = paramiko.RSAKey.from_private_key_file('id_rsa31')
# 连接虚拟机centos上的ip及端口
transport = paramiko.Transport(("192.168.79.9", 22))
transport.connect(username="root", pkey=private_key)
# 将实例化的Transport作为参数传入SFTPClient中
sftp = paramiko.SFTPClient.from_transport(transport)
# 将“calculator.py”上传到filelist文件夹中
sftp.put('D:\python库\Python_shell\day05\calculator.py', '/filedir/calculator.py')
# 将centos中的aaa.txt文件下载到桌面
sftp.get('/filedir/oldtext.txt', r'C:\Users\duany_000\Desktop\oldtext.txt')
transport.close()