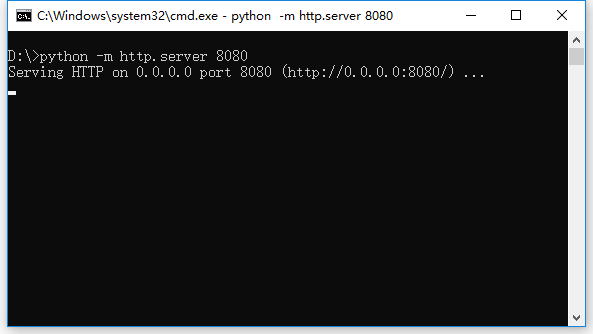
第一步、在命令行窗口进入一个目录,比如D:\code
输入:python -m http.server 8080
这样就简单的运行了一个python web服务器。
第二步、在浏览器中输入:http://127.0.0.1:8080/
可以看到目录下的文件夹和文件。
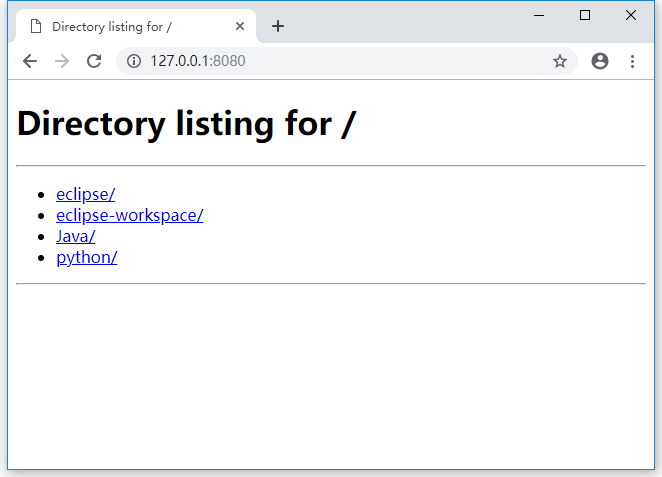
可以看到web 服务器搭建成功了。

对于Python 2,简单搭建Web服务器,只需在需要搭建Web服务器的目录(如C:/ 或 /home/klchang/)下,输入如下命令:
python -m SimpleHTTPServer 8080
含义为使用 8080端口的创建Web服务器,可以使用浏览器 http://127.0.0.1:8080 或 将 127.0.0.1 替换为本机的外部IP地址,进行访问。
对于Python 3,其创建Web服务器的等价命令,如下:
python3 -m http.server 8080
补充 – 2018.8.11:
上面的命令,只是简单地实现访问当前目录文件的功能,如果需要增加上传文件功能,则可参考如下的 Python 代码 (只支持 Python 2.x):
# SimpleHTTPServerWithUpload.py
# This code tweaked from https://github.com/tualatrix/tools/blob/master/SimpleHTTPServerWithUpload.py
"""Simple HTTP Server With Upload.
This module builds on BaseHTTPServer by implementing the standard GET
and HEAD requests in a fairly straightforward manner.
"""


__version__ = "0.1"
__all__ = ["SimpleHTTPRequestHandler"]
__author__ = "bones7456"
__home_page__ = "http://li2z.cn/"

import os
import posixpath
import BaseHTTPServer
import urllib
import cgi
import shutil
import mimetypes
import re
try:
    from cStringIO import StringIO
except ImportError:
    from StringIO import StringIO


class SimpleHTTPRequestHandler(BaseHTTPServer.BaseHTTPRequestHandler):

    """Simple HTTP request handler with GET/HEAD/POST commands.
    This serves files from the current directory and any of its
    subdirectories.  The MIME type for files is determined by
    calling the .guess_type() method. And can reveive file uploaded
    by client.
    The GET/HEAD/POST requests are identical except that the HEAD
    request omits the actual contents of the file.
    """

    server_version = "SimpleHTTPWithUpload/" + __version__

    def do_GET(self):
        """Serve a GET request."""
        f = self.send_head()
        if f:
            self.copyfile(f, self.wfile)
            f.close()

    def do_HEAD(self):
        """Serve a HEAD request."""
        f = self.send_head()
        if f:
            f.close()

    def do_POST(self):
        """Serve a POST request."""
        r, info = self.deal_post_data()
        print r, info, "by: ", self.client_address
        f = StringIO()
        f.write('<!DOCTYPE html PUBLIC "-//W3C//DTD HTML 3.2 Final//EN">')
        f.write("<html>\n<title>Upload Result Page</title>\n")
        f.write("<body>\n<h2>Upload Result Page</h2>\n")
        f.write("<hr>\n")
        if r:
            f.write("<strong>Success:</strong> ")
        else:
            f.write("<strong>Failed:</strong> ")
        f.write(info)
        f.write("<br><a href=\"%s\">back</a>" % self.headers['referer'])
        f.write("<hr><small>Powered By: bones7456, check new version at ")
        f.write("<a href=\"http://li2z.cn/?s=SimpleHTTPServerWithUpload\">")
        f.write("here</a>.</small></body>\n</html>\n")
        length = f.tell()
        f.seek(0)
        self.send_response(200)
        self.send_header("Content-type", "text/html")
        self.send_header("Content-Length", str(length))
        self.end_headers()
        if f:
            self.copyfile(f, self.wfile)
            f.close()

    def deal_post_data(self):
        boundary = self.headers.plisttext.split("=")[1]
        remainbytes = int(self.headers['content-length'])
        line = self.rfile.readline()
        remainbytes -= len(line)
        if not boundary in line:
            return (False, "Content NOT begin with boundary")
        line = self.rfile.readline()
        remainbytes -= len(line)
        fn = re.findall(r'Content-Disposition.*name="file"; filename="(.*)"', line)
        if not fn:
            return (False, "Can't find out file name...")
        elif not fn[0]:
            return (False, "No file chosen.")
        path = self.translate_path(self.path)
        fn = os.path.join(path, fn[0])
        while os.path.exists(fn):
            fn += "_"
        line = self.rfile.readline()
        remainbytes -= len(line)
        line = self.rfile.readline()
        remainbytes -= len(line)
        try:
            out = open(fn, 'wb')
        except IOError:
            return (False, "Can't create file to write, do you have permission to write?")

        if line.strip():
            preline = line
        else:
            preline = self.rfile.readline()
        remainbytes -= len(preline)
        while remainbytes > 0:
            line = self.rfile.readline()
            remainbytes -= len(line)
            if boundary in line:
                preline = preline[0:-1]
                if preline.endswith('\r'):
                    preline = preline[0:-1]
                out.write(preline)
                out.close()
                return (True, "File '%s' upload success!" % fn)
            else:
                out.write(preline)
                preline = line
        return (False, "Unexpect Ends of data.")

    def send_head(self):
        """Common code for GET and HEAD commands.
        This sends the response code and MIME headers.
        Return value is either a file object (which has to be copied
        to the outputfile by the caller unless the command was HEAD,
        and must be closed by the caller under all circumstances), or
        None, in which case the caller has nothing further to do.
        """
        path = self.translate_path(self.path)
        f = None
        if os.path.isdir(path):
            if not self.path.endswith('/'):
                # redirect browser - doing basically what apache does
                self.send_response(301)
                self.send_header("Location", self.path + "/")
                self.end_headers()
                return None
            for index in "index.html", "index.htm":
                index = os.path.join(path, index)
                if os.path.exists(index):
                    path = index
                    break
            else:
                return self.list_directory(path)
        ctype = self.guess_type(path)
        try:
            # Always read in binary mode. Opening files in text mode may cause
            # newline translations, making the actual size of the content
            # transmitted *less* than the content-length!
            f = open(path, 'rb')
        except IOError:
            self.send_error(404, "File not found")
            return None
        self.send_response(200)
        self.send_header("Content-type", ctype)
        fs = os.fstat(f.fileno())
        self.send_header("Content-Length", str(fs[6]))
        self.send_header("Last-Modified", self.date_time_string(fs.st_mtime))
        self.end_headers()
        return f

    def list_directory(self, path):
        """Helper to produce a directory listing (absent index.html).
        Return value is either a file object, or None (indicating an
        error).  In either case, the headers are sent, making the
        interface the same as for send_head().
        """
        try:
            list = os.listdir(path)
        except os.error:
            self.send_error(404, "No permission to list directory")
            return None
        list.sort(key=lambda a: a.lower())
        f = StringIO()
        displaypath = cgi.escape(urllib.unquote(self.path))
        f.write('<!DOCTYPE html PUBLIC "-//W3C//DTD HTML 3.2 Final//EN">')
        f.write("<html>\n<title>Directory listing for %s</title>\n" % displaypath)
        f.write("<body>\n<h2>Directory listing for %s</h2>\n" % displaypath)
        f.write("<hr>\n")
        f.write("<form ENCTYPE=\"multipart/form-data\" method=\"post\">")
        f.write("<input name=\"file\" type=\"file\"/>")
        f.write("<input type=\"submit\" value=\"upload\"/></form>\n")
        f.write("<hr>\n<ul>\n")
        for name in list:
            fullname = os.path.join(path, name)
            displayname = linkname = name
            # Append / for directories or @ for symbolic links
            if os.path.isdir(fullname):
                displayname = name + "/"
                linkname = name + "/"
            if os.path.islink(fullname):
                displayname = name + "@"
                # Note: a link to a directory displays with @ and links with /
            f.write('<li><a href="%s">%s</a>\n'
                    % (urllib.quote(linkname), cgi.escape(displayname)))
        f.write("</ul>\n<hr>\n</body>\n</html>\n")
        length = f.tell()
        f.seek(0)
        self.send_response(200)
        self.send_header("Content-type", "text/html")
        self.send_header("Content-Length", str(length))
        self.end_headers()
        return f

    def translate_path(self, path):
        """Translate a /-separated PATH to the local filename syntax.
        Components that mean special things to the local file system
        (e.g. drive or directory names) are ignored.  (XXX They should
        probably be diagnosed.)
        """
        # abandon query parameters
        path = path.split('?',1)[0]
        path = path.split('#',1)[0]
        path = posixpath.normpath(urllib.unquote(path))
        words = path.split('/')
        words = filter(None, words)
        path = os.getcwd()
        for word in words:
            drive, word = os.path.splitdrive(word)
            head, word = os.path.split(word)
            if word in (os.curdir, os.pardir): continue
            path = os.path.join(path, word)
        return path

    def copyfile(self, source, outputfile):
        """Copy all data between two file objects.
        The SOURCE argument is a file object open for reading
        (or anything with a read() method) and the DESTINATION
        argument is a file object open for writing (or
        anything with a write() method).
        The only reason for overriding this would be to change
        the block size or perhaps to replace newlines by CRLF
        -- note however that this the default server uses this
        to copy binary data as well.
        """
        shutil.copyfileobj(source, outputfile)

    def guess_type(self, path):
        """Guess the type of a file.
        Argument is a PATH (a filename).
        Return value is a string of the form type/subtype,
        usable for a MIME Content-type header.
        The default implementation looks the file's extension
        up in the table self.extensions_map, using application/octet-stream
        as a default; however it would be permissible (if
        slow) to look inside the data to make a better guess.
        """

        base, ext = posixpath.splitext(path)
        if ext in self.extensions_map:
            return self.extensions_map[ext]
        ext = ext.lower()
        if ext in self.extensions_map:
            return self.extensions_map[ext]
        else:
            return self.extensions_map['']

    if not mimetypes.inited:
        mimetypes.init() # try to read system mime.types
    extensions_map = mimetypes.types_map.copy()
    extensions_map.update({
        '': 'application/octet-stream', # Default
        '.py': 'text/plain',
        '.c': 'text/plain',
        '.h': 'text/plain',
        })


def test(HandlerClass = SimpleHTTPRequestHandler,
         ServerClass = BaseHTTPServer.HTTPServer):
    BaseHTTPServer.test(HandlerClass, ServerClass)

if __name__ == '__main__':
    test()
将其保存为 SimpleHTTPServerWithUpload.py,采用如下方式创建使用 8080 端口的 Web 服务器:
python SimpleHTTPServerWithUpload.py 8080
参考资料:
1、非常简单的Python HTTP服务
https://coolshell.cn/articles/1480.html
2、What is the Python 3 equivalent of “python -m SimpleHTTPServer”
我相信,要成为优秀的开发者,你必须对你每天都用的底层的软件系统有进一步的理解,包括编程语言、编译器和解释器、数据库和操作系统、WEB服务器和WEB框架。为了更好更深入的理解这些系统,你可以从零开始一块砖地,一面墙地,重建它们。
重中之重,什么是WEB服务器?

简而言之,它是一个位于一个物理服务器上的网络服务器(呀,服务器上的服务器),它等待客户端发送请求。当它接收到一个请求,就会生成一个响应并回发给客户端。客户端和服务器使用HTTP协议通信。客户端可以是浏览器或者别的使用HTTP协议的软件。
一个非常简单的WEB服务器实现长什么样呢?以下是我写的一个。例子是用Python语言写的,但是即使你不会Python(它是一个非常易学的语言,试试!),你仍然可以通过代码和下面的解释理解相关概念:
import socket

HOST, PORT = '', 8888

listen_socket = socket.socket(socket.AF_INET, socket.SOCK_STREAM)
listen_socket.setsockopt(socket.SOL_SOCKET, socket.SO_REUSEADDR, 1)
listen_socket.bind((HOST, PORT))
listen_socket.listen(1)
print 'Serving HTTP on port %s ...' % PORT
while True:
    client_connection, client_address = listen_socket.accept()
    request = client_connection.recv(1024)
    print request

    http_response = """
HTTP/1.1 200 OK

Hello, World!
"""
    client_connection.sendall(http_response)
    client_connection.close()
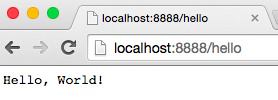
把上面的代码保存到webserver1.py或者直接从GitHub下载,然后像下面这样在命令行运行它
$ python webserver1.py
Serving HTTP on port 8888 …
现在在你的WEB浏览器地址栏里输入以下URL http://localhost:8888/hello,敲回车,见证奇迹的时刻。你会看到浏览器显示”Hello, World!“,像这样:
认真做一下吧,我会等你的。
做完了?很好。现在我们讨论一下它到底怎么工作的。
首先我们从你刚才键入的WEB地址开始。它叫URL,这是它的基本结构:
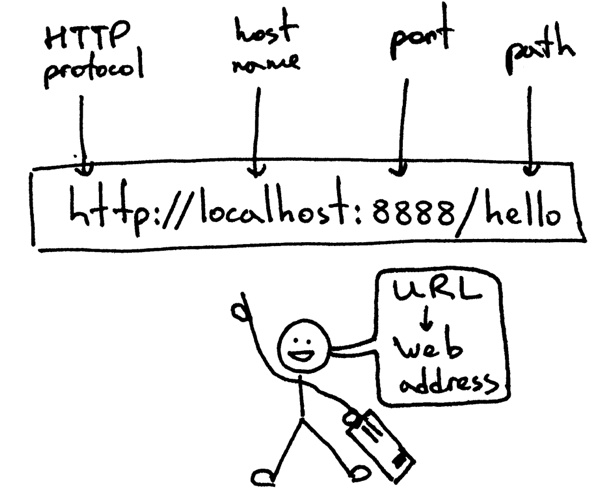
这个就表示怎样告诉浏览器要查找和连接的WEB服务器地址,和你要获取的服务器上的页面(路径)。但是在浏览器发送HTTP请求前,浏览器需要先和WEB服务器建立TCP连接。然后浏览器在TCP连接上发送HTTP请求,然后等待服务器回发HTTP响应。当浏览器接收到响应后,显示响应,在本次例子中,浏览器显示“Hello, World!”。
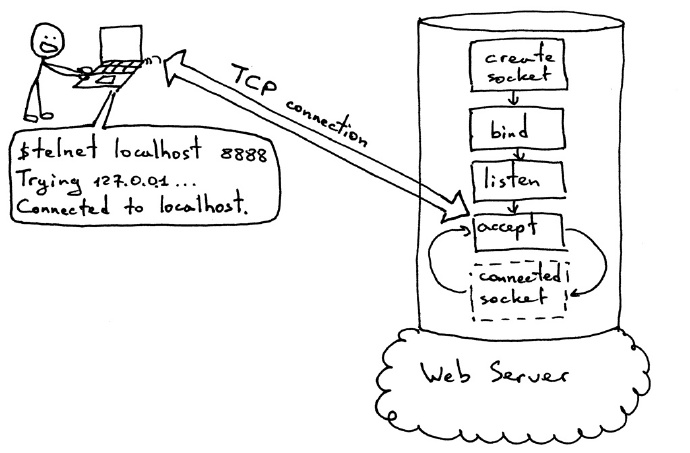
我们再详细探索一下客户端和服务器在发送HTTP请求和响应前如何建立TCP连接的。在建立连接,它们必须使用所谓的sockets。用你命令行下的telnet手动模拟浏览器吧,而不是直接使用浏览器。
在运行WEB服务器的同一台电脑上,在命令行启动一个telnet会话,指定连接到localhost主机,连接端口为8888,然后按回车:
$ telnet localhost 8888
Trying 127.0.0.1 …
Connected to localhost.
此时,你已经和运行在你本地主机的服务器建立了TCP连接,已经准备好发送并接收HTTP消息了。下图中你可以看到一个服务器要经过的标准步骤,然后才能接受新的TCP连接。
在同一个telnet会话中,输入 GET /hello HTTP/1.1然后敲回车:
$ telnet localhost 8888
Trying 127.0.0.1 …
Connected to localhost.
GET /hello HTTP/1.1

HTTP/1.1 200 OK
Hello, World!
你完成了手动模拟浏览器!你发送了一个HTTP请求并得到了一个HTTP响应。这是HTTP请求的基本结构:
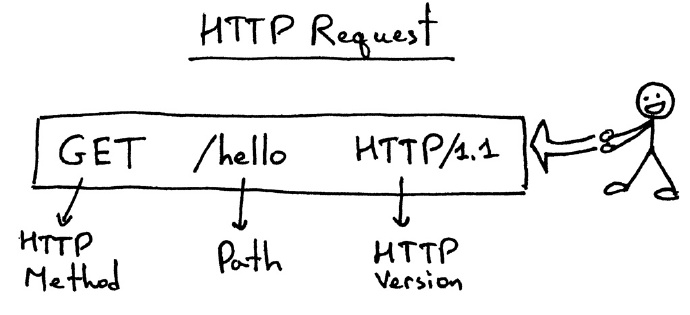
HTTP请求由行组成。行指示了HTTP方法(GET,因为我们请求我们的服务器返回给我们一些东西)、代表我们想要的服务器上的“页面”的路径 /hello和协议版本。
为了简单起见,此时我们的WEB服务器完全忽略了上面的请求行。你也可以输入任何垃圾字符取代“GET /hello HTTP/1.1”,你仍然会得到“Hello, World!”响应。
一旦你输入了请求行,敲了回车,客户端就发送请求给服务器,服务器读取请求行,打印出来然后返回相应的HTTP响应。
以下是服务器回发给客户端(这个例子中是telnet)的HTTP响应:
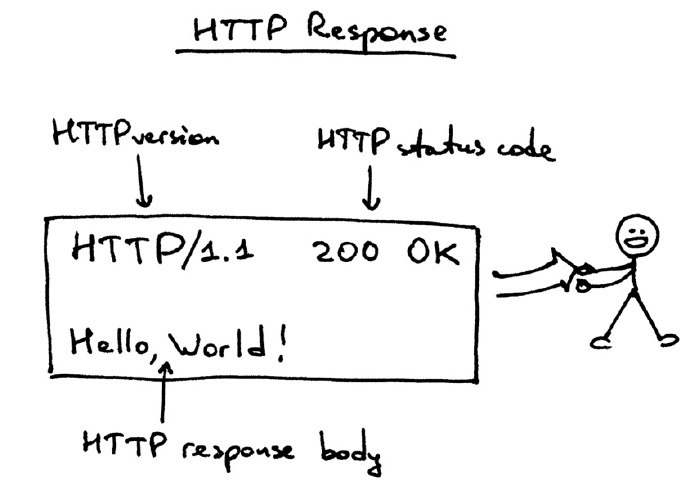
咱们分析一下它,响应包含了状态行HTTP/1.1 200 OK,随后一个必须的空行,和HTTP响应body。
响应状态行TTP/1.1 200 OK包含了HTTP版本,HTTP状态码和HTTP状态码理由短语OK。浏览器得到响应时,它就显示响应的body,所以你就看到了“Hello, World!”
这就是WEB浏览器怎么工作的基本模型。总结来说:WEB服务器创建一个监听socket然后开始循环接受新连接。客户端初始化一个TCP连接,在连接成功后,客户端发送HTTP请求到服务器,服务器响应一个显示给用户的HTTP响应。客户端和服务器都使用socket建立TCP连接。
你现在你拥有了一个非常基础的WEB服务器,你可以用浏览器或其他的HTTP客户端测试它。正如你看到的,使用telnet手动输入HTTP请求,你也就成了一个人肉 HTTP 客户端。
对你来说有一个问题:“怎样在你的刚完成的WEB服务器下运行 Django 应用、Flask 应用和 Pyramid 应用?在不单独修改服务器来适应这些不同的 WEB 框架的情况下。”
还记得吗?在“怎样在你的刚完成的WEB服务器下运行 Django 应用、Flask 应用和 Pyramid 应用?在不单独修改服务器来适应这些不同的WEB框架的情况下。”往下看,来找出答案。
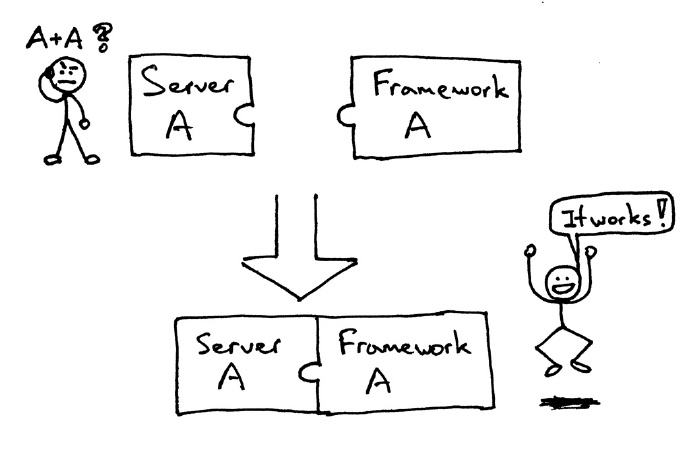
过去,你所选择的一个Python Web框架会限制你选择可用的Web服务器,反之亦然。如果框架和服务器设计的是可以一起工作的,那就很好:
但是,当你试着结合没有设计成可以一起工作的服务器和框架时,你可能要面对(可能你已经面对了)下面这种问题:
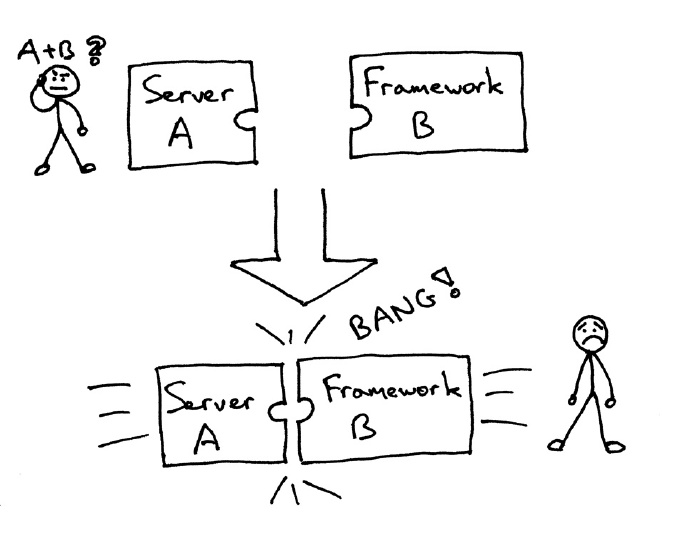
基本上,你只能用可以在一起工作的部分,而不是你想用的部分。
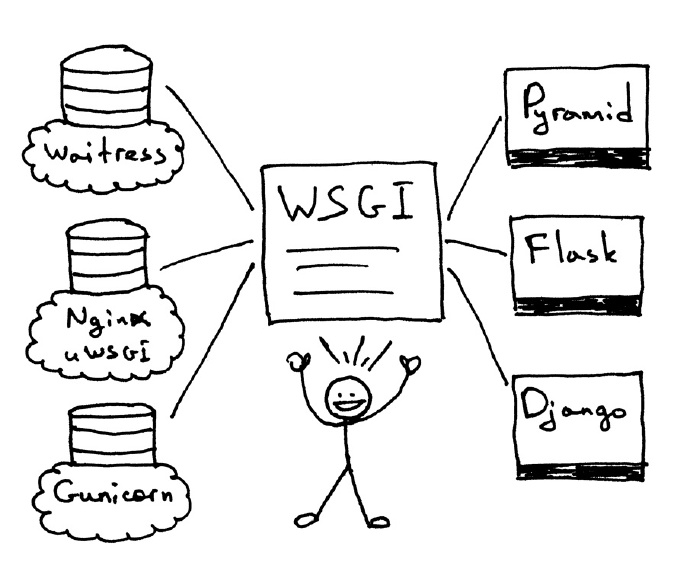
那么,怎样确保在不修改Web服务器和Web框架下,用你的Web服务器运行不同的Web框架?答案就是Python Web服务器网关接口(或者缩写为WSGI,读作“wizgy”)。

WSGI允许开发者把框架的选择和服务器的选择分开。现在你可以真正地混合、匹配Web服务器和Web框架了。例如,你可以在Gunicorn或者Nginx/uWSGI或者Waitress上面运行Django,Flask,或Pyramid。真正的混合和匹配哟,感谢WSGI服务器和框架两者都支持:
就这样,WSGI成了我在本系列第一部分和本文开头重复问的问题的答案。你的Web服务器必须实现WSGI接口的服务器端,所有的现代Python Web框架已经实现 了WSGI接口的框架端了,这就让你可以不用修改服务器代码,适应某个框架。
现在你了解了Web服务器和WEb框架支持的WSGI允许你选择一对儿合适的(服务器和框架),它对服务器和框架的开发者也有益,因为他们可以专注于他们特定的领域,而不是越俎代庖。其他语言也有相似的接口:例如,Java有Servlet API,Ruby有Rack。
一切都还不错,但我打赌你会说:“秀代码给我看!” 好吧,看看这个漂亮且简约的WSGI服务器实现:
# Tested with Python 2.7.9, Linux & Mac OS X
import socket
import StringIO
import sys


class WSGIServer(object):

    address_family = socket.AF_INET
    socket_type = socket.SOCK_STREAM
    request_queue_size = 1

    def __init__(self, server_address):
        # Create a listening socket
        self.listen_socket = listen_socket = socket.socket(
            self.address_family,
            self.socket_type
        )
        # Allow to reuse the same address
        listen_socket.setsockopt(socket.SOL_SOCKET, socket.SO_REUSEADDR, 1)
        # Bind
        listen_socket.bind(server_address)
        # Activate
        listen_socket.listen(self.request_queue_size)
        # Get server host name and port
        host, port = self.listen_socket.getsockname()[:2]
        self.server_name = socket.getfqdn(host)
        self.server_port = port
        # Return headers set by Web framework/Web application
        self.headers_set = []

    def set_app(self, application):
        self.application = application

    def serve_forever(self):
        listen_socket = self.listen_socket
        while True:
            # New client connection
            self.client_connection, client_address = listen_socket.accept()
            # Handle one request and close the client connection. Then
            # loop over to wait for another client connection
            self.handle_one_request()

    def handle_one_request(self):
        self.request_data = request_data = self.client_connection.recv(1024)
        # Print formatted request data a la 'curl -v'
        print(''.join(
            '< {line}\n'.format(line=line)
            for line in request_data.splitlines()
        ))

        self.parse_request(request_data)

        # Construct environment dictionary using request data
        env = self.get_environ()

        # It's time to call our application callable and get
        # back a result that will become HTTP response body
        result = self.application(env, self.start_response)

        # Construct a response and send it back to the client
        self.finish_response(result)

    def parse_request(self, text):
        request_line = text.splitlines()[0]
        request_line = request_line.rstrip('\r\n')
        # Break down the request line into components
        (self.request_method,  # GET
         self.path,            # /hello
         self.request_version  # HTTP/1.1
         ) = request_line.split()

    def get_environ(self):
        env = {}
        # The following code snippet does not follow PEP8 conventions
        # but it's formatted the way it is for demonstration purposes
        # to emphasize the required variables and their values
        #
        # Required WSGI variables
        env['wsgi.version']      = (1, 0)
        env['wsgi.url_scheme']   = 'http'
        env['wsgi.input']        = StringIO.StringIO(self.request_data)
        env['wsgi.errors']       = sys.stderr
        env['wsgi.multithread']  = False
        env['wsgi.multiprocess'] = False
        env['wsgi.run_once']     = False
        # Required CGI variables
        env['REQUEST_METHOD']    = self.request_method    # GET
        env['PATH_INFO']         = self.path              # /hello
        env['SERVER_NAME']       = self.server_name       # localhost
        env['SERVER_PORT']       = str(self.server_port)  # 8888
        return env

    def start_response(self, status, response_headers, exc_info=None):
        # Add necessary server headers
        server_headers = [
            ('Date', 'Tue, 31 Mar 2015 12:54:48 GMT'),
            ('Server', 'WSGIServer 0.2'),
        ]
        self.headers_set = [status, response_headers + server_headers]
        # To adhere to WSGI specification the start_response must return
        # a 'write' callable. We simplicity's sake we'll ignore that detail
        # for now.
        # return self.finish_response

    def finish_response(self, result):
        try:
            status, response_headers = self.headers_set
            response = 'HTTP/1.1 {status}\r\n'.format(status=status)
            for header in response_headers:
                response += '{0}: {1}\r\n'.format(*header)
            response += '\r\n'
            for data in result:
                response += data
            # Print formatted response data a la 'curl -v'
            print(''.join(
                '> {line}\n'.format(line=line)
                for line in response.splitlines()
            ))
            self.client_connection.sendall(response)
        finally:
            self.client_connection.close()


SERVER_ADDRESS = (HOST, PORT) = '', 8888


def make_server(server_address, application):
    server = WSGIServer(server_address)
    server.set_app(application)
    return server


if __name__ == '__main__':
    if len(sys.argv) < 2:
        sys.exit('Provide a WSGI application object as module:callable')
    app_path = sys.argv[1]
    module, application = app_path.split(':')
    module = __import__(module)
    application = getattr(module, application)
    httpd = make_server(SERVER_ADDRESS, application)
    print('WSGIServer: Serving HTTP on port {port} ...\n'.format(port=PORT))
    httpd.serve_forever()
它明显比本系列第一部分中的服务器代码大,但为了方便你理解,而不陷入具体细节,它也足够小了(只有150行不到)。上面的服务器还做了别的事 – 它可以运行你喜欢的Web框架写的基本的Web应用,可以是Pyramid,Flask,Django,或者其他的Python WSGI框架。
不信?自己试试看。把上面的代码保存成webserver2.py或者直接从Github上下载。如果你不带参数地直接运行它,它就会报怨然后退出。 Python
| 12 | $ python webserver2.pyProvide a WSGI application object as module:callable |
它真的想给Web框架提供服务,从这开始有趣起来。要运行服务器你唯一需要做的是安装Python。但是要运行使用Pyramid,Flask,和Django写的应用,你得先安装这些框架。一起安装这三个吧。我比较喜欢使用virtualenv。跟着以下步骤来创建和激活一个虚拟环境,然后安装这三个Web框架。
$ [sudo] pip install virtualenv
$ mkdir ~/envs
$ virtualenv ~/envs/lsbaws/
$ cd ~/envs/lsbaws/
$ ls
bin  include  lib
$ source bin/activate
(lsbaws) $ pip install pyramid
(lsbaws) $ pip install flask
(lsbaws) $ pip install django
此时你需要创建一个Web应用。我们先拿Pyramid开始吧。保存以下代码到保存webserver2.py时相同的目录。命名为pyramidapp.py。或者直接从Github上下载:
from pyramid.config import Configurator
from pyramid.response import Response


def hello_world(request):
    return Response(
        'Hello world from Pyramid!\n',
        content_type='text/plain',
    )

config = Configurator()
config.add_route('hello', '/hello')
config.add_view(hello_world, route_name='hello')
app = config.make_wsgi_app()
现在你已经准备好用完全属于自己的Web服务器来运行Pyramid应用了:
| 12 | (lsbaws) $ python webserver2.py pyramidapp:appWSGIServer: Serving HTTP on port 8888 … |
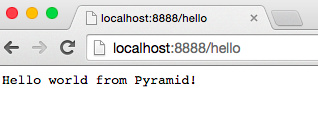
刚才你告诉你的服务器从python模块‘pyramidapp’中加载可调用的‘app’,现在你的服务器准备好了接受请求然后转发它们给你的Pyramid应用。目前应用只处理一个路由:/hello 路由。在浏览器里输入http://localhost:8888/hello地址,按回车键,观察结果:
你也可以在命令行下使用‘curl’工具来测试服务器:
| 12 | $ curl -v http://localhost:8888/hello… |
检查服务器和curl输出了什么到标准输出。
现在弄Flask。按照相同的步骤。
from flask import Flask
from flask import Response
flask_app = Flask('flaskapp')


@flask_app.route('/hello')
def hello_world():
    return Response(
        'Hello world from Flask!\n',
        mimetype='text/plain'
    )

app = flask_app.wsgi_app
保存以上代码为flaskapp.py或者从Github上下载它。然后像这样运行服务器:
| 12 | (lsbaws) $ python webserver2.py flaskapp:appWSGIServer: Serving HTTP on port 8888 … |
现在在浏览器里输入http://localhost:8888/hello然后按回车:
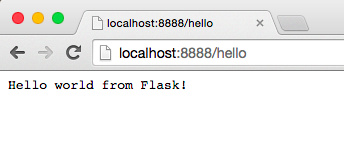
再一次,试试‘curl’,看看服务器返回了一条Flask应用产生的消息:
| 12 | $ curl -v http://localhost:8888/hello… |
服务器也能处理Django应用吗?试试吧!尽管这有点复杂,但我还是推荐克隆整个仓库,然后使用djangoapp.py,它是GitHub仓库的一部分。以下的源码,简单地把Django ‘helloworld’ 工程(使用Django的django-admin.py启动项目预创建的)添加到当前Python路径,然后导入了工程的WSGI应用。
import sys
sys.path.insert(0, './helloworld')
from helloworld import wsgi

app = wsgi.application
把以上代码保存为djangoapp.py,然后用你的Web服务器运行Django应用:
| 12 | (lsbaws) $ python webserver2.py djangoapp:appWSGIServer: Serving HTTP on port 8888 … |
输入下面的地址,然后按回车键:
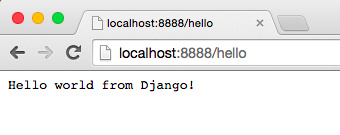
虽然你已经做过两次啦,你还是可以再在命令行测试一下,确认一下,这次是Django应用处理了请求。 Python
| 12 | $ curl -v http://localhost:8888/hello… |
你试了吧?你确定服务器可以和这三个框架一起工作吧?如果没试,请试一下。阅读挺重要,但这个系列是关于重建的,也就是说,你要自己动手。去动手试试吧。别担心,我等你哟。你必须试下,最好呢,你亲自输入所有的东西,确保它工作起来像你期望的那样。
很好,你已经体验到了WSGI的强大:它可以让你把Web服务器和Web框架结合起来。WSGI提供了Python Web服务器和Python Web框架之间的一个最小接口。它非常简单,在服务器和框架端都可以轻易实现。下面的代码片段展示了(WSGI)接口的服务器和框架端:
def run_application(application):
    """Server code."""
    # This is where an application/framework stores
    # an HTTP status and HTTP response headers for the server
    # to transmit to the client
    headers_set = []
    # Environment dictionary with WSGI/CGI variables
    environ = {}

    def start_response(status, response_headers, exc_info=None):
        headers_set[:] = [status, response_headers]

    # Server invokes the ‘application' callable and gets back the
    # response body
    result = application(environ, start_response)
    # Server builds an HTTP response and transmits it to the client
    …

def app(environ, start_response):
    """A barebones WSGI app."""
    start_response('200 OK', [('Content-Type', 'text/plain')])
    return ['Hello world!']

run_application(app)
以下是它如何工作的:
- 1.框架提供一个可调用的’应用’(WSGI规格并没有要求如何实现)
- 2.服务器每次接收到HTTP客户端请求后,执行可调用的’应用’。服务器把一个包含了WSGI/CGI变量的字典和一个可调用的’start_response’做为参数给可调用的’application’。
- 3.框架/应用生成HTTP状态和HTTP响应头,然后把它们传给可调用的’start_response’,让服务器保存它们。框架/应用也返回一个响应体。
- 4.服务器把状态,响应头,响应体合并到HTTP响应里,然后传给(HTTP)客户端(这步不是(WSGI)规格里的一部分,但它是后面流程中的一步,为了解释清楚我加上了这步)
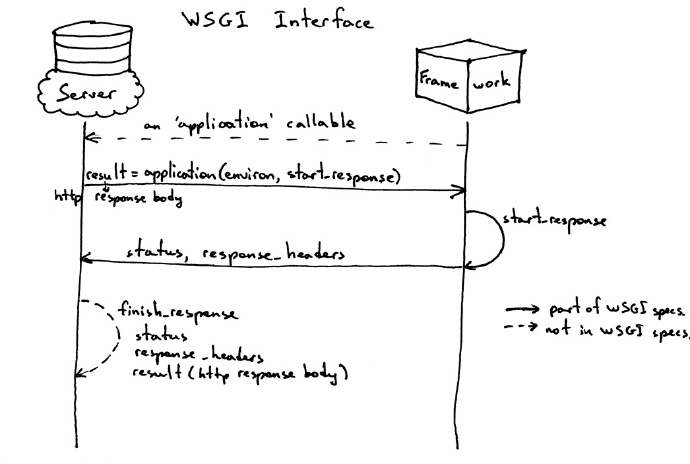
以下是接口的视觉描述:
目前为止,你已经了解了Pyramid,Flask,和Django Web应用,你还了解了实现了WSGI规范服务器端的服务器代码。你甚至已经知道了不使用任何框架的基本的WSGI应用代码片段。
问题就在于,当你使用这些框架中的一个来写Web应用时,你站在一个比较高的层次,并不直接和WSGI打交道,但我知道你对WSGI接口的框架端好奇,因为你在读本文。所以,咱们一起写个极简的WSGI Web应用/Web框架吧,不用Pyramid,Flask,或者Django,然后用你的服务器运行它:
def app(environ, start_response):
    """A barebones WSGI application.

    This is a starting point for your own Web framework :)
    """
    status = '200 OK'
    response_headers = [('Content-Type', 'text/plain')]
    start_response(status, response_headers)
    return ['Hello world from a simple WSGI application!\n']
再次,保存以上代码到wsgiapp.py文件,或者直接从GitHub上下载,然后像下面这样使用你的Web服务器运行应用: Python
| 12 | (lsbaws) $ python webserver2.py wsgiapp:appWSGIServer: Serving HTTP on port 8888 … |
输入下面地址,敲回车。你应该就看到下面结果了:

在你学习怎样写一个Web服务器时,你刚刚写了一个你自己的极简的WSGI Web框架!棒极啦。
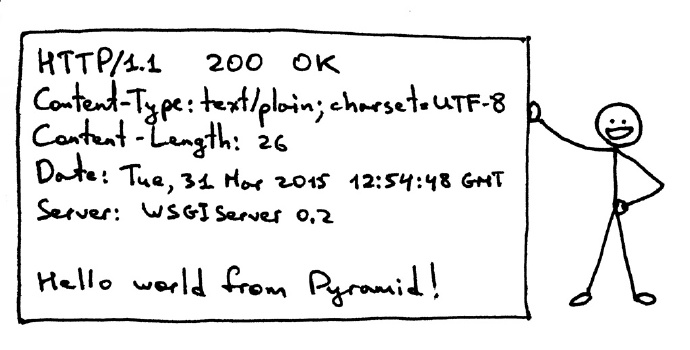
现在,让我们回头看看服务器传输了什么给客户端。以下就是使用HTTP客户端调用Pyramid应用时生成的HTTP响应:
这个响应跟你在本系列第一部分看到的有一些相近的部分,但也有一些新东西。例如,你以前没见过的4个HTTP头:Content-Type, Content-Length, Date, 和Servedr。这些头是Web服务器生成的响应应该有的。虽然他们并不是必须的。头的目的传输HTTP请求/响应的额外信息。
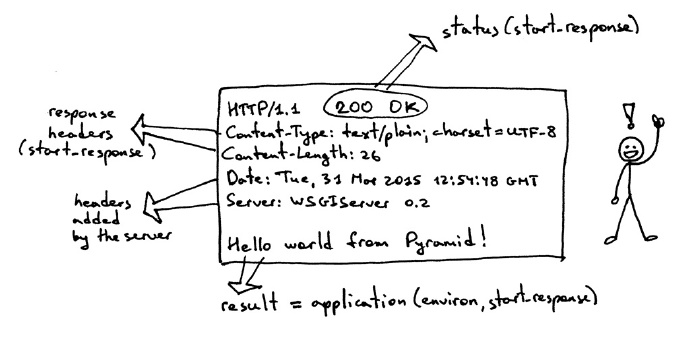
现在你对WSGI接口了解的更多啦,同样,以下是带有更多信息的HTTP响应,这些信息表示了哪些部件产生的它(响应):

我还没有介绍’environ’字典呢,但它基本上就是一个Python字典,必须包含WSGI规范规定的必要的WSGI和CGI变量。服务器在解析请求后,从HTTP请求拿到了字典的值,字典的内容看起来像下面这样:
Web框架使用字典里的信息来决定使用哪个视图,基于指定的路由,请求方法等,从哪里读请求体,错误写到哪里去,如果有的话。
现在你已经创建了你自己的WSGI Web服务器,使用不同的Web框架写Web应用。还有,你还顺手写了个简单的Web应用/Web框架。真是段难忘的旅程。咱们简要重述下WSGI Web服务器必须做哪些工作才能处理发给WSGI应用的请求吧:
- 首先,服务器启动并加载一个由Web框架/应用提供的可调用的’application’
- 然后,服务器读取请求
- 然后,服务器解析它
- 然后,服务器使用请求的数据创建了一个’environ’字典
- 然后,服务器使用’environ’字典和’start_response’做为参数调用’application’,并拿到返回的响应体。
- 然后,服务器使用调用’application’返回的数据,由’start_response’设置的状态和响应头,来构造HTTP响应。
- 最终,服务器把HTTP响应传回给户端。
这就是全部啦。现在你有了一个可工作的WSGI服务器,它可以处理使用像Django,Flask,Pyramid或者 你自己的WSGI框架这样的兼容WSGI的Web框架写的基本的Web应用。最优秀的地方是,服务器可以在不修改代码的情况下,使用不同的Web框架。
在你离开之前,还有个问题请你想一下,“该怎么做才能让服务器同一时间处理多个请求呢?”
“发明创造时,我们学得最多” —— Piaget
你已经创造了一个可以处理基本的 HTTP GET 请求的 WSGI 服务器。我还问了你一个问题,“怎么让服务器在同一时间处理多个请求?”在本文中你将找到答案。那么,系好安全带加大马力。你马上就乘上快车啦。准备好Linux、Mac OS X(或任何类unix系统)和 Python。本文的所有源码都能在GitHub上找到。
首先咱们回忆下一个基本的Web服务器长什么样,要处理客户端请求它得做什么。你在第一部分和第二部分创建的是一个迭代的服务器,每次处理一个客户端请求。除非已经处理了当前的客户端请求,否则它不能接受新的连接。有些客户端对此就不开心了,因为它们必须要排队等待,而且如果服务器繁忙的话,这个队伍会很长。

以下是迭代服务器webserver3a.py的代码:
#####################################################################
# Iterative server - webserver3a.py                                 #
#                                                                   #
# Tested with Python 2.7.9 & Python 3.4 on Ubuntu 14.04 & Mac OS X  #
#####################################################################
import socket

SERVER_ADDRESS = (HOST, PORT) = '', 8888
REQUEST_QUEUE_SIZE = 5

def handle_request(client_connection):
    request = client_connection.recv(1024)
    print(request.decode())
    http_response = b"""
HTTP/1.1 200 OK

Hello, World!
"""
    client_connection.sendall(http_response)

def serve_forever():
    listen_socket = socket.socket(socket.AF_INET, socket.SOCK_STREAM)
    listen_socket.setsockopt(socket.SOL_SOCKET, socket.SO_REUSEADDR, 1)
    listen_socket.bind(SERVER_ADDRESS)
    listen_socket.listen(REQUEST_QUEUE_SIZE)
    print('Serving HTTP on port {port} ...'.format(port=PORT))

    while True:
        client_connection, client_address = listen_socket.accept()
        handle_request(client_connection)
        client_connection.close()

if __name__ == '__main__':
    serve_forever()
要观察服务器同一时间只处理一个客户端请求,稍微修改一下服务器,在每次发送给客户端响应后添加一个60秒的延迟。添加这行代码就是告诉服务器睡眠60秒。

以下是睡眠版的服务器webserver3b.py代码:
#########################################################################
# Iterative server - webserver3b.py                                     #
#                                                                       #
# Tested with Python 2.7.9 & Python 3.4 on Ubuntu 14.04 & Mac OS X      #
#                                                                       #
# - Server sleeps for 60 seconds after sending a response to a client   #
#########################################################################
import socket
import time

SERVER_ADDRESS = (HOST, PORT) = '', 8888
REQUEST_QUEUE_SIZE = 5

def handle_request(client_connection):
    request = client_connection.recv(1024)
    print(request.decode())
    http_response = b"""
HTTP/1.1 200 OK

Hello, World!
"""
    client_connection.sendall(http_response)
    time.sleep(60)  # sleep and block the process for 60 seconds

def serve_forever():
    listen_socket = socket.socket(socket.AF_INET, socket.SOCK_STREAM)
    listen_socket.setsockopt(socket.SOL_SOCKET, socket.SO_REUSEADDR, 1)
    listen_socket.bind(SERVER_ADDRESS)
    listen_socket.listen(REQUEST_QUEUE_SIZE)
    print('Serving HTTP on port {port} ...'.format(port=PORT))

    while True:
        client_connection, client_address = listen_socket.accept()
        handle_request(client_connection)
        client_connection.close()

if __name__ == '__main__':
    serve_forever()
启动服务器:
| 1 | $ python webserver3b.py |
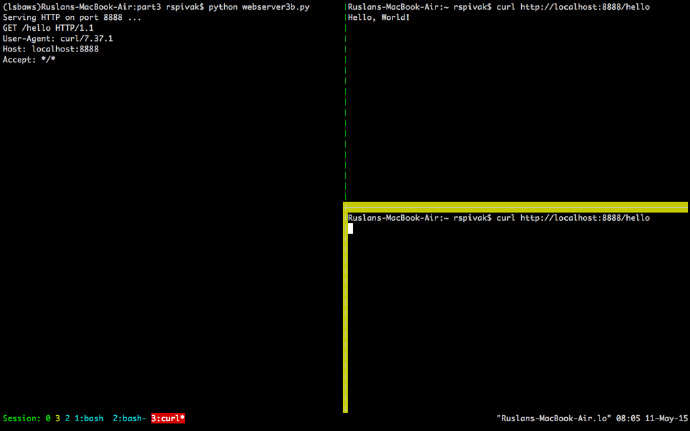
现在打开一个新的控制台窗口,运行以下curl命令。你应该立即就会看到屏幕上打印出了“Hello, World!”字符串:
$ curl http://localhost:8888/hello
Hello, World!

And without delay open up a second terminal window and run the same curl command:
立刻再打开一个控制台窗口,然后运行相同的curl命令:
| 1 | $ curl http://localhost:8888/hello |
如果你是在60秒内做的,那么第二个curl应该不会立刻产生任何输出,而是挂起。而且服务器也不会在标准输出打印出新请求体。在我的Mac上看起来像这样(在右下角的黄色高亮窗口表示第二个curl命令正挂起,等待服务器接受这个连接):
当你等待足够长时间(大于60秒)后,你会看到第一个curl终止了,第二个curl在屏幕上打印出“Hello, World!”,然后挂起60秒,然后再终止:
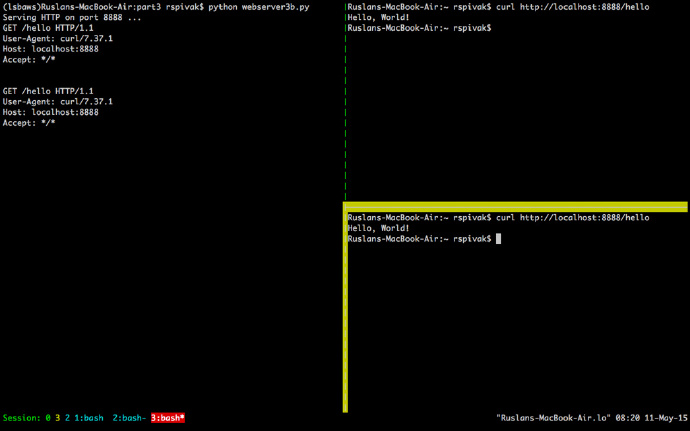
它是这么工作的,服务器完成处理第一个curl客户端请求,然后睡眠60秒后开始处理第二个请求。这些都是顺序地,或者迭代地,一步一步地,或者,在我们例子中是一次一个客户端请求地,发生。
咱们讨论点客户端和服务器的通信吧。为了让两个程序能够网络通信,它们必须使用socket。你在第一部分和第二部分已经见过socket了,但是,socket是什么呢?

socket就是通信终端的一种抽象,它允许你的程序使用文件描述符和别的程序通信。本文我将详细谈谈在Linux/Mac OS X上的TCP/IP socket。理解socket的一个重要的概念是TCP socket对。
TCP的socket对是一个4元组,标识着TCP连接的两个终端:本地IP地址、本地端口、远程IP地址、远程端口。一个socket对唯一地标识着网络上的TCP连接。标识着每个终端的两个值,IP地址和端口号,通常被称为socket。
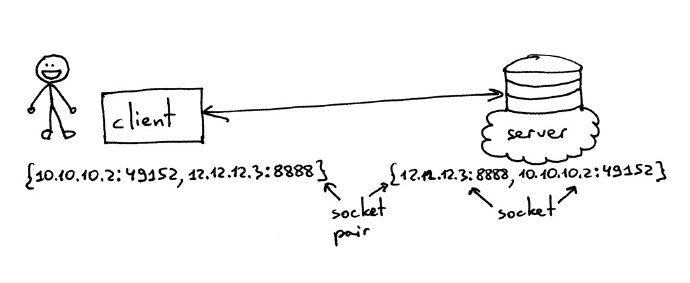
所以,元组{10.10.10.2:49152, 12.12.12.3:8888}是客户端TCP连接的唯一标识着两个终端的socket对。元组{12.12.12.3:8888, 10.10.10.2:49152}是服务器TCP连接的唯一标识着两个终端的socket对。标识TCP连接中服务器终端的两个值,IP地址12.12.12.3和端口8888,在这里就是指socket(同样适用于客户端终端)。
服务器创建一个socket并开始接受客户端连接的标准流程经历通常如下:
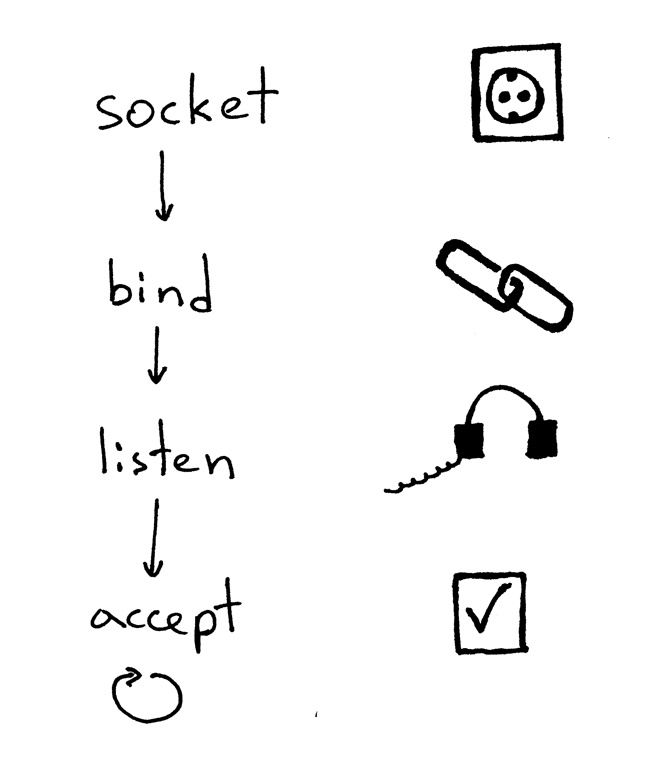
- 服务器创建一个TCP/IP socket。在Python里使用下面的语句即可:
Python 1listen_socket = socket.socket(socket.AF_INET, socket.SOCK_STREAM) - 服务器可能会设置一些socket选项(这是可选的,上面的代码就设置了,为了在杀死或重启服务器后,立马就能再次重用相同的地址)。
Python 1listen_socket.setsockopt(socket.SOL_SOCKET, socket.SO_REUSEADDR, 1) - 然后,服务器绑定指定地址,bind函数分配一个本地地址给socket。在TCP中,调用bind可以指定一个端口号,一个IP地址,两者都,或者两者都不指定。
Python 1listen_socket.bind(SERVER_ADDRESS) - 然后,服务器让这个socket成为监听socket。
Python 1listen_socket.listen(REQUEST_QUEUE_SIZE)
listen方法只会被服务器调用。它告诉内核它要接受这个socket上的到来的连接请求了。
做完这些后,服务器开始循环地一次接受一个客户端连接。当有连接到达时,aceept调用返回已连接的客户端socket。然后,服务器从这个socket读取请求数据,在标准输出上把数据打印出来,并回发一个消息给客户端。然后,服务器关闭客户端连接,准备好再次接受新的客户端连接。
下面是客户端使用TCP/IP和服务器通信要做的:
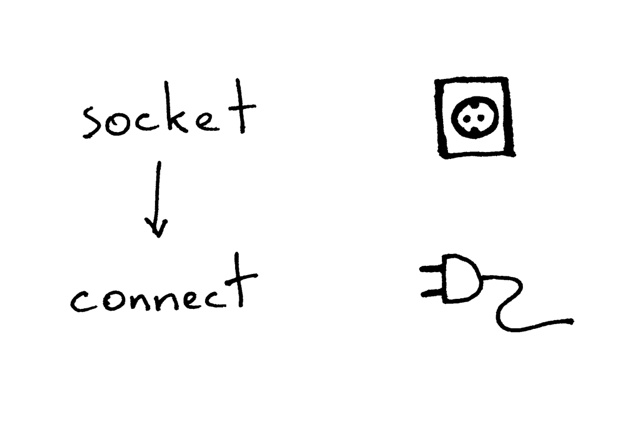
以下是客户端连接服务器,发送请求并打印响应的示例代码:
import socket

# create a socket and connect to a server
sock = socket.socket(socket.AF_INET, socket.SOCK_STREAM)
sock.connect(('localhost', 8888))

# send and receive some data
sock.sendall(b'test')
data = sock.recv(1024)
print(data.decode())
创建socket后,客户端需要连接服务器。这是通过connect调用做到的: Python
| 1 | sock.connect((‘localhost’, 8888)) |
客户端仅需提供要连接的远程IP地址或主机名和远程端口号即可。
可能你注意到了,客户端不用调用bind和accept。客户端没必要调用bind,是因为客户端不关心本地IP地址和本地端口号。当客户端调用connect时内核的TCP/IP栈自动分配一个本地IP址地和本地端口。本地端口被称为暂时端口( ephemeral port),也就是,short-lived 端口。

服务器上标识着一个客户端连接的众所周知的服务的端口被称为well-known端口(举例来说,80就是HTTP,22就是SSH)。操起Python shell,创建个连接到本地服务器的客户端连接,看看内核分配给你创建的socket的暂时的端口是多少(在这之前启动webserver3a.py或webserver3b.py):
>>> import socket
>>> sock = socket.socket(socket.AF_INET, socket.SOCK_STREAM)
>>> sock.connect(('localhost', 8888))
>>> host, port = sock.getsockname()[:2]
>>> host, port
('127.0.0.1', 60589)
上面这个例子中,内核分配了60589这个暂时端口。
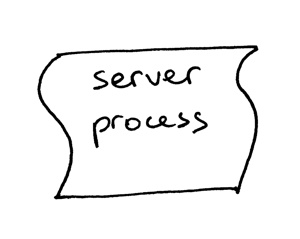
在我开始回答第二部分提出的问题前,我需要快速讲一下几个重要的概念。你很快就知道为什么重要了。两个概念是进程和文件描述符。
什么是进程?进程就是一个正在运行的程序的实例。比如,当服务器代码执行时,它被加载进内存,运行起来的程序实例被称为进程。内核记录了进程的一堆信息用于跟踪,进程ID就是一个例子。当你运行服务器 webserver3a.py 或 webserver3b.py 时,你就在运行一个进程了。
在控制台窗口运行webserver3b.py: Python
| 1 | $ python webserver3b.py |
在别的控制台窗口使用ps命令获取这个进程的信息: Python
| 12 | $ ps | grep webserver3b | grep -v grep7182 ttys003 0:00.04 python webserver3b.py |
ps命令表示你确实运行了一个Python进程webserver3b。进程创建时,内核分配给它一个进程ID,也就是 PID。在UNIX里,每个用户进程都有个父进程,父进程也有它自己的进程ID,叫做父进程ID,或者简称PPID。假设默认你是在BASH shell里运行的服务器,那新进程的父进程ID就是BASH shell的进程ID。
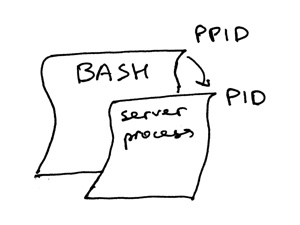
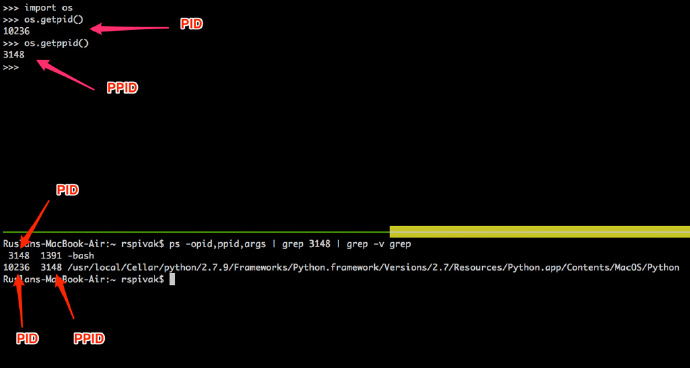
自己试试,看看它是怎么工作的。再启动Python shell,这将创建一个新进程,使用 os.getpid() 和 os.getppid() 系统调用获取Python shell进程的ID和父进程ID(BASH shell的PID)。然后,在另一个控制台窗口运行ps命令,使用grep查找PPID(父进程ID,我的是3148)。在下面的截图你可以看到在我的Mac OS X上,子Python shell进程和父BASH shell进程的关系:
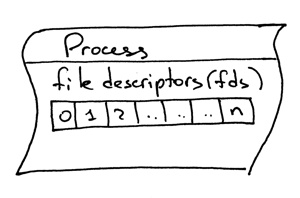
另一个要了解的重要概念是文件描述符。那么什么是文件描述符呢?文件描述符是当打开一个存在的文件,创建一个文件,或者创建一个socket时,内核返回的非负整数。你可能已经听过啦,在UNIX里一切皆文件。内核使用文件描述符来追踪进程打开的文件。当你需要读或写文件时,你就用文件描述符标识它好啦。Python给你包装成更高级别的对象来处理文件(和socket),你不必直接使用文件描述符来标识一个文件,但是,在底层,UNIX中是这样标识文件和socket的:通过它们的整数文件描述符。
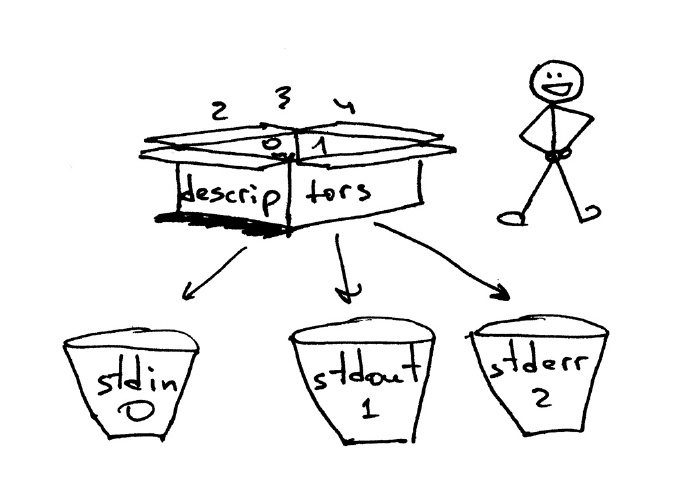
默认情况下,UNIX shell分配文件描述符0给进程的标准输入,文件描述符1给进程的标准输出,文件描述符2给标准错误。
就像我前面说的,虽然Python给了你更高级别的文件或者类文件的对象,你仍然可以使用对象的fileno()方法来获取对应的文件描述符。回到Python shell来看看怎么做:
>>> import sys
>>> sys.stdin
<open file '<stdin>', mode 'r' at 0x102beb0c0>
>>> sys.stdin.fileno()
0
>>> sys.stdout.fileno()
1
>>> sys.stderr.fileno()
2
虽然在Python中处理文件和socket,通常使用高级的文件/socket对象,但有时候你需要直接使用文件描述符。下面这个例子告诉你如何使用write系统调用写一个字符串到标准输出,write使用整数文件描述符做为参数:
>>> import sys
>>> import os
>>> res = os.write(sys.stdout.fileno(), 'hellon')
hello
有趣的是——应该不会惊讶到你啦,因为你已经知道在UNIX里一切皆文件——socket也有一个分配给它的文件描述符。再说一遍,当你创建一个socket时,你得到的是一个对象而不是非负整数,但你也可以使用我前面提到的fileno()方法直接访问socket的文件描述符。
还有一件事我想说下:你注意到了吗?在第二个例子webserver3b.py中,当服务器进程在60秒的睡眠时你仍然可以用curl命令来连接。当然啦,curl没有立刻输出什么,它只是在那挂起。但为什么服务器不接受连接,客户端也不立刻被拒绝,而是能连接服务器呢?答案就是socket对象的listen方法和它的BACKLOG参数,我称它为 REQUEST_QUEUE_SIZE(请求队列长度)。BACKLOG参数决定了内核为进入的连接请求准备的队列长度。当服务器webser3b.py睡眠时,第二个curl命令可以连接到服务器,因为内核在服务器socket的进入连接请求队列上有足够的可用空间。
然而增加BACKLOG参数不会神奇地让服务器同时处理多个客户端请求,设置一个合理大点的backlog参数挺重要的,这样accept调用就不用等新连接建立起来,立刻就能从队列里获取新的连接,然后开始处理客户端请求啦。
吼吼!你已经了解了非常多的背景知识啦。咱们快速简要重述到目前为止你都学了什么(如果你都知道啦就温习一下吧)。

- 迭代服务器
- 服务器socket创建流程(socket, bind, listen, accept)
- 客户端连接创建流程(socket, connect)
- socket对
- socket
- 临时端口和众所周知端口
- 进程
- 进程ID(PID),父进程ID(PPID),父子关系。
- 文件描述符
- listen方法的BACKLOG参数的意义
现在我准备回答第二部分问题的答案了:“怎样才能让服务器同时处理多个请求?”或者换句话说,“怎样写一个并发服务器?”

在Unix上写一个并发服务器最简单的方法是使用fork()系统调用。

下面就是新的牛逼闪闪的并发服务器webserver3c.py的代码,它能同时处理多个客户端请求(和咱们迭代服务器例子webserver3b.py一样,每个子进程睡眠60秒):

###########################################################################
# Concurrent server - webserver3c.py                                      #
#                                                                         #
# Tested with Python 2.7.9 & Python 3.4 on Ubuntu 14.04 & Mac OS X        #
#                                                                         #
# - Child process sleeps for 60 seconds after handling a client's request #
# - Parent and child processes close duplicate descriptors                #
#                                                                         #
###########################################################################
import os
import socket
import time

SERVER_ADDRESS = (HOST, PORT) = '', 8888
REQUEST_QUEUE_SIZE = 5

def handle_request(client_connection):
    request = client_connection.recv(1024)
    print(
        'Child PID: {pid}. Parent PID {ppid}'.format(
            pid=os.getpid(),
            ppid=os.getppid(),
        )
    )
    print(request.decode())
    http_response = b"""
HTTP/1.1 200 OK

Hello, World!
"""
    client_connection.sendall(http_response)
    time.sleep(60)

def serve_forever():
    listen_socket = socket.socket(socket.AF_INET, socket.SOCK_STREAM)
    listen_socket.setsockopt(socket.SOL_SOCKET, socket.SO_REUSEADDR, 1)
    listen_socket.bind(SERVER_ADDRESS)
    listen_socket.listen(REQUEST_QUEUE_SIZE)
    print('Serving HTTP on port {port} ...'.format(port=PORT))
    print('Parent PID (PPID): {pid}n'.format(pid=os.getpid()))

    while True:
        client_connection, client_address = listen_socket.accept()
        pid = os.fork()
        if pid == 0:  # child
            listen_socket.close()  # close child copy
            handle_request(client_connection)
            client_connection.close()
            os._exit(0)  # child exits here
        else:  # parent
            client_connection.close()  # close parent copy and loop over

if __name__ == '__main__':
    serve_forever()
在深入讨论for如何工作之前,先自己试试,看看服务器确实可以同时处理多个请求,不像webserver3a.py和webserver3b.py。用下面命令启动服务器: Python
| 1 | $ python webserver3c.py |
像你以前那样试试用两个curl命令,自己看看,现在虽然服务器子进程在处理客户端请求时睡眠60秒,但不影响别的客户端,因为它们是被不同的完全独立的进程处理的。你应该能看到curl命令立刻就输出了“Hello, World!”,然后挂起60秒。你可以接着想运行多少curl命令就运行多少(嗯,几乎是任意多),它们都会立刻输出服务器的响应“Hello, Wrold”,而且不会有明显的延迟。试试看。
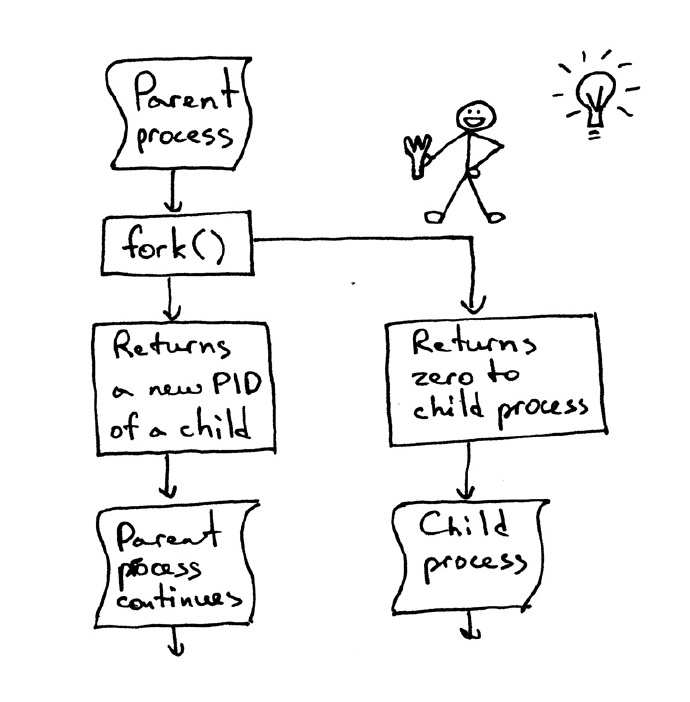
理解fork()的最重要的点是,你fork了一次,但它返回了两次:一个是在父进程里,一个是在子进程里。当你fork了一个新进程,子进程返回的进程ID是0。父进程里fork返回的是子进程的PID。
我仍然记得当我第一次知道它使用它时我对fork是有多着迷。它就像魔法一样。我正读着一段连续的代码,然后“duang”的一声:代码克隆了自己,然后就有两个相同代码的实例同时运行。我想除了魔法无法做到,我是认真哒。
当父进程fork了一个新的子进程,子进程就获取了父进程文件描述符的拷贝:
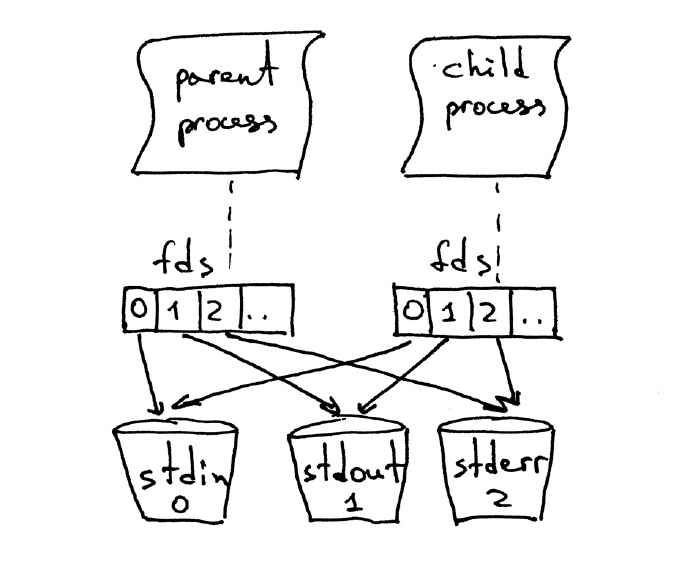
你可能已经注意到啦,上面代码里的父进程关闭了客户端连接: Python
| 12 | else: # parent client_connection.close() # close parent copy and loop over |
那么,如果它的父进程关闭了同一个socket,子进程为什么还能从客户端socket读取数据呢?答案就在上图。内核使用描述符引用计数来决定是否关闭socket。只有当描述符引用计数为0时才关闭socket。当服务器创建一个子进程,子进程获取了父进程的文件描述符拷贝,内核增加了这些描述符的引用计数。在一个父进程和一个子进程的场景中,客户端socket的描述符引用计数就成了2,当父进程关闭了客户端连接socket,它仅仅把引用计数减为1,不会引发内核关闭这个socket。子进程也把父进程的listen_socket拷贝给关闭了,因为子进程不用管接受新连接,它只关心处理已经连接的客户端的请求: Python
| 1 | listen_socket.close() # close child copy |
本文后面我会讲下如果不关闭复制的描述符会发生什么。
你从并发服务器源码看到啦,现在服务器父进程唯一的角色就是接受一个新的客户端连接,fork一个新的子进程来处理客户端请求,然后重复接受另一个客户端连接,就没有别的事做啦。服务器父进程不处理客户端请求——它的小弟(子进程)干这事。
跑个题,我们说两个事件并发到底是什么意思呢?

当我们说两个事件并发时,我们通常表达的是它们同时发生。简单来说,这也不错,但你要知道严格定义是这样的: Python
| 1 | 如果你不能通过观察程序来知道哪个先发生的,那么这两个事件就是并发的。 |
又到了简要重述目前为止已经学习的知识点和概念的时间啦.

- 在Unix下写一个并发服务器最简单的方法是使用fork()系统调用
- 当一个进程fork了一个新进程时,它就变成了那个新fork产生的子进程的父进程。
- 在调用fork后,父进程和子进程共享相同的文件描述符。
- 内核使用描述符引用计数来决定是否关闭文件/socket。
- 服务器父进程的角色是:现在它干的所有活就是接受一个新连接,fork一个子进来来处理这个请求,然后循环接受新连接。
咱们来看看,如果在父进程和子进程中你不关闭复制的socket描述符会发生什么吧。以下是个修改后的版本,服务器不关闭复制的描述符,webserver3d.py:
 ###########################################################################
# Concurrent server - webserver3d.py                                      #
#                                                                         #
# Tested with Python 2.7.9 & Python 3.4 on Ubuntu 14.04 & Mac OS X        #
###########################################################################
import os
import socket

SERVER_ADDRESS = (HOST, PORT) = '', 8888
REQUEST_QUEUE_SIZE = 5

def handle_request(client_connection):
    request = client_connection.recv(1024)
    http_response = b"""
HTTP/1.1 200 OK

Hello, World!
"""
    client_connection.sendall(http_response)

def serve_forever():
    listen_socket = socket.socket(socket.AF_INET, socket.SOCK_STREAM)
    listen_socket.setsockopt(socket.SOL_SOCKET, socket.SO_REUSEADDR, 1)
    listen_socket.bind(SERVER_ADDRESS)
    listen_socket.listen(REQUEST_QUEUE_SIZE)
    print('Serving HTTP on port {port} ...'.format(port=PORT))

    clients = []
    while True:
        client_connection, client_address = listen_socket.accept()
        # store the reference otherwise it's garbage collected
        # on the next loop run
        clients.append(client_connection)
        pid = os.fork()
        if pid == 0:  # child
            listen_socket.close()  # close child copy
            handle_request(client_connection)
            client_connection.close()
            os._exit(0)  # child exits here
        else:  # parent
            # client_connection.close()
            print(len(clients))

if __name__ == '__main__':
    serve_forever()
启动服务器:
| 1 | $ python webserver3d.py |
使用curl去连接服务器:
| 12 | $ curl http://localhost:8888/helloHello, World! |
好的,curl打印出来并发服务器的响应,但是它不终止,一直挂起。发生了什么?服务器不再睡眠60秒了:它的子进程开心地处理了客户端请求,关闭了客户端连接然后退出啦,但是客户端curl仍然不终止。

那么,为什么curl不终止呢?原因就在于复制的文件描述符。当子进程关闭了客户端连接,内核减少引用计数,值变成了1。服务器子进程退出,但是客户端socket没有被内核关闭掉,因为引用计数不是0啊,所以,结果就是,终止数据包(在TCP/IP说法中叫做FIN)没有发送给客户端,所以客户端就保持在线啦。这里还有个问题,如果服务器不关闭复制的文件描述符然后长时间运行,最终会耗尽可用文件描述符。

使用Control-C停止webserver3d.py,使用shell内建的命令ulimit检查一下shell默认设置的进程可用资源:
$ ulimit -a
core file size          (blocks, -c) 0
data seg size           (kbytes, -d) unlimited
scheduling priority             (-e) 0
file size               (blocks, -f) unlimited
pending signals                 (-i) 3842
max locked memory       (kbytes, -l) 64
max memory size         (kbytes, -m) unlimited
open files                      (-n) 1024
pipe size            (512 bytes, -p) 8
POSIX message queues     (bytes, -q) 819200
real-time priority              (-r) 0
stack size              (kbytes, -s) 8192
cpu time               (seconds, -t) unlimited
max user processes              (-u) 3842
virtual memory          (kbytes, -v) unlimited
file locks                      (-x) unlimited
看到上面的了咩,我的Ubuntu上,进程的最大可打开文件描述符是1024。
现在咱们看看怎么让服务器耗尽可用文件描述符。在已存在或新的控制台窗口,调用服务器最大可打开文件描述符为256: Python
| 1 | $ ulimit -n 256 |
在同一个控制台上启动webserver3d.py: Python
| 1 | $ python webserver3d.py |
使用下面的client3.py客户端来测试服务器。
#####################################################################
# Test client - client3.py                                          #
#                                                                   #
# Tested with Python 2.7.9 & Python 3.4 on Ubuntu 14.04 & Mac OS X  #
#####################################################################
import argparse
import errno
import os
import socket

SERVER_ADDRESS = 'localhost', 8888
REQUEST = b"""
GET /hello HTTP/1.1
Host: localhost:8888

"""

def main(max_clients, max_conns):
    socks = []
    for client_num in range(max_clients):
        pid = os.fork()
        if pid == 0:
            for connection_num in range(max_conns):
                sock = socket.socket(socket.AF_INET, socket.SOCK_STREAM)
                sock.connect(SERVER_ADDRESS)
                sock.sendall(REQUEST)
                socks.append(sock)
                print(connection_num)
                os._exit(0)

if __name__ == '__main__':
    parser = argparse.ArgumentParser(
        description='Test client for LSBAWS.',
        formatter_class=argparse.ArgumentDefaultsHelpFormatter,
    )
    parser.add_argument(
        '--max-conns',
        type=int,
        default=1024,
        help='Maximum number of connections per client.'
    )
    parser.add_argument(
        '--max-clients',
        type=int,
        default=1,
        help='Maximum number of clients.'
    )
    args = parser.parse_args()
    main(args.max_clients, args.max_conns)
在新的控制台窗口里,启动client3.py,让它创建300个连接同时连接服务器。 Python
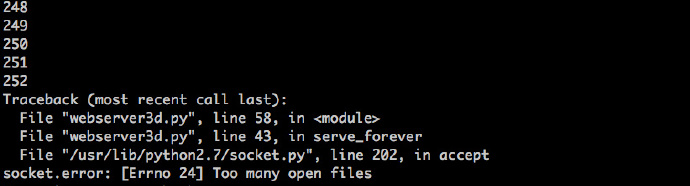
| 1 | $ python client3.py –max-clients=300 |
很快服务器就崩了。下面是我电脑上抛异常的截图:
教训非常明显啦——服务器应该关闭复制的描述符。但即使关闭了复制的描述符,你还没有接触到底层,因为你的服务器还有个问题,僵尸!

是哒,服务器代码就是产生了僵尸。咱们看下是怎么产生的。再次运行服务器: Python
| 1 | $ python webserver3d.py |
在另一个控制台窗口运行下面的curl命令: Python
| 1 | $ curl http://localhost:8888/hello |
现在运行ps命令,显示运行着的Python进程。以下是我的Ubuntu电脑上的ps输出:
$ ps auxw | grep -i python | grep -v grep
vagrant   9099  0.0  1.2  31804  6256 pts/0    S+   16:33   0:00 python webserver3d.py
vagrant   9102  0.0  0.0      0     0 pts/0    Z+   16:33   0:00 [python] <defunct>
你看到上面第二行了咩?它说PId为9102的进程的状态是Z+,进程的名称是。这个就是僵尸啦。僵尸的问题在于,你杀死不了他们啊。

即使你试着用 $ kill -9 来杀死僵尸,它们还是会幸存下来哒,自己试试看看。
僵尸到底是什么呢?为什么咱们的服务器会产生它们呢?僵尸就是一个进程终止了,但是它的父进程没有等它,还没有接收到它的终止状态。当一个子进程比父进程先终止,内核把子进程转成僵尸,存储进程的一些信息,等着它的父进程以后获取。存储的信息通常就是进程ID,进程终止状态,进程使用的资源。嗯,僵尸还是有用的,但如果服务器不好好处理这些僵尸,系统就会越来越堵塞。咱们看看怎么做到的。首先停止服务器,然后新开一个控制台窗口,使用ulimit命令设置最大用户进程为400(确保设置打开文件更高,比如500吧): Python
| 12 | $ ulimit -u 400$ ulimit -n 500 |
在同一个控制台窗口运行webserver3d.py: Python
| 1 | $ python webserver3d.py |
新开一个控制台窗口,启动client3.py,让它创建500个连接同时连接到服务器: Python
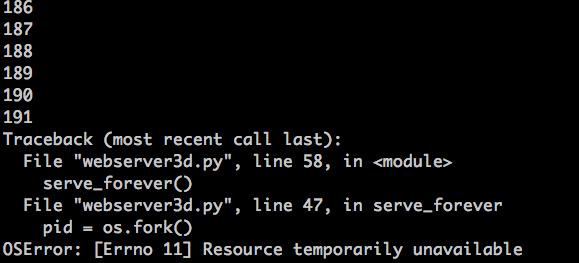
| 1 | $ python client3.py –max-clients=500 |
然后,服务器又一次崩了,是OSError的错误:抛了资源临时不可用的异常,当试图创建新的子进程时但创建不了时,因为达到了最大子进程数限制。以下是我的电脑的截图:
看到了吧,如果你不处理好僵尸,服务器长时间运行就会出问题。我会简短讨论下服务器应该怎样处理僵尸问题。
咱们简要重述下目前为止你已经学习到主要知识点:
- 如果不关闭复制描述符,客户端不会终止,因为客户端连接不会关闭。
- 如果不关闭复制描述符,长时间运行的服务器最终会耗尽可用文件描述符(最大打开文件)。
- 当fork了一个子进程,然后子进程退出了,父进程没有等它,而且没有收集它的终止状态,它就变成僵尸了。
- 僵尸要吃东西,我们的场景中,就是内存。服务器最终会耗尽可用进程(最大用户进程),如果不处理好僵尸的话。
- 僵尸杀不死的,你需要等它们。
那么,处理好僵尸的话,要做什么呢?要修改服务器代码去等僵尸,获取它们的终止状态。通过调用wait系统调用就好啦。不幸的是,这不完美,因为如果调用wait,然而没有终止的子进程,wait就会阻塞服务器,实际上就是阻止了服务器处理新的客户端连接请求。有其他办法吗?当然有啦,其中之一就是使用信息处理器和wait系统调用组合。
以下是如何工作的。当一个子进程终止了,内核发送SIGCHLD信号。父进程可以设置一个信号处理器来异步地被通知,然后就能wait子进程获取它的终止状态,因此阻止了僵尸进程出现。
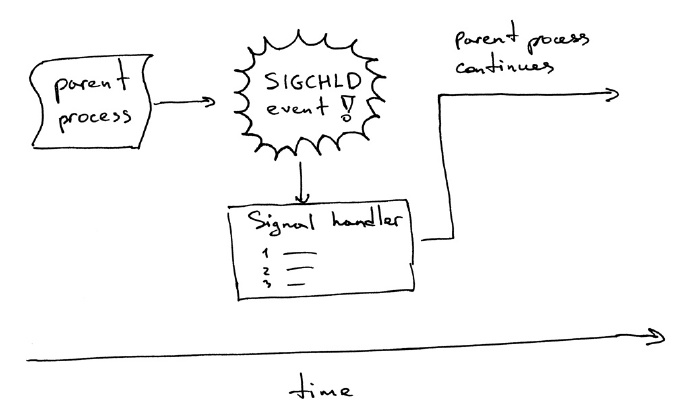
顺便说下,异步事件意味着父进程不会提前知道事件发生的时间。
修改服务器代码,设置一个SIGCHLD事件处理器,然后在事件处理器里wait终止的子进程。webserver3e.py代码如下:
###########################################################################
# Concurrent server - webserver3e.py                                      #
#                                                                         #
# Tested with Python 2.7.9 & Python 3.4 on Ubuntu 14.04 & Mac OS X        #
###########################################################################
import os
import signal
import socket
import time

SERVER_ADDRESS = (HOST, PORT) = '', 8888
REQUEST_QUEUE_SIZE = 5

def grim_reaper(signum, frame):
    pid, status = os.wait()
    print(
        'Child {pid} terminated with status {status}'
        'n'.format(pid=pid, status=status)
    )

def handle_request(client_connection):
    request = client_connection.recv(1024)
    print(request.decode())
    http_response = b"""
HTTP/1.1 200 OK

Hello, World!
"""
    client_connection.sendall(http_response)
    # sleep to allow the parent to loop over to 'accept' and block there
    time.sleep(3)

def serve_forever():
    listen_socket = socket.socket(socket.AF_INET, socket.SOCK_STREAM)
    listen_socket.setsockopt(socket.SOL_SOCKET, socket.SO_REUSEADDR, 1)
    listen_socket.bind(SERVER_ADDRESS)
    listen_socket.listen(REQUEST_QUEUE_SIZE)
    print('Serving HTTP on port {port} ...'.format(port=PORT))

    signal.signal(signal.SIGCHLD, grim_reaper)

    while True:
        client_connection, client_address = listen_socket.accept()
        pid = os.fork()
        if pid == 0:  # child
            listen_socket.close()  # close child copy
            handle_request(client_connection)
            client_connection.close()
            os._exit(0)
        else:  # parent
            client_connection.close()

if __name__ == '__main__':
    serve_forever()
启动服务器:
| 1 | $ python webserver3e.py |
使用老朋友curl给修改后的并发服务器发送请求: Python
| 1 | $ curl http://localhost:8888/hello |
观察服务器:
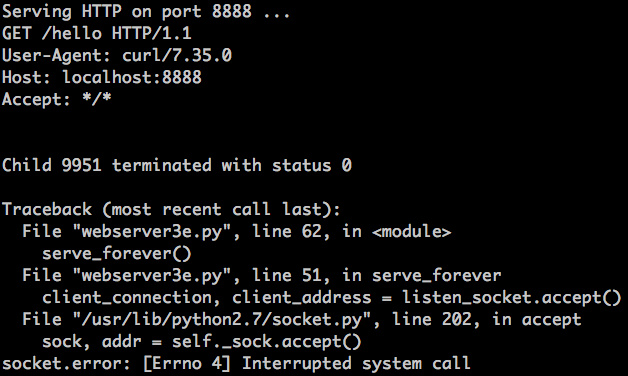
刚才发生了什么?accept调用失败了,错误是EINTR。

当子进程退出,引发SIGCHLD事件时,父进程阻塞在accept调用,这激活了事件处理器,然后当事件处理器完成时,accept系统调用就中断了:

别着急,这个问题很好解决。你要做的就是重新调用accept。以下是修改后的代码:
###########################################################################
# Concurrent server - webserver3f.py                                      #
#                                                                         #
# Tested with Python 2.7.9 & Python 3.4 on Ubuntu 14.04 & Mac OS X        #
###########################################################################
import errno
import os
import signal
import socket

SERVER_ADDRESS = (HOST, PORT) = '', 8888
REQUEST_QUEUE_SIZE = 1024

def grim_reaper(signum, frame):
    pid, status = os.wait()

def handle_request(client_connection):
    request = client_connection.recv(1024)
    print(request.decode())
    http_response = b"""
HTTP/1.1 200 OK

Hello, World!
"""
    client_connection.sendall(http_response)

def serve_forever():
    listen_socket = socket.socket(socket.AF_INET, socket.SOCK_STREAM)
    listen_socket.setsockopt(socket.SOL_SOCKET, socket.SO_REUSEADDR, 1)
    listen_socket.bind(SERVER_ADDRESS)
    listen_socket.listen(REQUEST_QUEUE_SIZE)
    print('Serving HTTP on port {port} ...'.format(port=PORT))

    signal.signal(signal.SIGCHLD, grim_reaper)

    while True:
        try:
            client_connection, client_address = listen_socket.accept()
        except IOError as e:
            code, msg = e.args
            # restart 'accept' if it was interrupted
            if code == errno.EINTR:
                continue
            else:
                raise

        pid = os.fork()
        if pid == 0:  # child
            listen_socket.close()  # close child copy
            handle_request(client_connection)
            client_connection.close()
            os._exit(0)
        else:  # parent
            client_connection.close()  # close parent copy and loop over

if __name__ == '__main__':
    serve_forever()
启动修改后的webserver3f.py: Python
| 1 | $ python webserver3f.py |
使用curl给修改后的服务器发送请求: Python
| 1 | $ curl http://localhost:8888/hello |
看到了吗?没有EINTR异常啦。现在,验证一下吧,没有僵尸了,带wait的SIGCHLD事件处理器也能处理好子进程了。怎么验证呢?只要运行ps命令,看看没有Z+状态的进程(没有进程)。太棒啦!没有僵尸在四周跳的感觉真安全呢!
- 如果fork了子进程并不wait它,它就成僵尸了。
- 使用SIGCHLD事件处理器来异步的wait终止了的子进程来获取它的终止状态
- 使用事件处理器时,你要明白,系统调用会被中断的,你要做好准备对付这种情况
嗯,目前为止,一次都好。没有问题,对吧?好吧,几乎滑。再次跑下webserver3f.py,这次不用curl请求一次了,改用client3.py来创建128个并发连接: Python
| 1 | $ python client3.py –max-clients 128 |
现在再运行ps命令 Python
| 1 | $ ps auxw | grep -i python | grep -v grep |
看到了吧,少年,僵尸又回来了!

这次又出什么错了呢?当你运行128个并发客户端时,建立了128个连接,子进程处理了请求然后几乎同时终止了,这就引发了SIGCHLD信号洪水般的发给父进程。问题在于,信号没有排队,父进程错过了一些信号,导致了一些僵尸到处跑没人管:
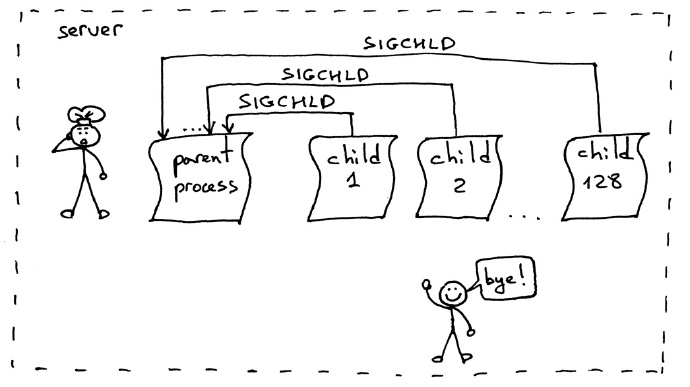
解决方案就是设置一个SIGCHLD事件处理器,但不用wait了,改用waitpid系统调用,带上WNOHANG参数,循环处理,确保所有的终止的子进程都被处理掉。以下是修改后的webserver3g.py:
###########################################################################
# Concurrent server - webserver3g.py                                      #
#                                                                         #
# Tested with Python 2.7.9 & Python 3.4 on Ubuntu 14.04 & Mac OS X        #
###########################################################################
import errno
import os
import signal
import socket

SERVER_ADDRESS = (HOST, PORT) = '', 8888
REQUEST_QUEUE_SIZE = 1024

def grim_reaper(signum, frame):
    while True:
        try:
            pid, status = os.waitpid(
                -1,          # Wait for any child process
                 os.WNOHANG  # Do not block and return EWOULDBLOCK error
            )
        except OSError:
            return

        if pid == 0:  # no more zombies
            return

def handle_request(client_connection):
    request = client_connection.recv(1024)
    print(request.decode())
    http_response = b"""
HTTP/1.1 200 OK

Hello, World!
"""
    client_connection.sendall(http_response)

def serve_forever():
    listen_socket = socket.socket(socket.AF_INET, socket.SOCK_STREAM)
    listen_socket.setsockopt(socket.SOL_SOCKET, socket.SO_REUSEADDR, 1)
    listen_socket.bind(SERVER_ADDRESS)
    listen_socket.listen(REQUEST_QUEUE_SIZE)
    print('Serving HTTP on port {port} ...'.format(port=PORT))

    signal.signal(signal.SIGCHLD, grim_reaper)

    while True:
        try:
            client_connection, client_address = listen_socket.accept()
        except IOError as e:
            code, msg = e.args
            # restart 'accept' if it was interrupted
            if code == errno.EINTR:
                continue
            else:
                raise

        pid = os.fork()
        if pid == 0:  # child
            listen_socket.close()  # close child copy
            handle_request(client_connection)
            client_connection.close()
            os._exit(0)
        else:  # parent
            client_connection.close()  # close parent copy and loop over

if __name__ == '__main__':
    serve_forever()
启动服务器:
| 1 | $ python webserver3g.py |
使用测试客户端client3.py: Python
| 1 | $ python client3.py –max-clients 128 |
现在验证一下没有僵尸了吧。哈!没有僵尸的日子真好!

恭喜!这真是段很长的旅程啊,希望你喜欢。现在你已经拥有了自己的简单并发服务器,而且这个代码有助于你在将来的工作中开发一个产品级的Web服务器。
我要把它留作练习,你来修改第二部分的WSGI服务器,让它达到并发。你在这里可以找到修改后的版本。但是你要自己实现后再看我的代码哟。你已经拥有了所有必要的信息,所以,去实现它吧!
接下来做什么呢?就像Josh Billings说的那样,
像邮票那样——用心做一件事,直到完成。
去打好基础吧。质疑你已经知道的,保持深入研究。

如果你只学方法,你就依赖方法。但如果你学会原理,你可以发明自己的方法。—— 爱默生
以下是我挑出来对本文最重要的几本书。它们会帮你拓宽加深我提到的知识。我强烈建议你想言设法弄到这些书:从朋友那借也好,从本地图书馆借,或者从亚马逊买也行。它们是守护者:
- Unix网络编程,卷1:socket网络API(第三版)
- UNIX环境高级编程,第三版
- Linux编程接口:Linux和UNIX系统编辑手册
- TCP/IP详解,卷1:协议(第二版)
- The Little Book of SEMAPHORES (2nd Edition): The Ins and Outs of Concurrency Control and Common Mistakes. Also available for free on the author’s site here.